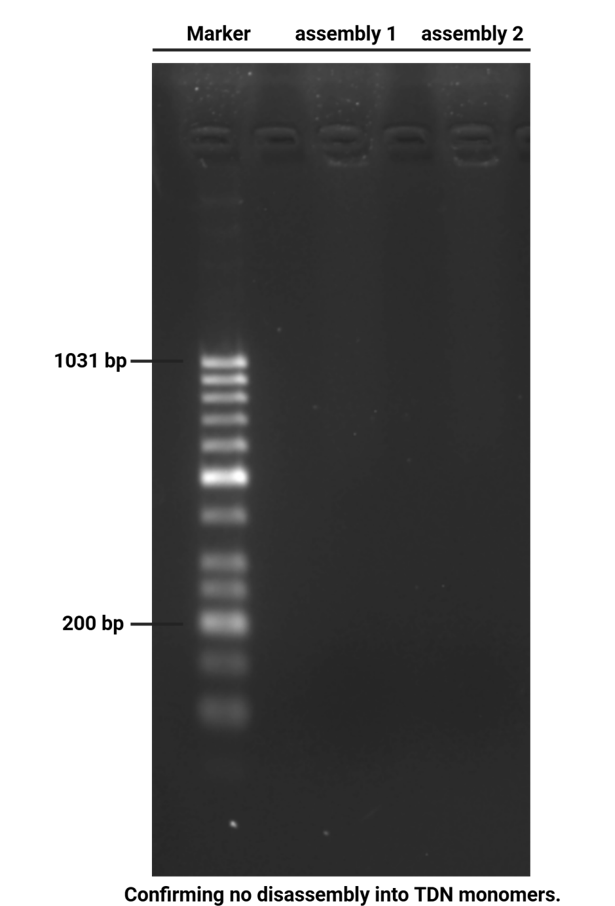
During the process of experiment,to guarantee a certain rigidity of the monomers,we tested two different types of DNA tetrahedron,one is the Rigidified DNA Tetrahedron (RDT),another is the Tetrahedral DNA Nanostructure (TDN).Their backbone structures are shown in the figure below. However, in the later stage of the experiment, due to the low purity of RDT during synthesis, using it as an assembly monomer would introduce disordered and incorrect assembly into the assembly structure, making it impossible to obtain the structure we needed. In contrast, TDN is relatively simple to synthesize and has high purity, which enables it to assemble well into the 2D material we required. Therefore, in the later stage of the experiment, we mainly used TDN assemblies as the research object. In other parts of the webpage, we also take TDN assemblies as the focus of discussion. Nevertheless, in the labbook, we will record all the experiments we conducted on both types of tetrahedra and present them to you.
The left figure shows the RDT backbone, and the right figure shows the TDN sequence.

In the electrophoresis ,shorthand labels are used for DNA strands and various assemblies. The annotations are explained below.
Annotations for RDT-related tetrahedral structures
①A、A1、A2、A3 –the A-face of RDT and its three component strands.
②B、B1、B2、B3 –the B-face of RDT and its three component strands.
③C、C1、C2、C3 –the C-face of RDT and its three component strands.
④D、D1、D2、D3 –the D-face of RDT and its three component strands.
⑤1+2、2+3、1+3–pairwise combinations of strands within one face. In single-face-specific electrophoresis characterizations,the strands loaded belong to the corresponding face;in all other cases,the strands used are from face A.
⑥RDT denotes the rigid DNA tetrahedron.
Annotations for Tetrahedral DNA Nanostructure
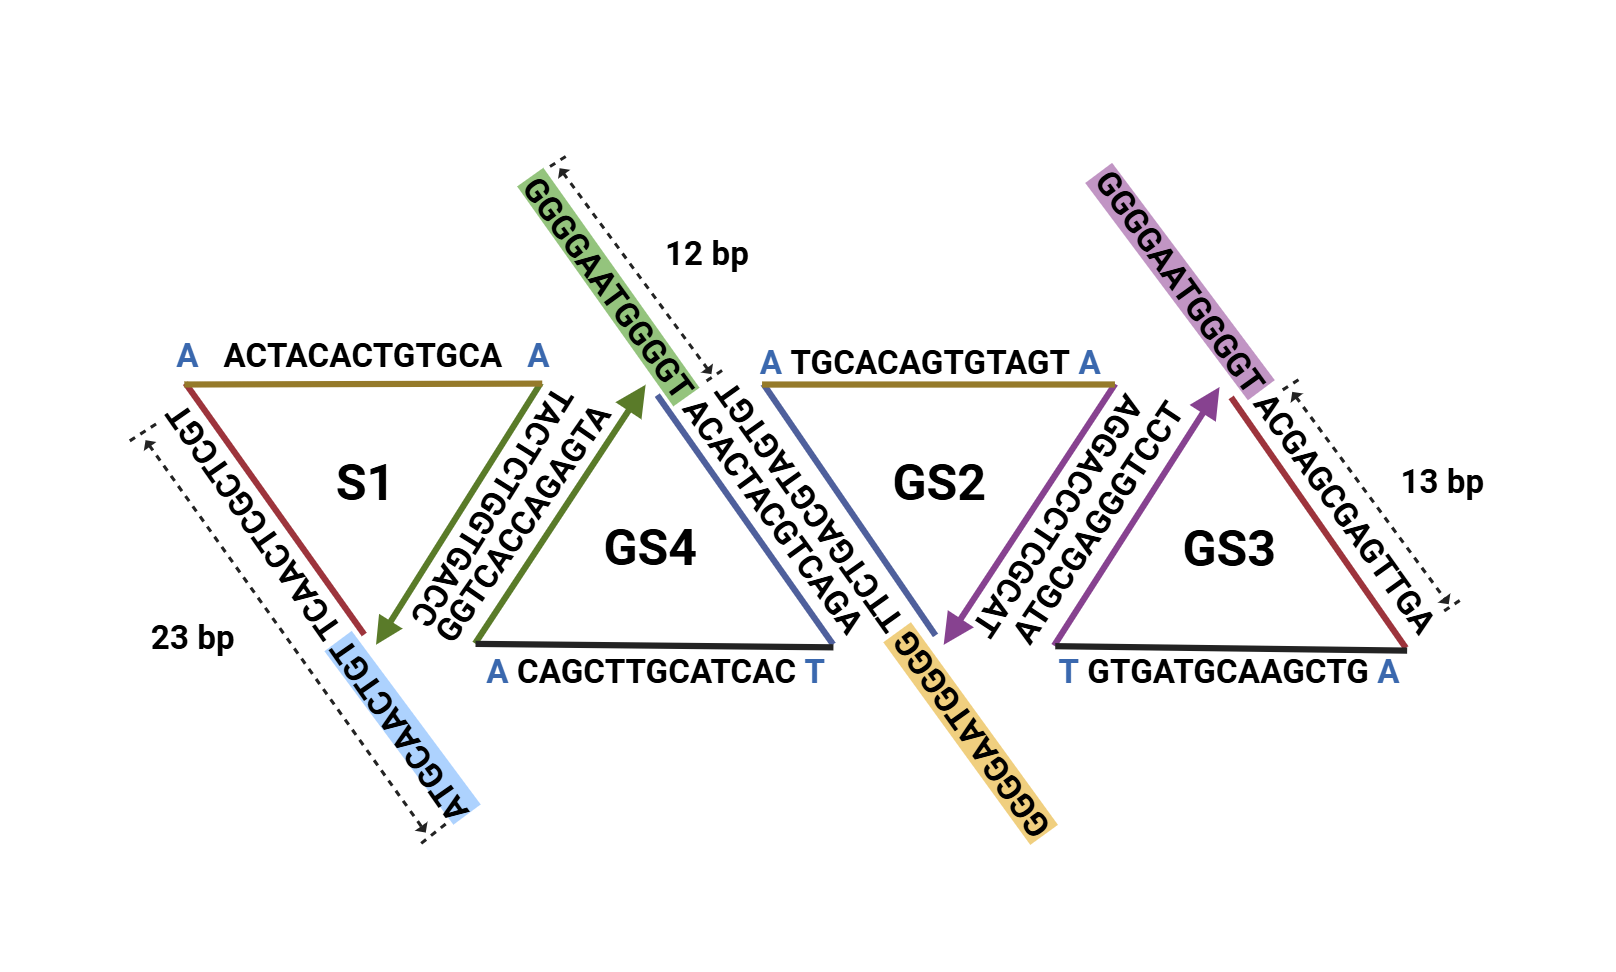
⑦S1、GS2、GS3、GS4 designate the four strands of the simple tetrahedron; the prefix G in the last three strands indicates that each contains a vertex sequence capable of forming a G-quadruplex.
⑧TDN-1、TDN-2、TDN-3、TDN-4 same meaning as ⑦.
⑨TDN–simple tetrahedron.
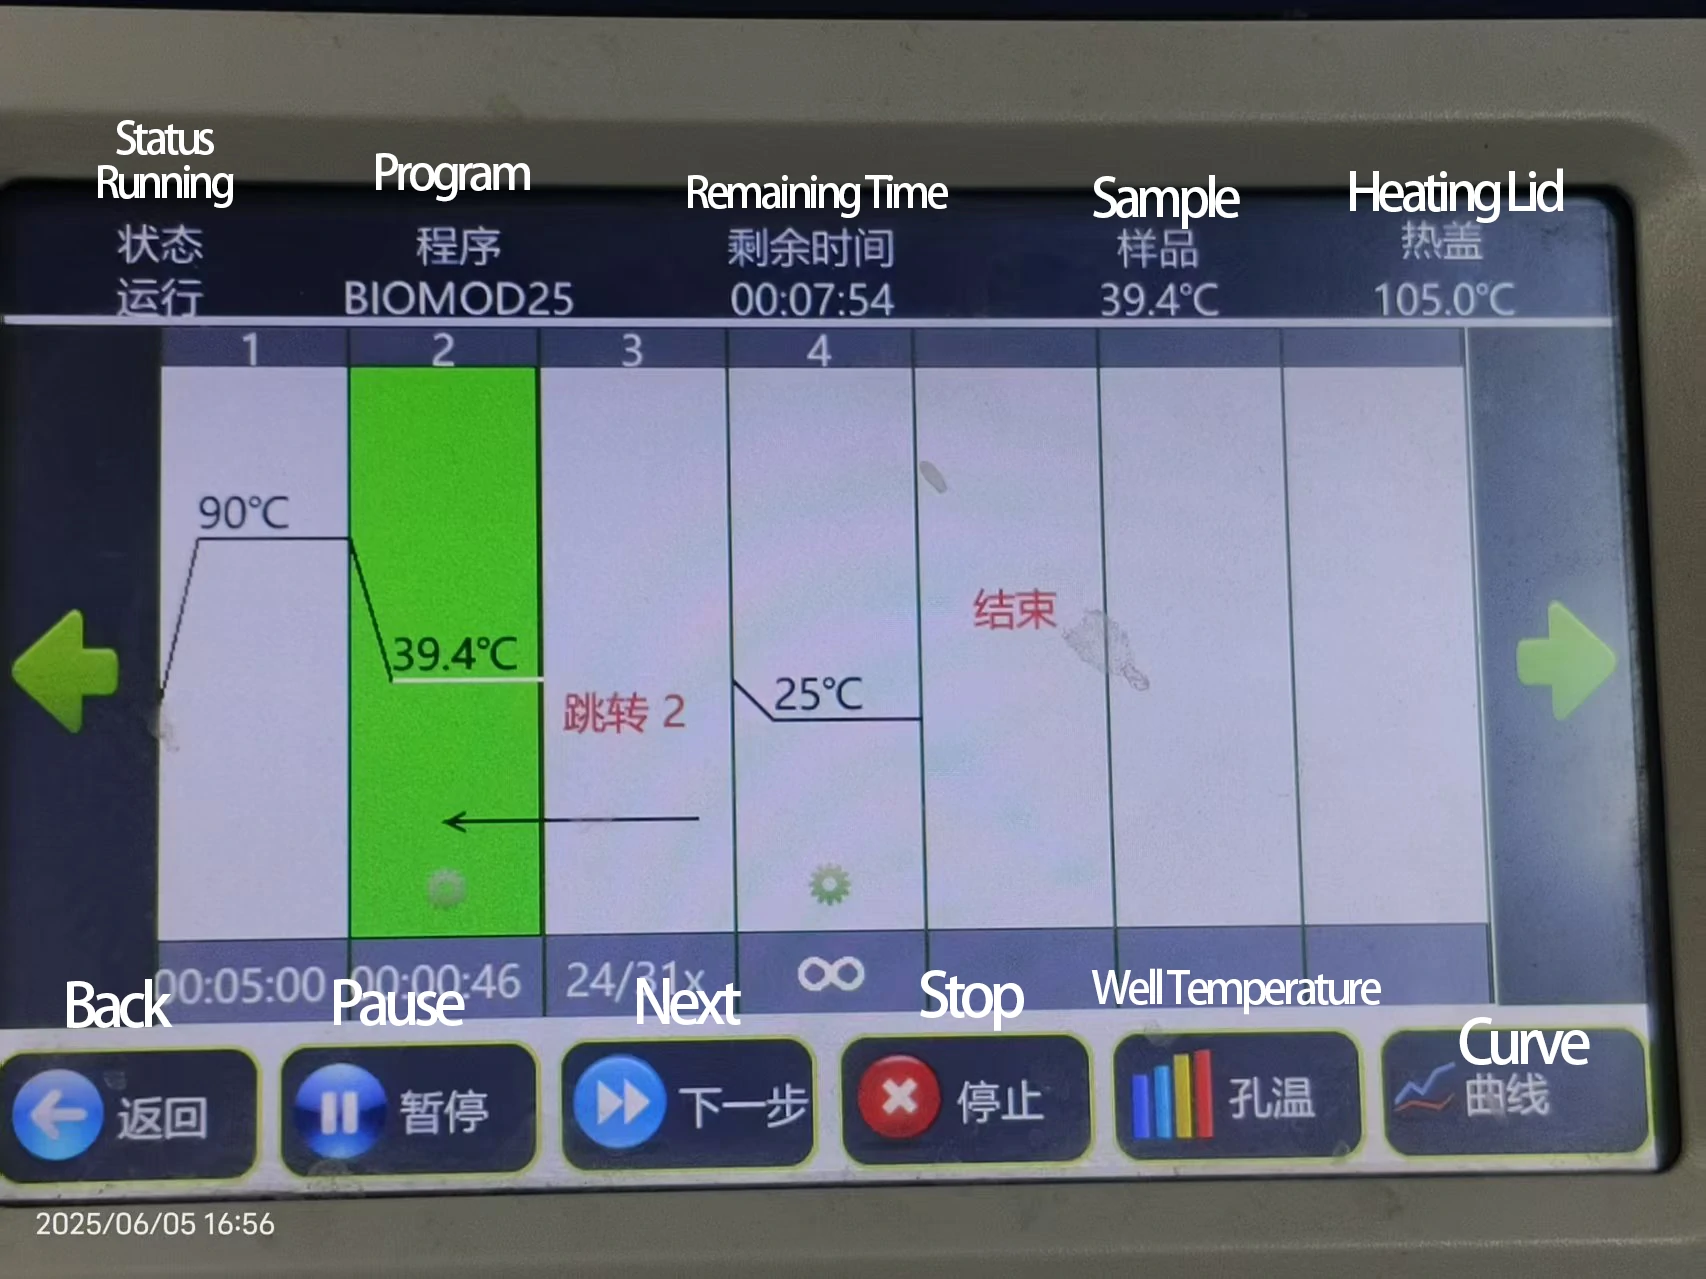
The programs used in this Labbook:
| 6 h PCR program | 1 | 2 | 3 | 4 |
|---|---|---|---|---|
| Temp.(°C) | 90 | step -1 °C | 25 | 4 |
| time(min) | 5 | 5 min per × 65 | 5 | ∞ |
| 24 h PCR program | 1 | 2 | 3 | 4 | 5 |
|---|---|---|---|---|---|
| Temp.(°C) | 90 | 80 | step -1 °C | 25 | 4 |
| time(min) | 5 | 25 | 25 min per × 55 | 25 | ∞ |
| 1×TE buffer preparation | |||
|---|---|---|---|
| Drug name | 0.5 M EDTA solution pH=8 | 1 M Tris-HCl solution pH=8 | Ultrapure water |
| Volume | 200 μL | 1000 μL | 98.8 ml |
Centrifuge 12 tubes of lyophilized DNA at 25 °C, 6500 rpm for 2 min.
| 10 μM DNA solution preparation | ||||||||||||
|---|---|---|---|---|---|---|---|---|---|---|---|---|
| DNA strand | RDT-A1-G4 | RDT-A2 | RDT-A3 | RDT-B1-G4 | RDT-B2 | RDT-B3 | RDT-C1-G4 | RDT-C2 | RDT-C3 | RDT-D1-S1 | RDT-D2 | RDT-D3 |
| Corresponding buffer volume/μL | 214 | 244 | 250 | 224 | 254 | 245 | 226 | 255 | 255 | 218 | 262 | 253 |
After reconstitution, store reagents and buffers and DNA solutions in the 4 °C refrigerator in the cell-culture room; store dry DNA powders in the –20 °C freezer in the lab. This experiment used EDTA, which contains sodium ions, but at low concentration that should not affect G4 binding.
| Face A | Face B | Face C | Face D | Face D(2) | A1+A3(1+3) | |
|---|---|---|---|---|---|---|
| X1-strand(10 μM) | 2 μL | 2 μL | 2 μL | 0 μL | 2 μL | 2 μL |
| X2-strand(10 μM) | 2 μL | 2 μL | 2 μL | 2 μL | 2 μL | 0 μL |
| X3-strand(10 μM) | 2 μL | 2 μL | 2 μL | 2 μL | 2 μL | 2 μL |
| dd H2O | 3 μL | 3 μL | 3 μL | 3 μL | 3 μL | 5 μL |
| 10 × T4 Buffer | 1 μL | 1 μL | 1 μL | 1 μL | 1 μL | 1 μL |
Follow the table to prepare the solution mixture
Heat to 90 °C for 5 min; slowly cool to 4 °C over 6 h.
Add D1 solution to Face D, store at room temperature for an hour.
Store at 4 °C.
Assembly procedure:
Solution preparation:

Potassium assembly:
Mix 10 μL RDT solution with 10 μL Tris-HCl/K⁺ buffer.
| Face A | Face B | Face C | Face D | Face D(2) | A1+A3(1+3) | |
|---|---|---|---|---|---|---|
| X1-strand(10 μM) | 2 μL | 2 μL | 2 μL | 0 μL | 2 μL | 2 μL |
| X2-strand(10 μM) | 2 μL | 2 μL | 2 μL | 2 μL | 2 μL | 0 μL |
| X3-strand(10 μM) | 2 μL | 2 μL | 2 μL | 2 μL | 2 μL | 2 μL |
| dd H2O | 3 μL | 3 μL | 3 μL | 3 μL | 3 μL | 5 μL |
| 10 × T4 Buffer | 1 μL | 1 μL | 1 μL | 1 μL | 1 μL | 1 μL |
Follow the table to prepare the solution mixture
Heat to 90 °C for 5 min; slowly cool to 4 °C over 6 h.
Add D1 solution to Face D, store at room temperature for an hour.
Store at 4 °C.
Prepare the gel with 0.5 g agarose, 25 mL 0.5 × TBE Buffer.
Mix the solutions (solvents) in 200 μL EP tubes according to the table below.
| Sample | 5×DNA Loading Buffer | ddH2O | |
|---|---|---|---|
| 1 | Marker(50-1031 bp) 6 μL | 2 μL | 2 μL |
| 2 | Face A 3.1 μL | 2 μL | 4.9 μL |
| 3 | Face B 3.1 μL | 2 μL | 4.9 μL |
| 4 | Face C 3.1 μL | 2 μL | 4.9 μL |
| 5 | Face D 3.1 μL | 2 μL | 4.9 μL |
| 6 | Face D exploration 3.1 μL | 2 μL | 4.9 μL |
| 7 | 1+3 3.1 μL | 2 μL | 4.9 μL |
| 8 | Marker(500-15000 bp) 6 μL | 2 μL | 4.9 μL |
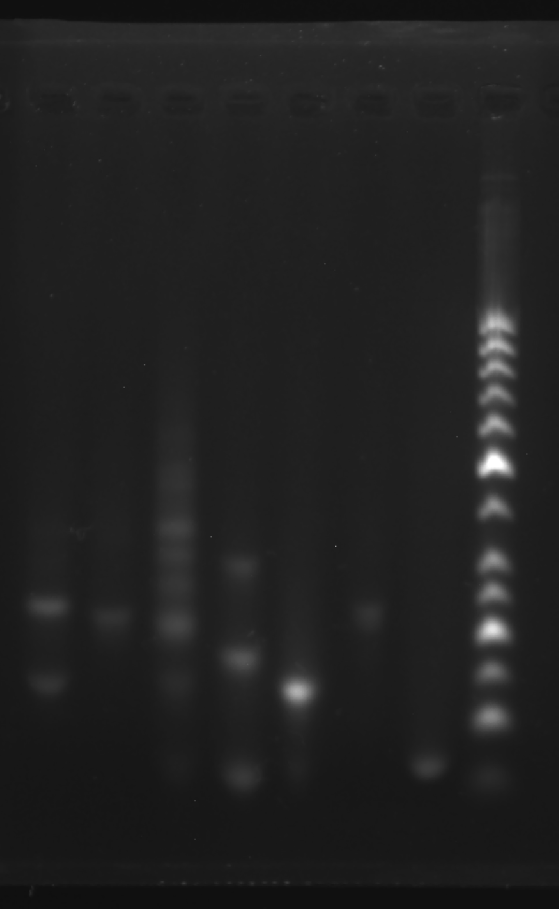
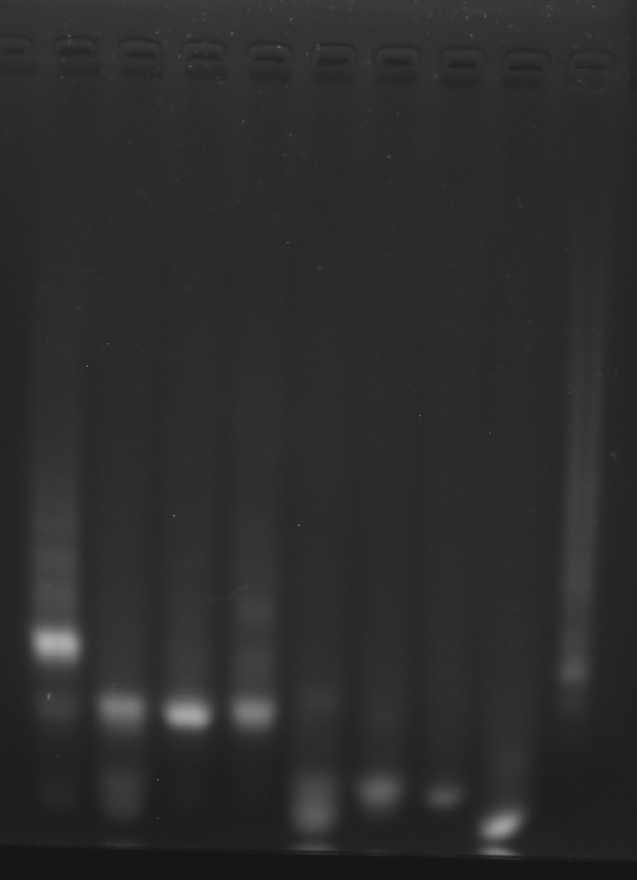
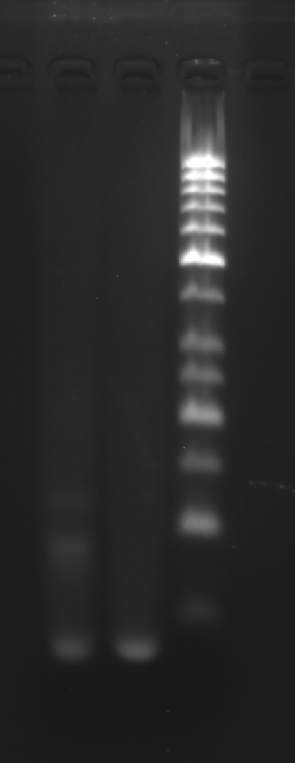
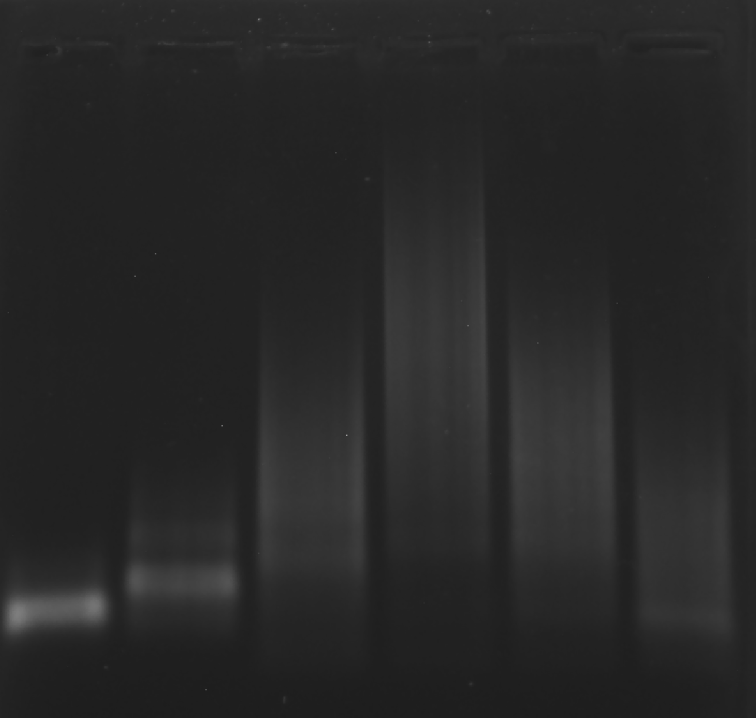
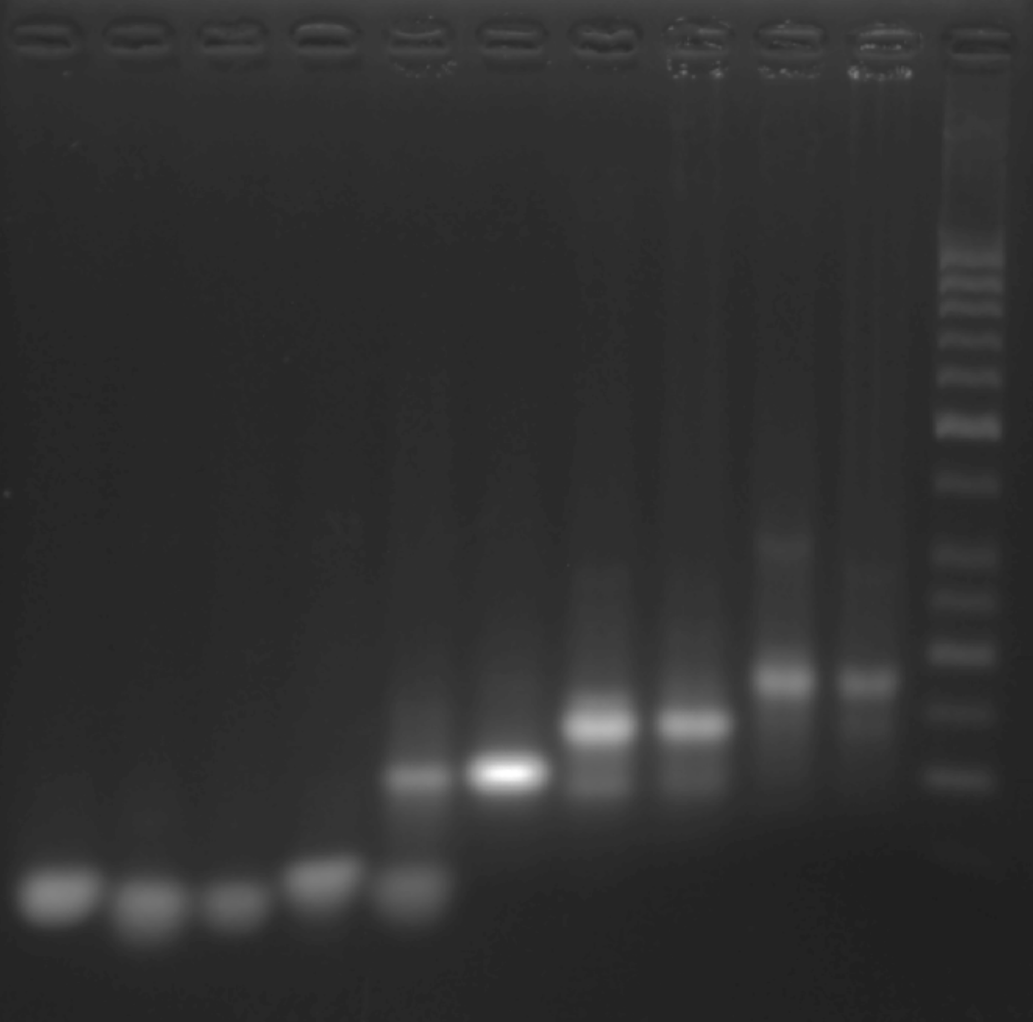
Add sample solutions of 10 μL each into the sample holes, according to the table below, Set the voltage to 80 V and run the electrophoresis for 70 min.
| Lane | 1 | 2 | 3 | 4 | 5 | 6 | 7 | 8 |
|---|---|---|---|---|---|---|---|---|
| Sample | Marker(50-1031 bp) 6 μL | Face A 3.1 μL | Face B 3.1 μL | Face C 3.1 μL | Face D 3.1 μL | Face D exploration 3.1 μL | 1+3 3.1 μL | Marker(500-15000 bp) 3.1 μL |
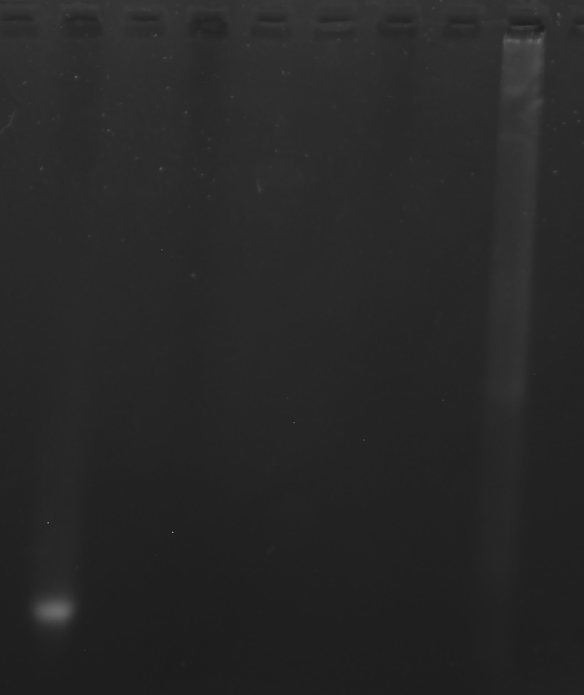
Obtain the electrophoretogram.
| Face A | Face B | Face C | A1+A2(1+2) | A2+A3(1+3) | A1+A3(1+3) | |
|---|---|---|---|---|---|---|
| X1-strand(10 μM) | 2 μL | 2 μL | 2 μL | 2 μL | 0 μL | 2 μL |
| X2-strand(10 μM) | 2 μL | 2 μL | 2 μL | 2 μL | 2 μL | 0 μL |
| X3-strand(10 μM) | 2 μL | 2 μL | 2 μL | 0 μL | 2 μL | 2 μL |
| dd H2O | 3 μL | 3 μL | 3 μL | 5 μL | 5 μL | 5 μL |
| 10 × T4 Buffer | 1 μL | 1 μL | 1 μL | 1 μL | 1 μL | 1 μL |
Follow the table to prepare the solution mixture
Heat to 90 °C for 5 min; slowly cool to 4 °C over 6 h.
Store at 4 °C.
5 μL of each face was mix together and store at room temperature for an hour.
Prepare the gel with 0.5 g agarose, 25 mL 0.5 × TBE Buffer
Mix the solutions (solvents) in 200 μL EP tubes according to the table below.
| Sample | 5×DNA Loading Buffer | ddH2O | |
|---|---|---|---|
| 1 | Face A 3.1 μL | 2 μL | 4.9 μL |
| 2 | Face B 3.1 μL | 2 μL | 4.9 μL |
| 3 | Face C 3.1 μL | 2 μL | 4.9 μL |
| 4 | 1+2 3.1 μL | 2 μL | 4.9 μL |
| 5 | 2+3 3.1 μL | 2 μL | 4.9 μL |
| 6 | 1+3 3.1 μL | 2 μL | 4.9 μL |
| 7 | strand 3 3.1 μL | 2 μL | 4.9 μL |
| 8 | Marker(50-1031 bp) 6 μL | 2 μL | 2 μL |
Add sample solutions of 10 μL each into the sample holes, according to the table below, Set the voltage to 80 V and run the electrophoresis for 70 min.
| Lane | 1 | 2 | 3 | 4 | 5 | 6 | 7 | 8 |
|---|---|---|---|---|---|---|---|---|
| Sample | Face A 3.1 μL | Face B 3.1 μL | Face C 3.1 μL | 1+2 3.1 μL | 2+3 3.1 μL | 1+3 3.1 μL | strand 3 3.1 μL | Marker(50-1031 bp) 6 μL |
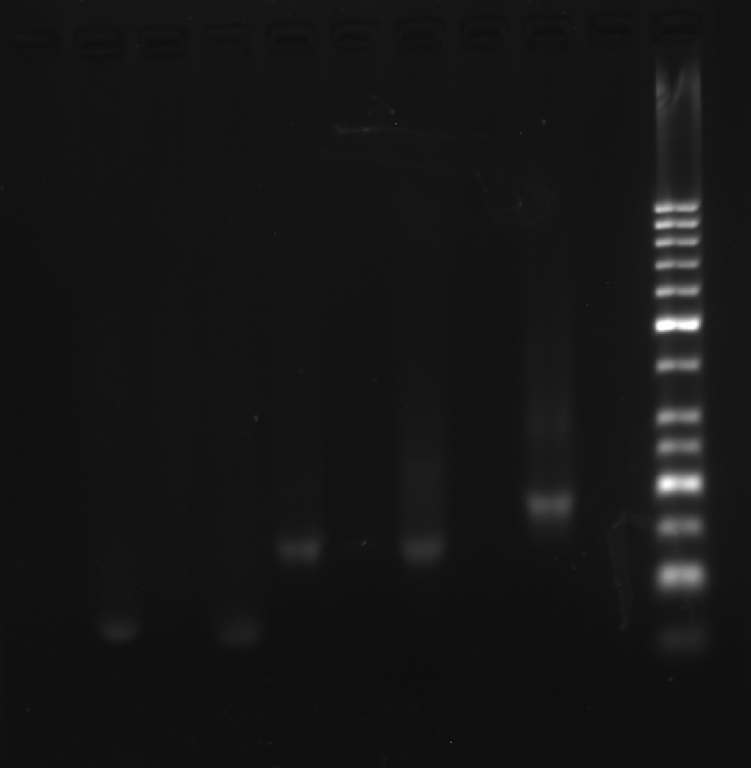
Obtain the electrophoretogram.
| Face A | Face B | Face C | A1+A2(1+2) | A2+A3(1+3) | A1+A3(1+3) | |
|---|---|---|---|---|---|---|
| X1-strand(10 μM) | 2 μL | 2 μL | 2 μL | 2 μL | 0 μL | 2 μL |
| X2-strand(10 μM) | 2 μL | 2 μL | 2 μL | 2 μL | 2 μL | 0 μL |
| X3-strand(10 μM) | 2 μL | 2 μL | 2 μL | 0 μL | 2 μL | 2 μL |
| dd H2O | 3 μL | 3 μL | 3 μL | 5 μL | 5 μL | 5 μL |
| 10 × T4 Buffer | 1 μL | 1 μL | 1 μL | 1 μL | 1 μL | 1 μL |
Follow the table to prepare the solution mixture
Heat to 90 °C for 5 min; slowly cool to 4 °C over 6 h.
Store at 4 °C.
Prepare the gel with 0.5 g agarose, 25 mL 0.5 × TBE Buffer
Mix the solutions (solvents) in 200 μL EP tubes according to the table below.
| Sample | 5×DNA Loading Buffer | ddH2O | |
|---|---|---|---|
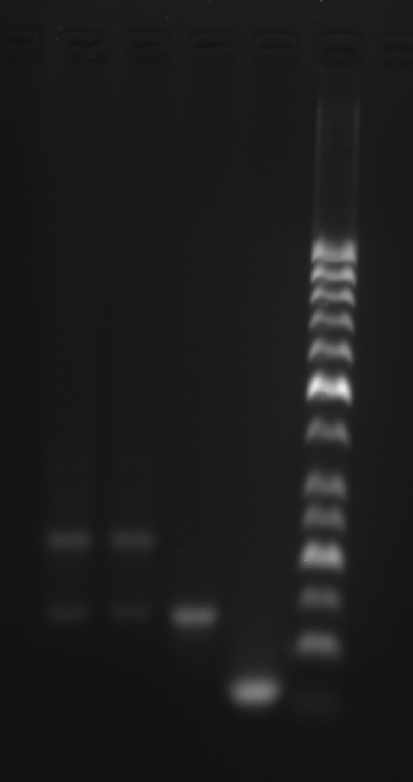
| 1 | Marker(50-1031 bp) 6 μL | 2 μL | 2 μL |
| 2 | RDT 3.1 μL | 2 μL | 4.9 μL |
| 3 | 2+3 3.1 μL | 2 μL | 4.9 μL |
| 4 | strand A3 3.1 μL | 2 μL | 4.9 μL |
| 5 | Face A 3.1 μL | 2 μL | 4.9 μL |
| 6 | Face B 3.1 μL | 2 μL | 4.9 μL |
| 7 | Face C 3.1 μL | 2 μL | 4.9 μL |
Add sample solutions of 10 μL each into the sample holes, according to the table below, Set the voltage to 80 V and run the electrophoresis for 70 min.
| Lane | 1 | 2 | 3 | 4 | 5 | 6 | 7 |
|---|---|---|---|---|---|---|---|
| Sample | Marker(50-1031 bp)6 μL | RDT 3.1 μL | 2+3 3.1 μL | strand A3 3.1 μL | Face A 3.1 μL | Face B 3.1 μL | Face C 3.1 μL |
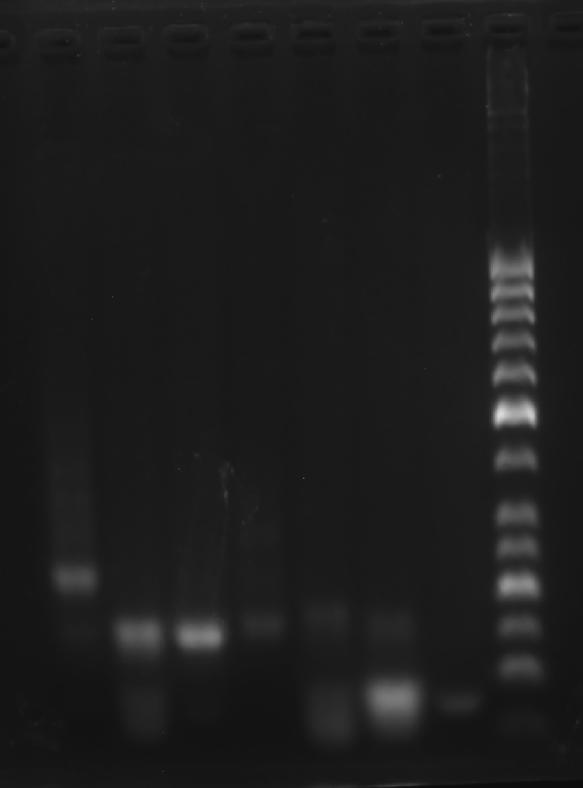
Obtain the electrophoretogram.
Prepare the gel with 0.5 g agarose, 25 mL 0.5 × TBE Buffer
Mix the solutions (solvents) in 200 μL EP tubes according to the table below.
| Sample | 5×DNA Loading Buffer | ddH2O | |
|---|---|---|---|
| 1 | Face A 3.1 μL | 2 μL | 4.9 μL |
| 2 | Face B 3.1 μL | 2 μL | 4.9 μL |
| 3 | Face C 3.1 μL | 2 μL | 4.9 μL |
| 4 | Face C(halve the concentration) 3.1 μL | 2 μL | 4.9 μL |
| 5 | 2+3 3.1 μL | 2 μL | 4.9 μL |
| 6 | strand A3 3.1 μL | 2 μL | 4.9 μL |
| 7 | Marker(50-1031 bp) 6 μL | 2 μL | 2 μL |
Add sample solutions of 10 μL each into the sample holes, according to the table below, Set the voltage to 80 V and run the electrophoresis for 70 min.
| Lane | 1 | 2 | 3 | 4 | 5 | 6 | 7 |
|---|---|---|---|---|---|---|---|
| Sample | Face A 3.1 μL | Face B 3.1 μL | Face C 3.1 μL | Face C(halve the concentration) 3.1 μL | 2+3 3.1 μL | strand A3 3.1 μL | Marker(50-1031 bp) 6 μL |
Obtain the electrophoretogram.
Prepare the gel with 0.5 g agarose, 25 mL 0.5 × TBE Buffer
Mix the solutions (solvents) in 200 μL EP tubes according to the table below.
| Sample | 5×DNA Loading Buffer | ddH2O | |
|---|---|---|---|
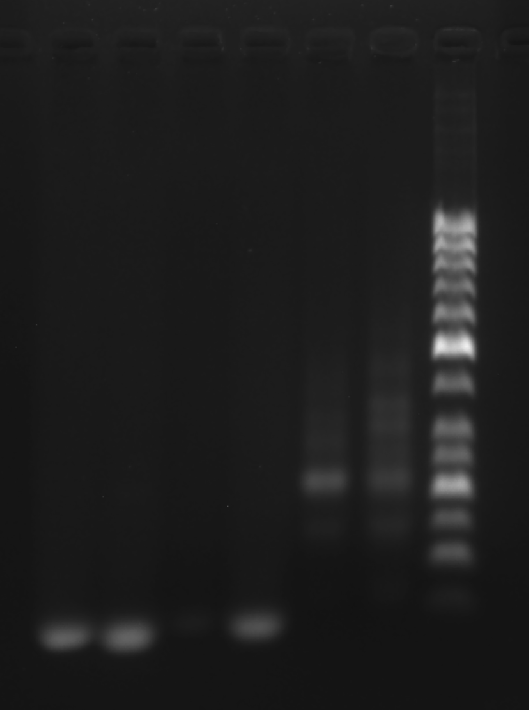
| 1 | Face A 3.1 μL | 2 μL | 4.9 μL |
| 2 | Face B 3.1 μL | 2 μL | 4.9 μL |
| 3 | Face C 3.1 μL | 2 μL | 4.9 μL |
| 4 | Face D 3.1 μL | 2 μL | 4.9 μL |
| 5 | 2+3 3.1 μL | 2 μL | 4.9 μL |
| 6 | strand A3 3.1 μL | 2 μL | 4.9 μL |
| 7 | Marker(50-1031 bp) 6 μL | 2 μL | 2 μL |
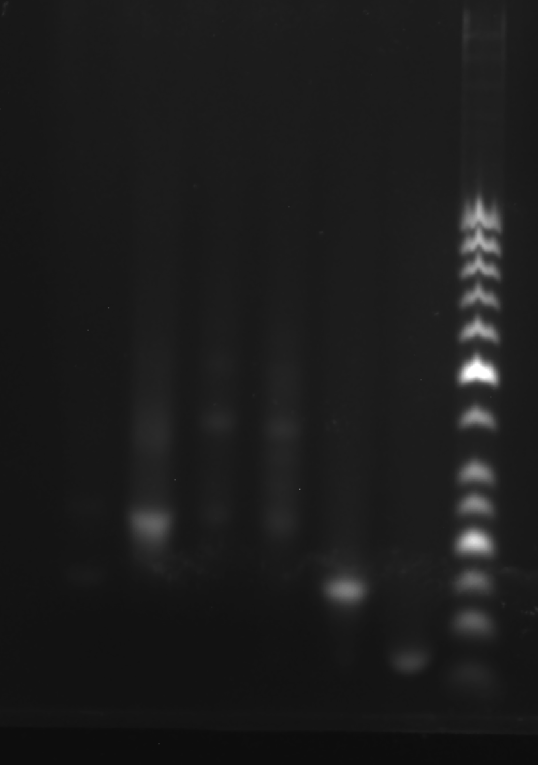
Add sample solutions of 10 μL each into the sample holes, according to the table below, Set the voltage to 80 V and run the electrophoresis for 70 min.
| Lane | 1 | 2 | 3 | 4 | 5 | 6 | 7 |
|---|---|---|---|---|---|---|---|
| Sample | Face A 3.1 μL | Face B 3.1 μL | Face C 3.1 μL | Face D 3.1 μL | 2+3 3.1 μL | strand A3 3.1 μL | Marker(50-1031 bp) 6 μL |
Obtain the electrophoretogram.
Prepare the gel with 0.5 g agarose, 25 mL 0.5 × TBE Buffer
Mix the solutions (solvents) in 200 μL EP tubes according to the table below.
| Sample | 5×DNA Loading Buffer | ddH2O | |
|---|---|---|---|
| 1 | Face A 3.1 μL | 2 μL | 4.9 μL |
| 2 | Face B 3.1 μL | 2 μL | 4.9 μL |
| 3 | 2+3 3.1 μL | 2 μL | 4.9 μL |
| 4 | strand A3 3.1 μL | 2 μL | 4.9 μL |
| 5 | Marker(50-1031 bp) 3.1 μL | 2 μL | 4.9 μL |
Add sample solutions of 10 μL each into the sample holes, according to the table below, Set the voltage to 80 V and run the electrophoresis for 70 min.
| Lane | 1 | 2 | 3 | 4 | 5 |
|---|---|---|---|---|---|
| Sample | Face A 3.1 μL | Face B 3.1 μL | 2+3 3.1 μL | strand A3 3.1 μL | Marker(50-1031 bp) 3.1 μL |
Obtain the electrophoretogram.
Prepare the gel with 0.5 g agarose, 25 mL 0.5 × TBE Buffer.
Mix the solutions (solvents) in 200 μL EP tubes according to the table below.
| Sample | 5×DNA Loading Buffer | ddH2O | |
|---|---|---|---|
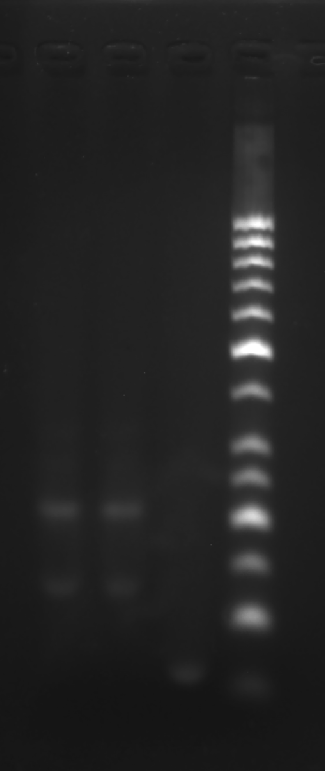
| 1 | Marker(50-1031 bp) 6 μL | 2 μL | 2 μL |
| 2 | Face A 3.1 μL | 2 μL | 4.9 μL |
| 3 | Face B 3.1 μL | 2 μL | 4.9 μL |
| 4 | Face C 3.1 μL | 2 μL | 4.9 μL |
| 5 | 2+3 3.1 μL | 2 μL | 4.9 μL |
| 6 | Strand A3 3.1 μL | 2 μL | 4.9 μL |
Add sample solutions of 10 μL each into the sample holes, according to the table below, Set the voltage to 80 V and run the electrophoresis for 70 min.
| Lane | 1 | 2 | 3 | 4 | 5 | 6 |
|---|---|---|---|---|---|---|
| Sample | Marker(50-1031 bp) 6 μL | Face A 3.1 μL | Face B 3.1 μL | Face C 3.1 μL | 2+3 3.1 μL | Strand A3 3.1 μL |
Obtain the electrophoretogram..
Prepare the gel with 0.5 g agarose, 25 mL 0.5 × TBE Buffer
Mix the solutions (solvents) in 200 μL EP tubes according to the table below.
| Sample | 5×DNA Loading Buffer | ddH2O | |
|---|---|---|---|
| 1 | Face A 3.1 μL | 2 μL | 4.9 μL |
| 2 | Face A 3.1 μL | 2 μL | 4.9 μL |
| 3 | Strand A3 3.1 μL | 2 μL | 4.9 μL |
| 4 | Marker(50-1031 bp) 6 μL | 2 μL | 2 μL |
Add sample solutions of 10 μL each into the sample holes, according to the table below, Set the voltage to 80 V and run the electrophoresis for 70 min.
| Lane | 1 | 2 | 3 | 4 |
|---|---|---|---|---|
| Sample | Face A 3.1 μL | Face A 3.1 μL | Strand A3 3.1 μL | Marker(50-1031 bp) 6 μL |
Obtain the electrophoretogram.
Centrifuge 5 tubes of lyophilized DNA at 25 °C, 6500 rpm for 2 min.
| 10uM DNA solution preparation | |||||
|---|---|---|---|---|---|
| DNA strand | S1 | GS2 | GS3 | GS4 | RDT-C2 |
| Corresponding buffer volume/μL | 419 | 382 | 379 | 381 | 254 |
After reconstitution, store reagents and buffers and DNA solutions in the 4 °C refrigerator in the cell-culture room; store dry DNA powders in the –20 °C freezer in the lab. This experiment used EDTA, which contains sodium ions, but at low concentration that should not affect G4 binding.
Mix equal volume S1 GS2 GS3 GS4 solution (10 μM each).
Heat to 90 °C for 5 min; slowly cool to 4 °C over 24 h.
Store at 4 °C.
Mix equal volume C1 New-C2 C3 solution (10 μM each).
Heat to 90 °C for 5 min; slowly cool to 4 °C over 6 h.
Store at 4 °C.
5 μL of each face was mix together and store at room temperature for an hour.
| Face A | Face B | Old Face C | Face D | |
|---|---|---|---|---|
| X1-strand(10 μM) | 2 μL | 2 μL | 2 μL | 0 μL |
| X2-strand(10 μM) | 2 μL | 2 μL | 2 μL | 2 μL |
| X3-strand(10 μM) | 2 μL | 2 μL | 2 μL | 2 μL |
| dd H2O | 3 μL | 3 μL | 3 μL | 3 μL |
| 10 × T4 Buffer | 1 μL | 1 μL | 1 μL | 1 μL |
Follow the table to prepare the solution mixture
Heat to 90 °C for 5 min; slowly cool to 4 °C over 6 h.
Add D1 solution to Face D, store at room temperature for an hour.
Store at 4 °C.
Prepare the gel with 0.5 g agarose, 25 mL 0.5 × TBE Buffer.
Mix the solutions (solvents) in 200 μL EP tubes according to the table below.
| Sample | 5×DNA Loading Buffer | ddH2O | |
|---|---|---|---|
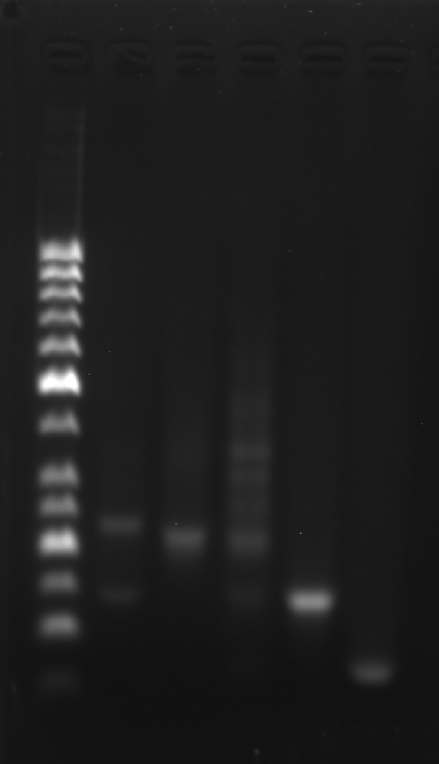
| 1 | S1 3.1 μL | 2 μL | 4.9 μL |
| 2 | GS2 3.1 μL | 2 μL | 4.9 μL |
| 3 | GS3 3.1 μL | 2 μL | 4.9 μL |
| 4 | TDN 3.1 μL | 2 μL | 4.9 μL |
| 5 | New face C 3.1 μL | 2 μL | 4.9 μL |
| 6 | Old face C 3.1 μL | 2 μL | 4.9 μL |
| 7 | Marker(50-1031 bp) 6 μL | 2 μL | 2 μL |
Add sample solutions of 10 μL each into the sample holes, according to the table below, Set the voltage to 80 V and run the electrophoresis for 70 min.
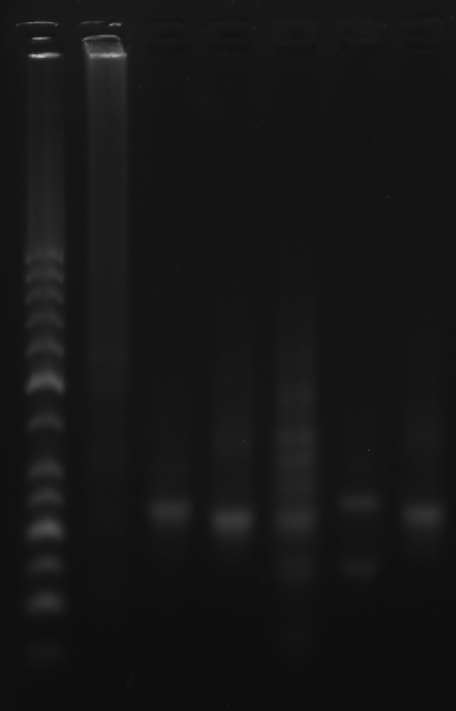
| Lane | 1 | 2 | 3 | 4 | 5 | 6 | 7 |
|---|---|---|---|---|---|---|---|
| Sample | S1 3.1 μL | GS2 3.1 μL | GS3 3.1 μL | TDN 3.1 μL | New face C 3.1 μL | Old face C 3.1 μL | Marker(50-1031 bp) 6 μL |
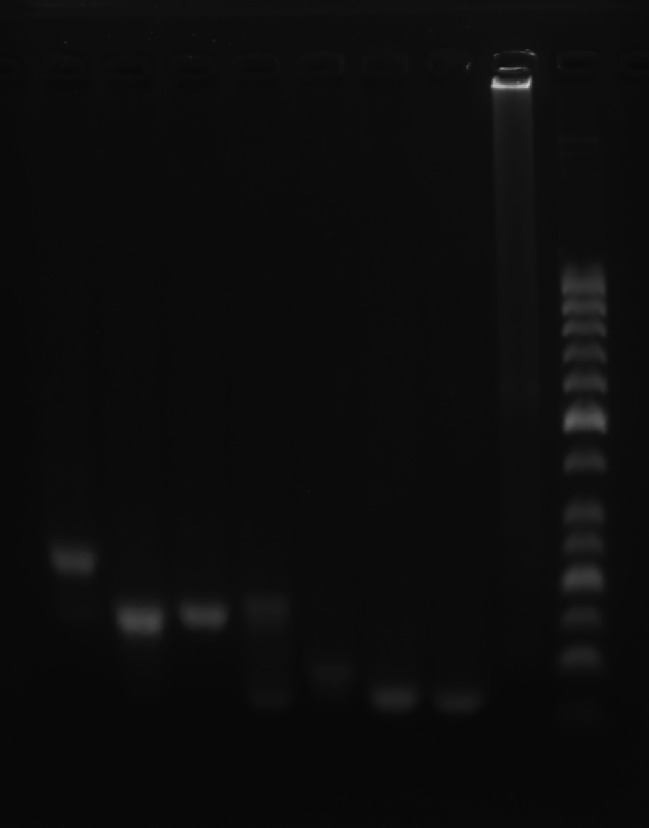
Obtain the electrophoretogram.
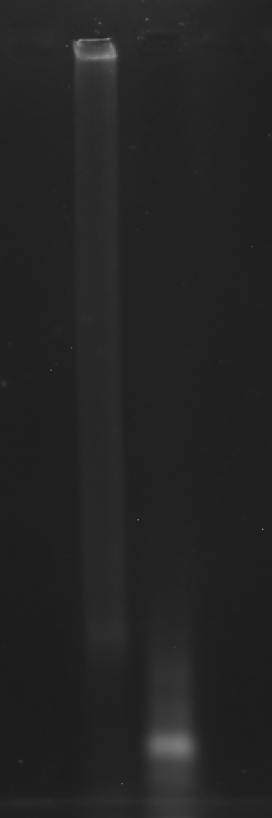
Prepare the gel with 0.5 g agarose, 25 mL 0.5 × TBE Buffer.
Mix the solutions (solvents) in 200 μL EP tubes according to the table below.
| Sample | 5×DNA Loading Buffer | ddH2O | |
|---|---|---|---|
| 1 | 2+3 3.1 μL | 2 μL | 4.9 μL |
| 2 | RDT 3.1 μL | 2 μL | 4.9 μL |
Add sample solutions of 10 μL each into the sample holes, according to the table below, Set the voltage to 80 V and run the electrophoresis for 70 min.
| Lane | 1 | 2 |
|---|---|---|
| Sample | 2+3 3.1 μL | RDT(best assembly version) 3.1 μL |
Obtain the electrophoretogram.
Prepare the gel with 0.5 g agarose, 25 mL 0.5 × TBE Buffer.
Mix the solutions (solvents) in 200 μL EP tubes according to the table below.
| Sample | 5×DNA Loading Buffer | ddH2O | |
|---|---|---|---|
| 1 | Face A 3.1 μL | 2 μL | 4.9 μL |
| 2 | 1+2 3.1 μL | 2 μL | 4.9 μL |
| 3 | 2+3 3.1 μL | 2 μL | 4.9 μL |
| 4 | 1+3 3.1 μL | 2 μL | 4.9 μL |
| 5 | A1 3.1 μL | 2 μL | 4.9 μL |
| 6 | A2 3.1 μL | 2 μL | 4.9 μL |
| 7 | A3 3.1 μL | 2 μL | 4.9 μL |
| 8 | Marker(50-1031 bp) 6 μL | 2 μL | 2 μL |
Add sample solutions of 10 μL each into the sample holes, according to the table below, Set the voltage to 80 V and run the electrophoresis for 70 min.
| Lane | 1 | 2 | 3 | 4 | 5 | 6 | 7 | 8 |
|---|---|---|---|---|---|---|---|---|
| Sample | Face A 3.1 μL | 1+2 3.1 μL | 2+3 3.1 μL | 1+3 3.1 μL | A1 3.1 μL | A2 3.1 μL | A3 3.1 μL | Marker(50-1031 bp) 6 μL |
Obtain the electrophoretogram.

Prepare the gel with 0.5 g agarose, 25 mL 0.5 × TBE Buffer.
Mix the solutions (solvents) in 200 μL EP tubes according to the table below.
| Sample | 5×DNA Loading Buffer | ddH2O | |
|---|---|---|---|
| 1 | B3 3.1 μL | 2 μL | 4.9 μL |
| 2 | B2 3.1 μL | 2 μL | 4.9 μL |
| 3 | B1 3.1 μL | 2 μL | 4.9 μL |
| 4 | 1+3 3.1 μL | 2 μL | 4.9 μL |
| 5 | 2+3 3.1 μL | 2 μL | 4.9 μL |
| 6 | 1+2 3.1 μL | 2 μL | 4.9 μL |
| 7 | Face B 3.1 μL | 2 μL | 4.9 μL |
| 8 | Marker(50-1031 bp) 6 μL | 2 μL | 2 μL |
Add sample solutions of 10 μL each into the sample holes, according to the table below, Set the voltage to 80 V and run the electrophoresis for 70 min.
| Lane | 1 | 2 | 3 | 4 | 5 | 6 | 7 | 8 |
|---|---|---|---|---|---|---|---|---|
| Sample | B3 3.1 μL | B2 3.1 μL | B1 3.1 μL | 1+3 3.1 μL | 2+3 3.1 μL | 1+2 3.1 μL | Face B 3.1 μL | Marker(50-1031 bp) 6 μL |
Obtain the electrophoretogram.
Prepare the gel with 0.5 g agarose, 25 mL 0.5 × TBE Buffer.
Mix the solutions (solvents) in 200 μL EP tubes according to the table below.
| Sample | 5×DNA Loading Buffer | ddH2O | |
|---|---|---|---|
| 1 | Face C 3.1 μL | 2 μL | 4.9 μL |
| 2 | 1+2 3.1 μL | 2 μL | 4.9 μL |
| 3 | 2+3 3.1 μL | 2 μL | 4.9 μL |
| 4 | 1+3 3.1 μL | 2 μL | 4.9 μL |
| 5 | C1 3.1 μL | 2 μL | 4.9 μL |
| 6 | C2 3.1 μL | 2 μL | 4.9 μL |
| 7 | C3 3.1 μL | 2 μL | 4.9 μL |
| 8 | Marker(50-1031 bp) 6 μL | 2 μL | 2 μL |
Add sample solutions of 10 μL each into the sample holes, according to the table below, Set the voltage to 80 V and run the electrophoresis for 70 min.
| Lane | 1 | 2 | 3 | 4 | 5 | 6 | 7 | 8 |
|---|---|---|---|---|---|---|---|---|
| Sample | Face C 3.1 μL | 1+2 3.1 μL | 2+3 3.1 μL | 1+3 3.1 μL | C1 3.1 μL | C2 3.1 μL | C3 3.1 μL | Marker(50-1031 bp) 6 μL |
Obtain the electrophoretogram.
Prepare the gel with 0.5 g agarose, 25 mL 0.5 × TBE Buffer.
Mix the solutions (solvents) in 200 μL EP tubes according to the table below.
| Sample | 5×DNA Loading Buffer | ddH2O | |
|---|---|---|---|
| 1 | Face D 3.1 μL | 2 μL | 4.9 μL |
| 2 | 1+2 3.1 μL | 2 μL | 4.9 μL |
| 3 | 2+3 3.1 μL | 2 μL | 4.9 μL |
| 4 | 1+3 3.1 μL | 2 μL | 4.9 μL |
| 5 | D1 3.1 μL | 2 μL | 4.9 μL |
| 6 | D2 3.1 μL | 2 μL | 4.9 μL |
| 7 | D3 3.1 μL | 2 μL | 4.9 μL |
| 8 | Marker(50-1031 bp) 6 μL | 2 μL | 2 μL |
Add sample solutions of 10 μL each into the sample holes, according to the table below, Set the voltage to 80 V and run the electrophoresis for 70 min.
| Lane | 1 | 2 | 3 | 4 | 5 | 6 | 7 | 8 |
|---|---|---|---|---|---|---|---|---|
| Sample | Face D 3.1 μL | 1+2 3.1 μL | 2+3 3.1 μL | 1+3 3.1 μL | D1 3.1 μL | D2 3.1 μL | D3 3.1 μL | Marker(50-1031 bp) 6 μL |
Obtain the electrophoretogram.
Clean 1 copper grid with plasma for 15 seconds.
Drop 1.5 μL of RDT solution onto the grid, allow adsorption for 2–5 minutes.
Remove excess liquid, air dry. Stain with 10 μL of 2% phosphotungstic acid solution for one minute, then wash off with water and dry again.
Observe under Hitachi H800 (200 kV).
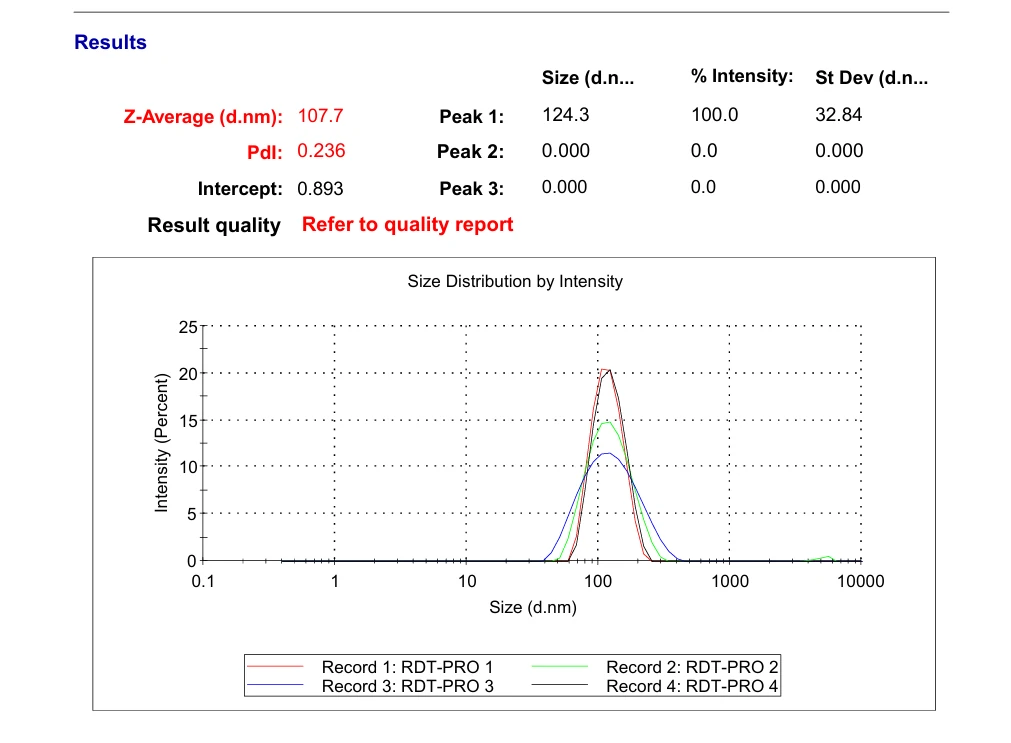
Transfer 20 μL RDT solution into different microtubes.
Dilute to 1000 μL with water.
Load into cuvette; run three scans (30 s each).
Record average particle size.
Mix equal volume C1 C2 C3 solution (10 μM each).
Heat to 90 °C for 5 min; slowly cool to 4 °C over 6 h.
Store at 4 °C.
Prepare the gel with 0.5 g agarose, 25 mL 0.5 × TBE Buffer
Mix the solutions (solvents) in 200 μL EP tubes according to the table below.
| Sample | 5×DNA Loading Buffer | ddH2O | |
|---|---|---|---|
| 1 | Face C 3.1 μL | 2 μL | 4.9 μL |
| 2 | 1+2 3.1 μL | 2 μL | 4.9 μL |
| 3 | 2+3 3.1 μL | 2 μL | 4.9 μL |
| 4 | 1+3 3.1 μL | 2 μL | 4.9 μL |
| 5 | C1 3.1 μL | 2 μL | 4.9 μL |
| 6 | C2 3.1 μL | 2 μL | 4.9 μL |
| 7 | C3 3.1 μL | 2 μL | 4.9 μL |
| 8 | TDN 3.1 μL | 2 μL | 4.9 μL |
| 9 | TDN + K 3.1 μL | 2 μL | 4.9 μL |
Add sample solutions of 10 μL each into the sample holes, according to the table below, Set the voltage to 80 V and run the electrophoresis for 70 min.
| Lane | 1 | 2 | 3 | 4 | 5 | 6 | 7 | 8 | 9 |
|---|---|---|---|---|---|---|---|---|---|
| Sample | Face C 3.1 μL | 1+2 3.1 μL | 2+3 3.1 μL | 1+3 3.1 μL | C1 3.1 μL | C2 3.1 μL | C3 3.1 μL | TDN 3.1 μL | TDN + K 3.1 μL |
Obtain the electrophoretogram.
Mix equal volume A1 A2 A3 B1 B2 B3 C1 C2 C3 D1 D2 D3 solution (10 μM each).
Heat to 90 °C for 5 min; slowly cool to 4 °C over 6 h.
Store at 4 °C.
Mix equal volume S1 GS2 GS3 GS4 solution (10 μM each).
Heat to 90 °C for 5 min; slowly cool to 4 °C over 24 h.
Store at 4 °C.
Prepare the gel with 0.125 g agarose, 25 mL 0.5 × TBE Buffer.
Mix the solutions (solvents) in 200 μL EP tubes according to the table below.
| Sample | 5×DNA Loading Buffer | ddH2O | |
|---|---|---|---|
| 1 | RDT(mix directly) 3.1 μL | 2 μL | 4.9 μL |
| 2 | Face C 3.1 μL | 2 μL | 4.9 μL |
Add sample solutions of 10 μL each into the sample holes, according to the table below, Set the voltage to 80 V and run the electrophoresis for 70 min.
| Lane | 1 | 2 |
|---|---|---|
| Sample | RDT(mix directly) 1X 3.1 μL | Face C 3.1 μL |
Obtain the electrophoretogram.
Procedure:
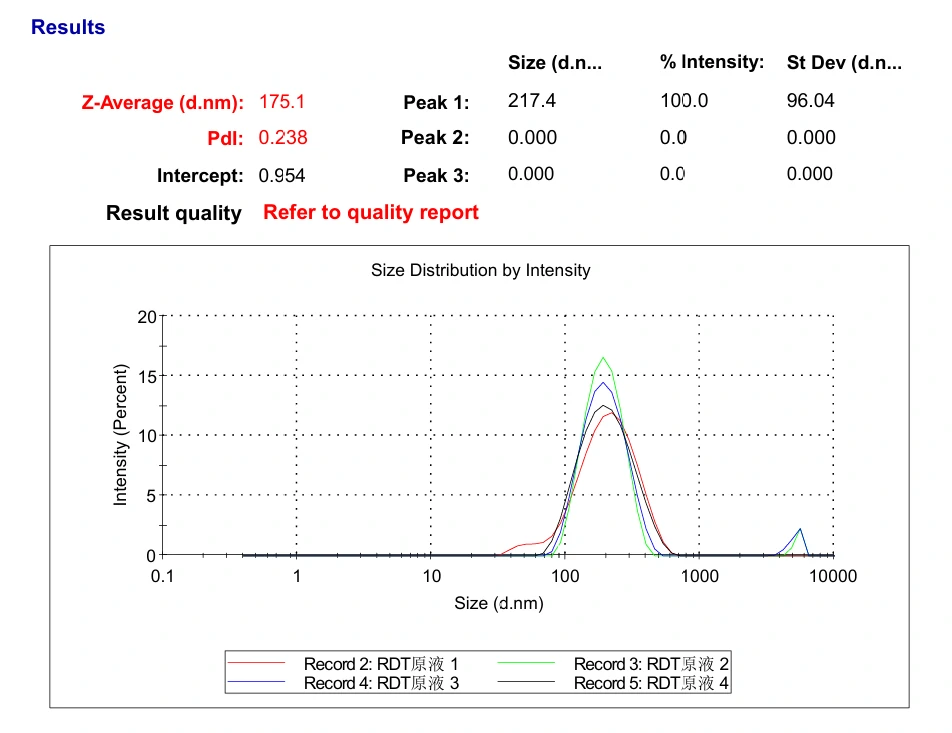
Transfer 20 μL RDT solution into different microtubes.
Dilute to 1000 μL with water.
Load into cuvette; run three scans (30 s each).
Record average particle size.
Mix RDT solution with 250 mM KCl solution (1:1).
Incubate 24 hours at room temperature.
Proceed to AFM/TEM or DLS/CD measurements.
Prepare the gel with 0.75 g agarose, 25 mL 0.5 × TBE Buffer.
Mix the solutions (solvents) in 200 μL EP tubes according to the table below.
| Sample | 5×DNA Loading Buffer | ddH2O | |
|---|---|---|---|
| 1 | TDN 3.1 μL | 2 μL | 4.9 μL |
| 2 | S1 3.1 μL | 2 μL | 4.9 μL |
| 3 | Marker(50-1031 bp) 6 μL | 2 μL | 2 μL |
Add sample solutions of 10 μL each into the sample holes, according to the table below, Set the voltage to 80 V and run the electrophoresis for 70 min.
| Lane | 1 | 2 | 3 |
|---|---|---|---|
| Sample | TDN 3.1 μL | S1 3.1 μL | Marker(50-1031 bp) 6 μL |
Obtain the electrophoretogram.
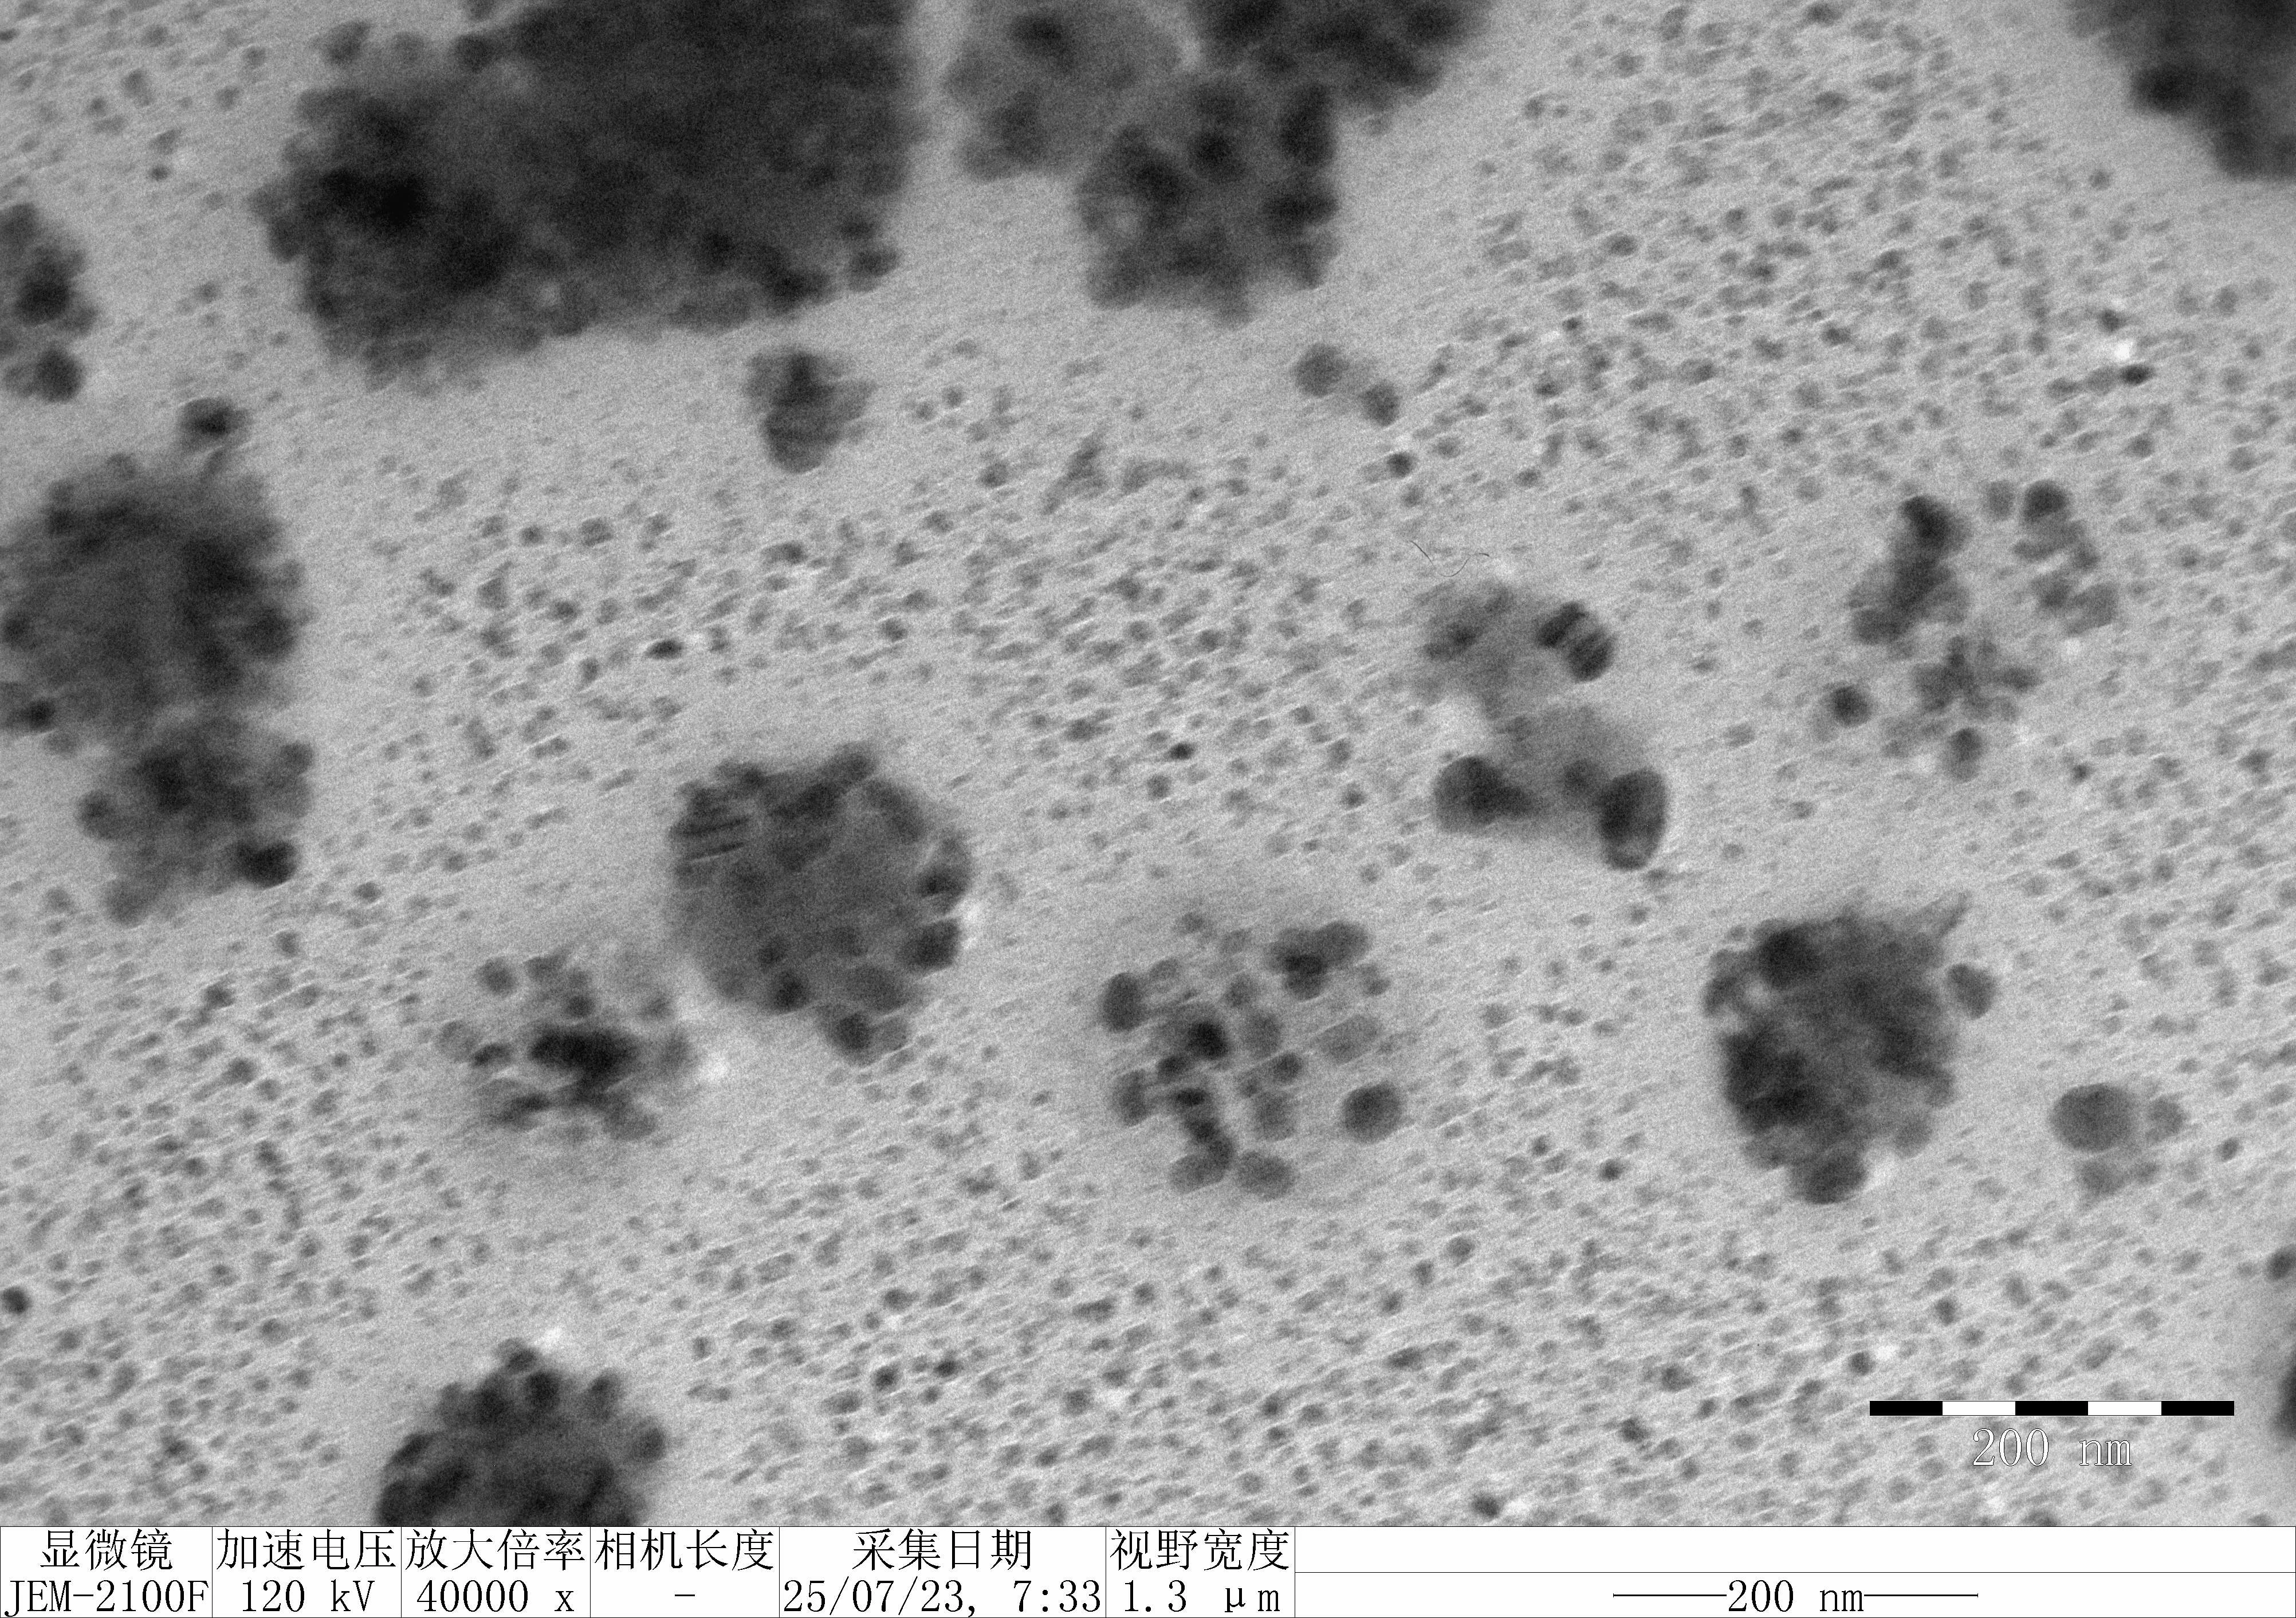
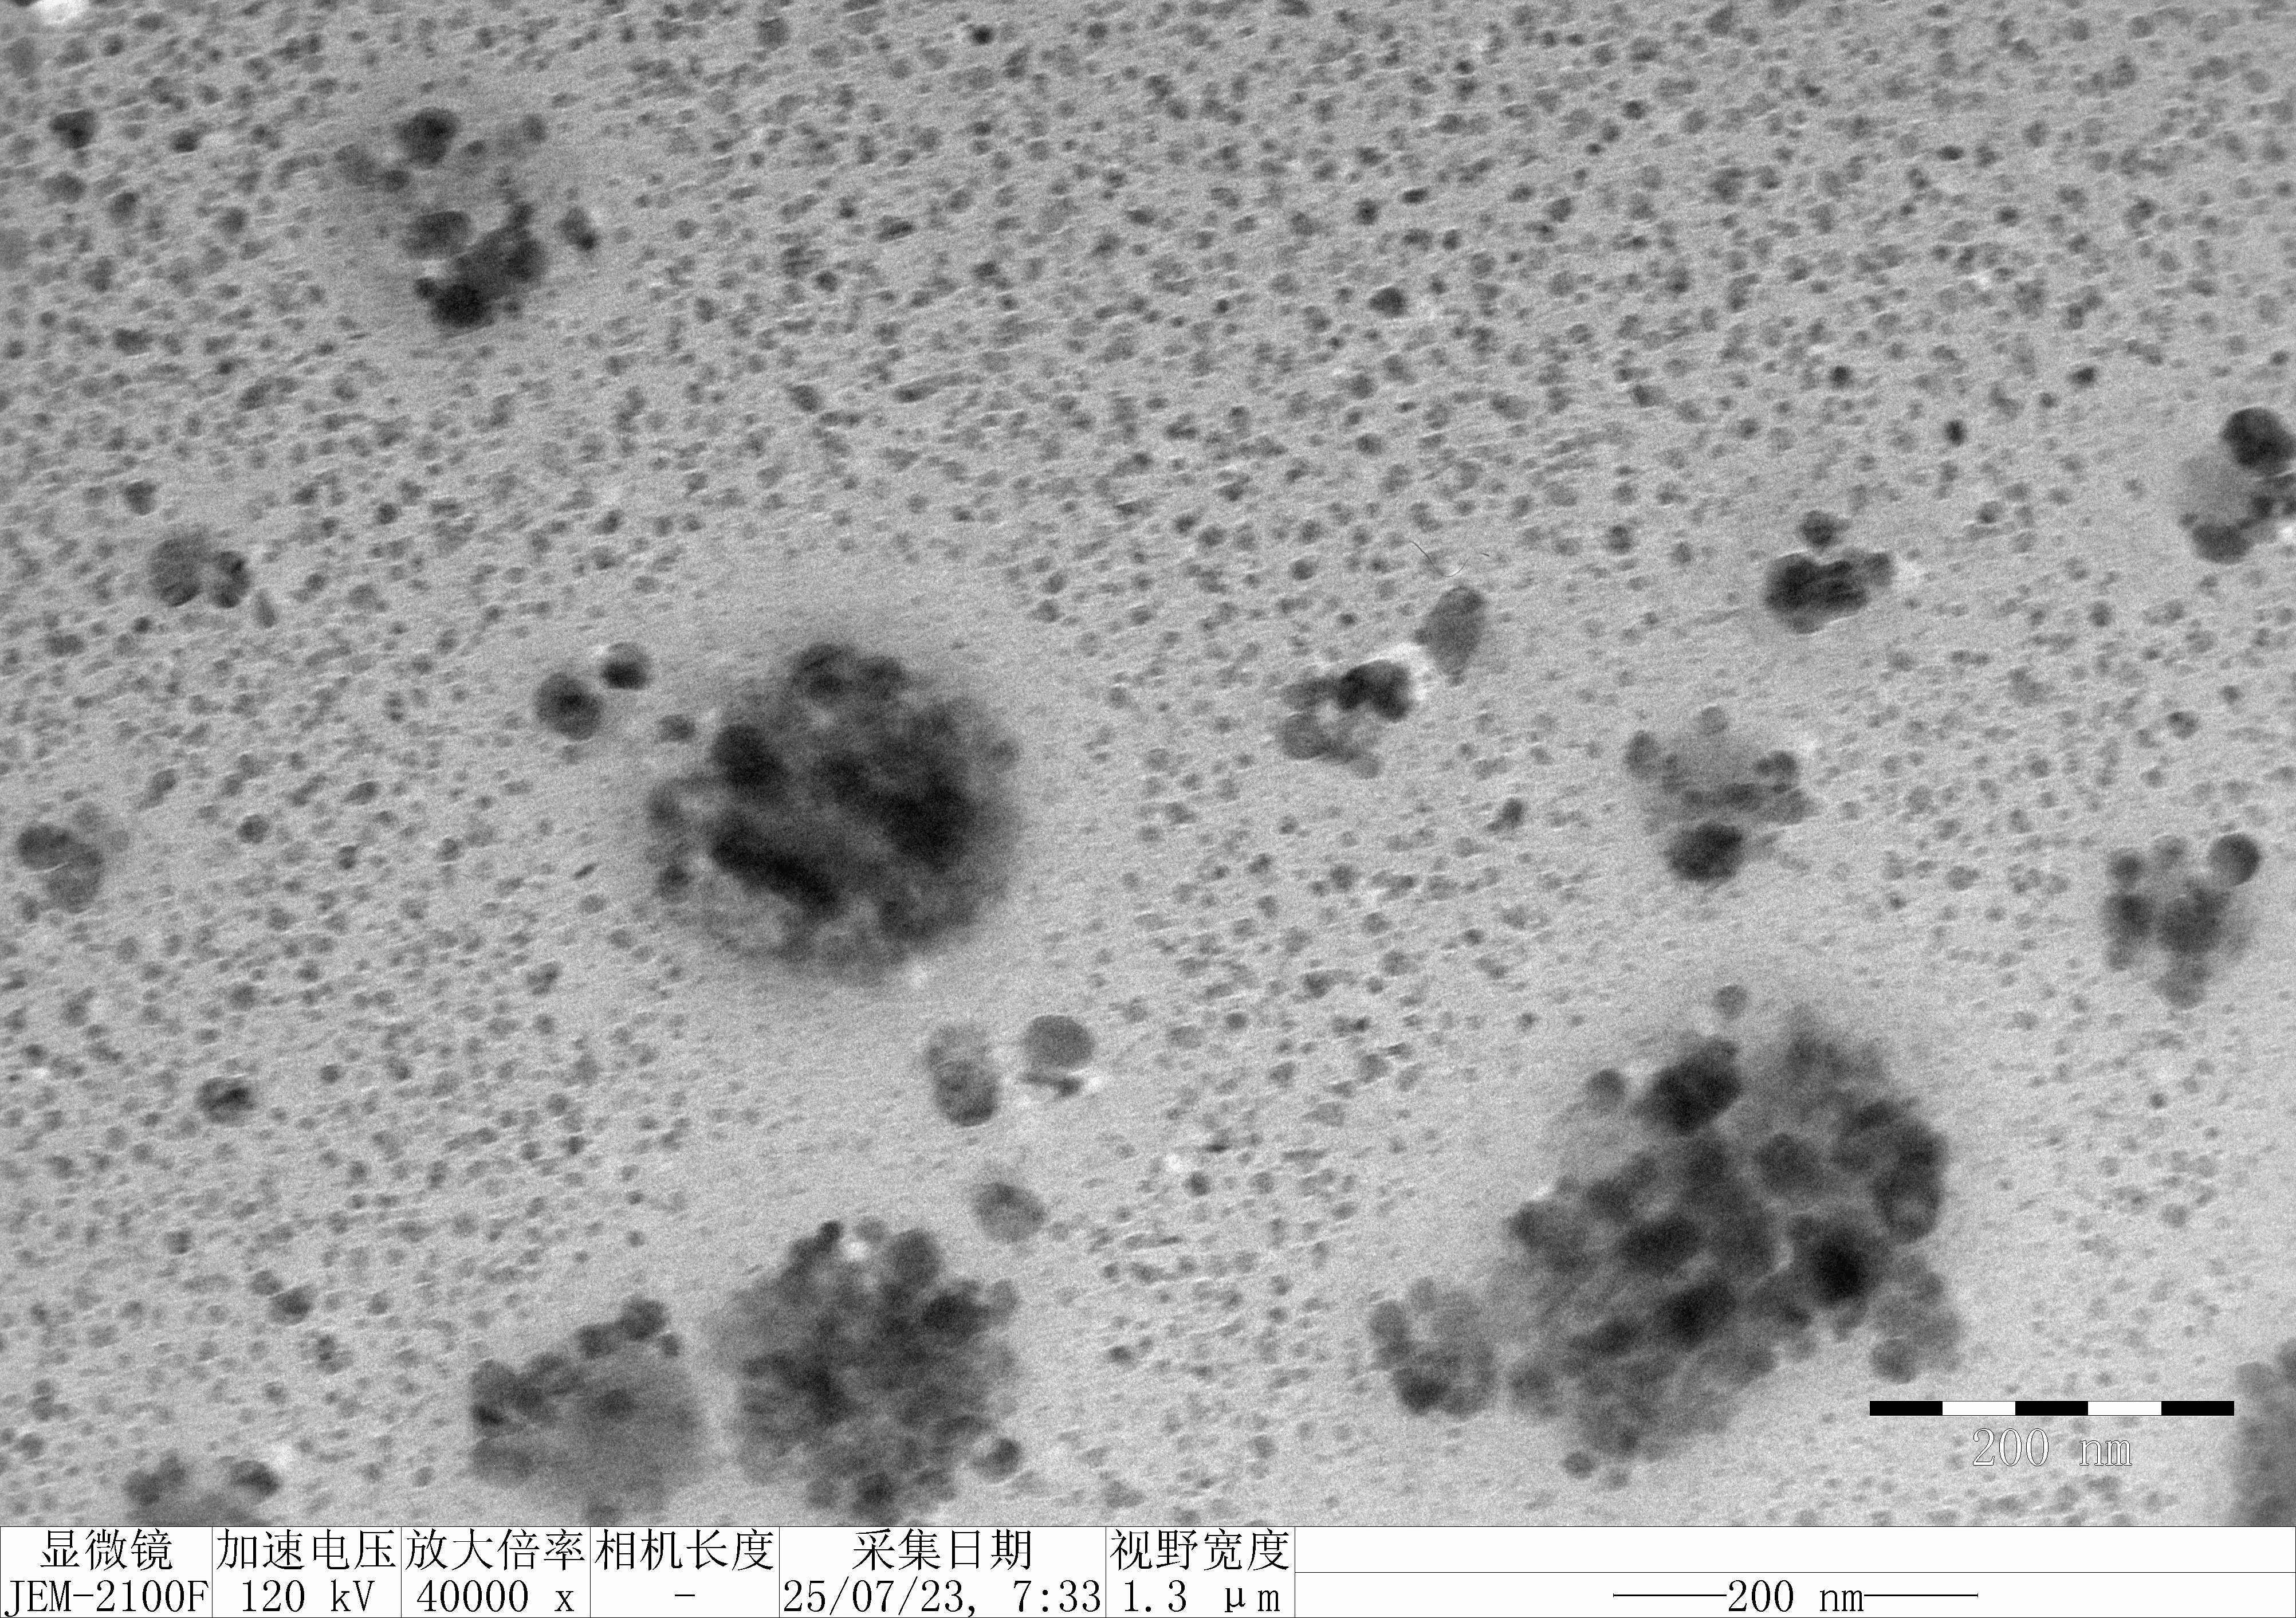
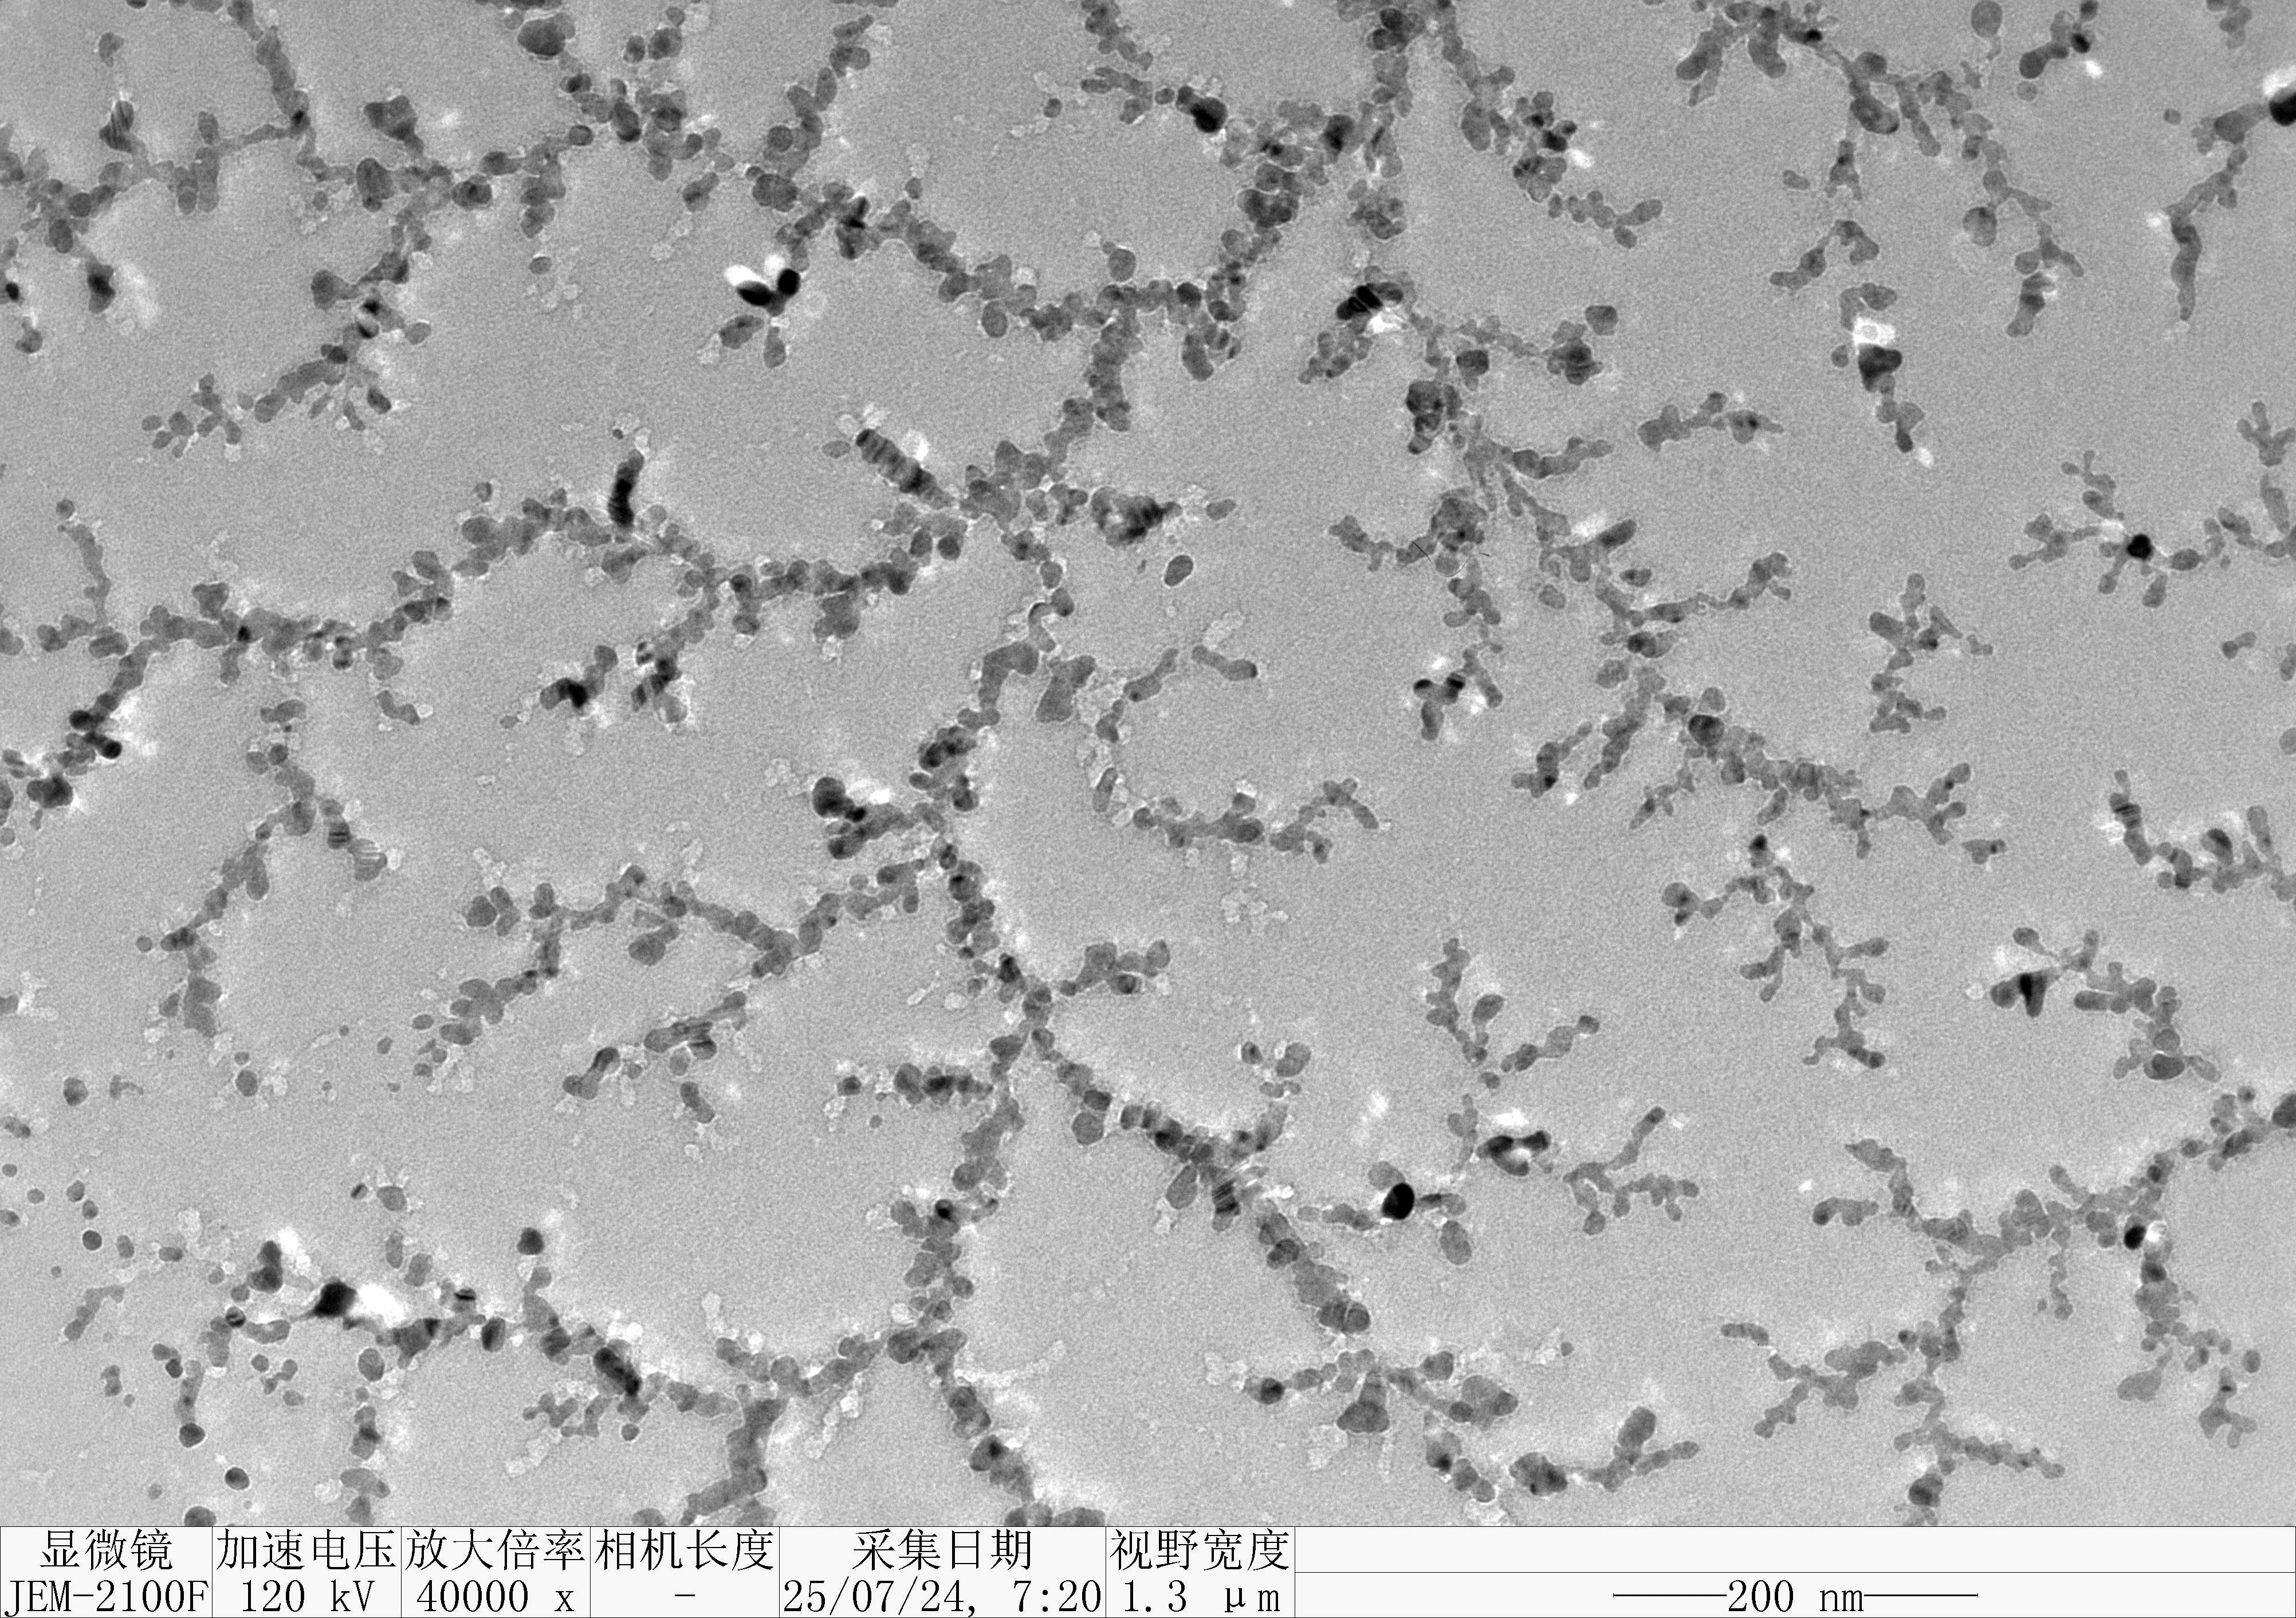
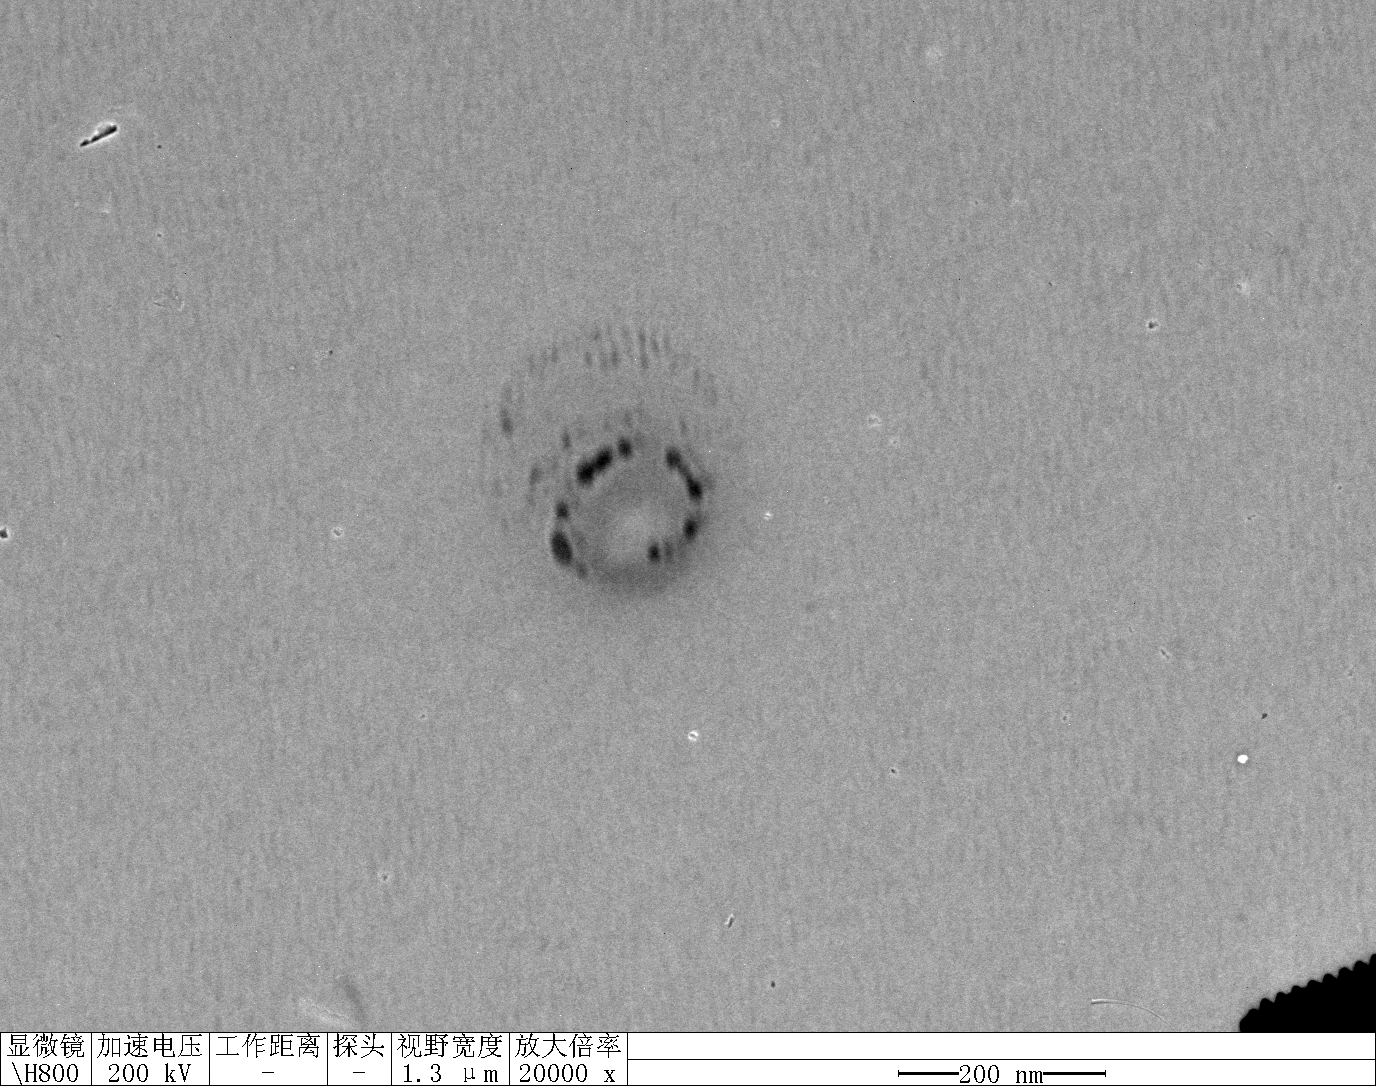
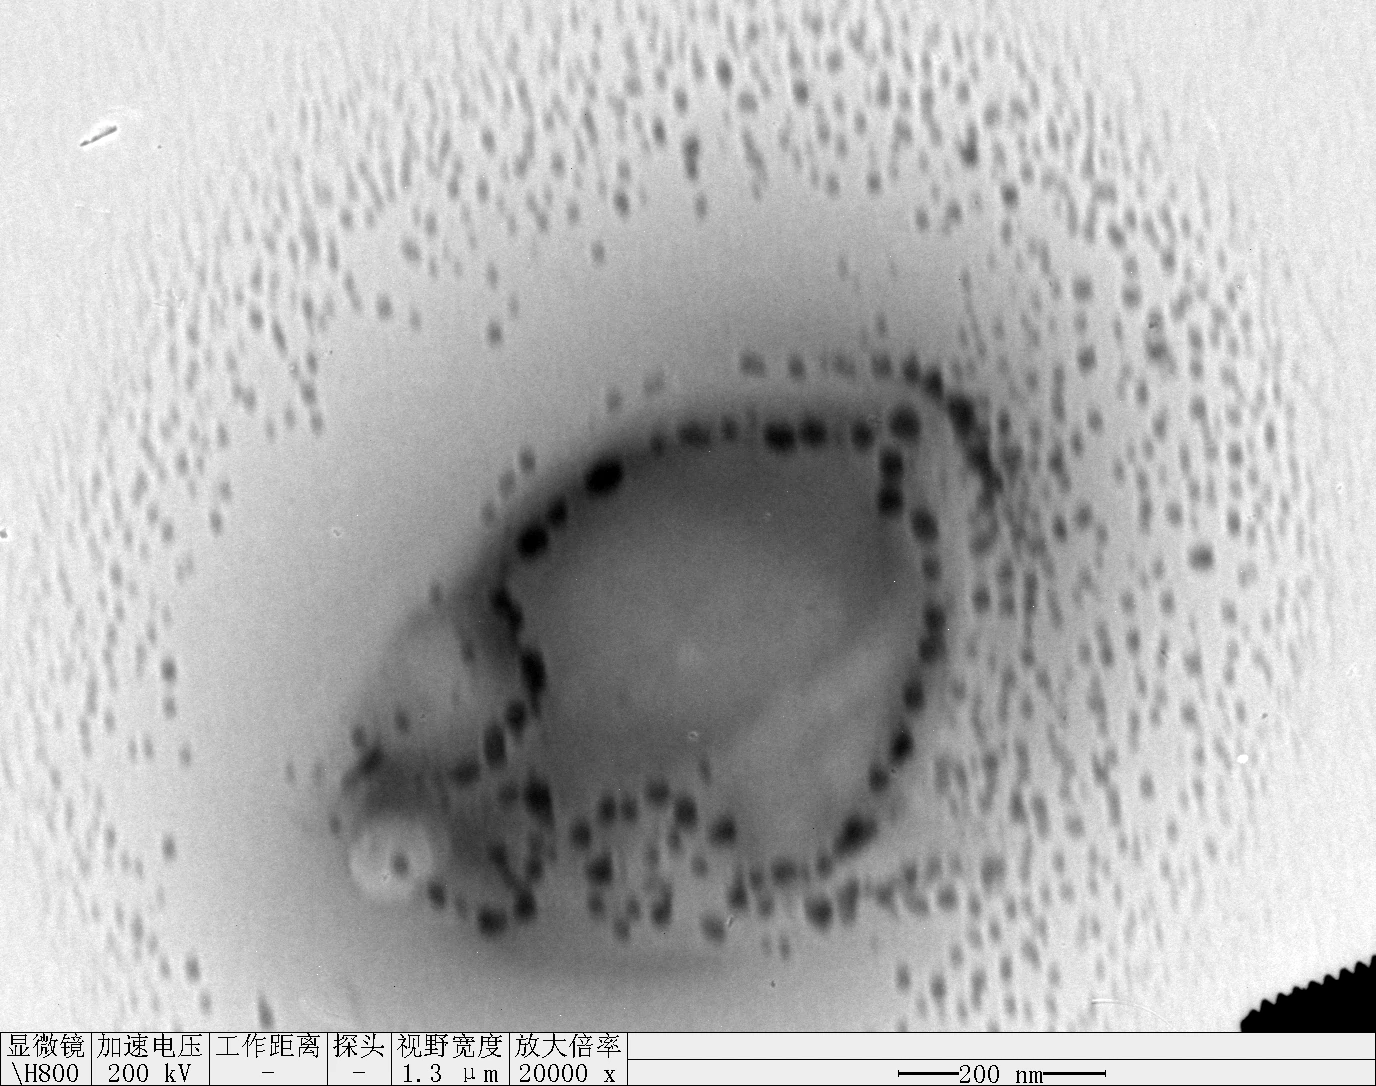
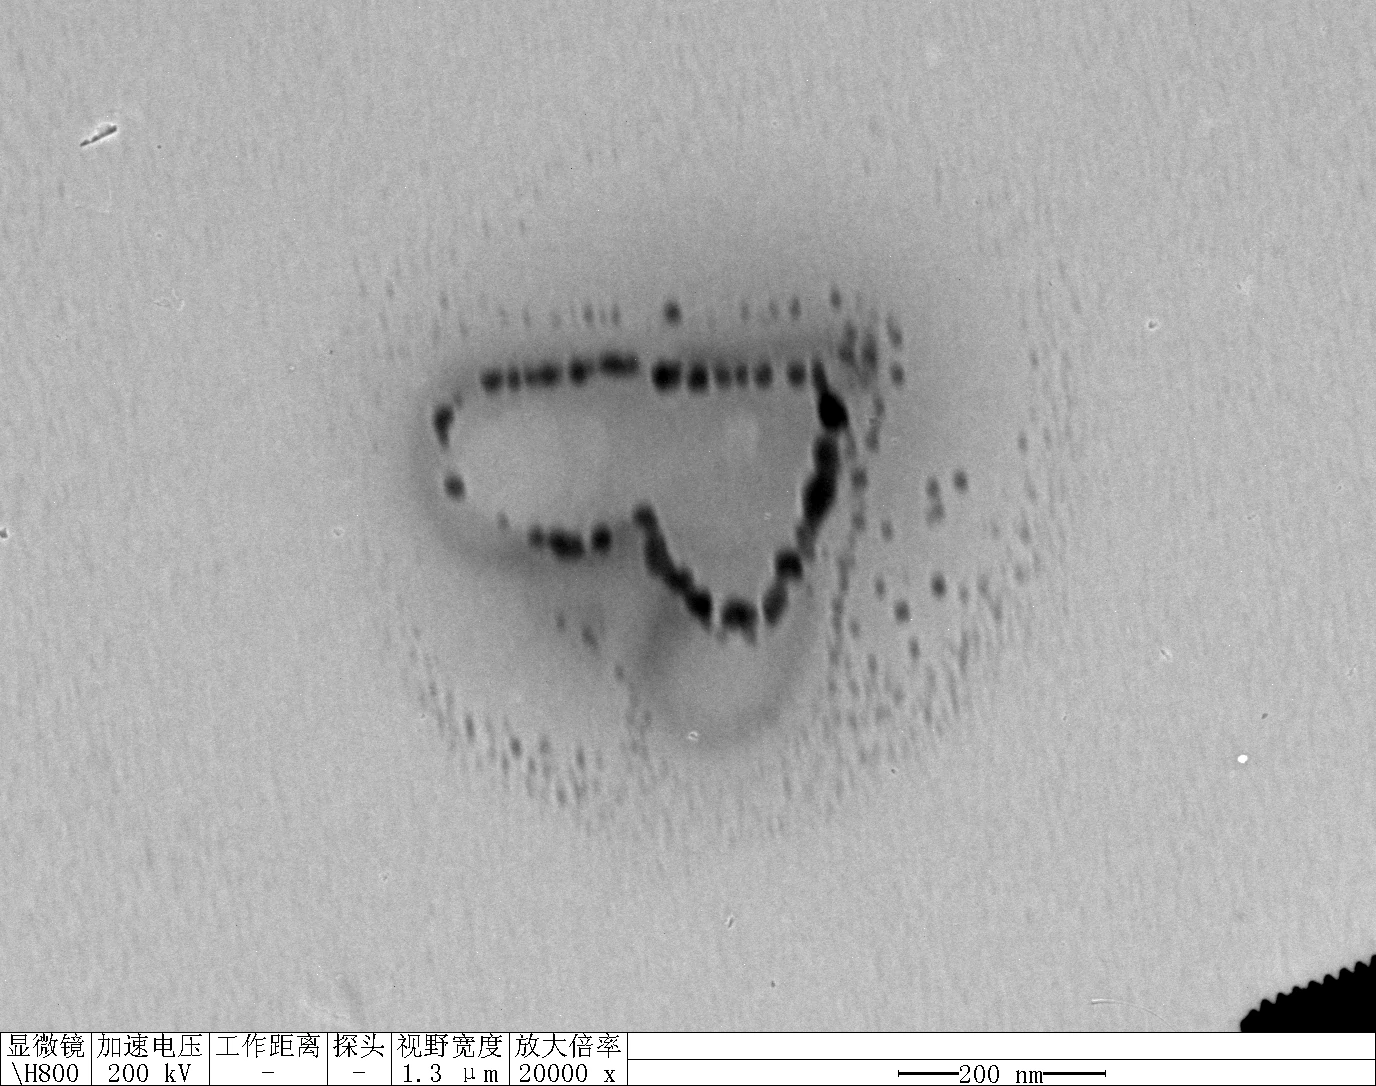
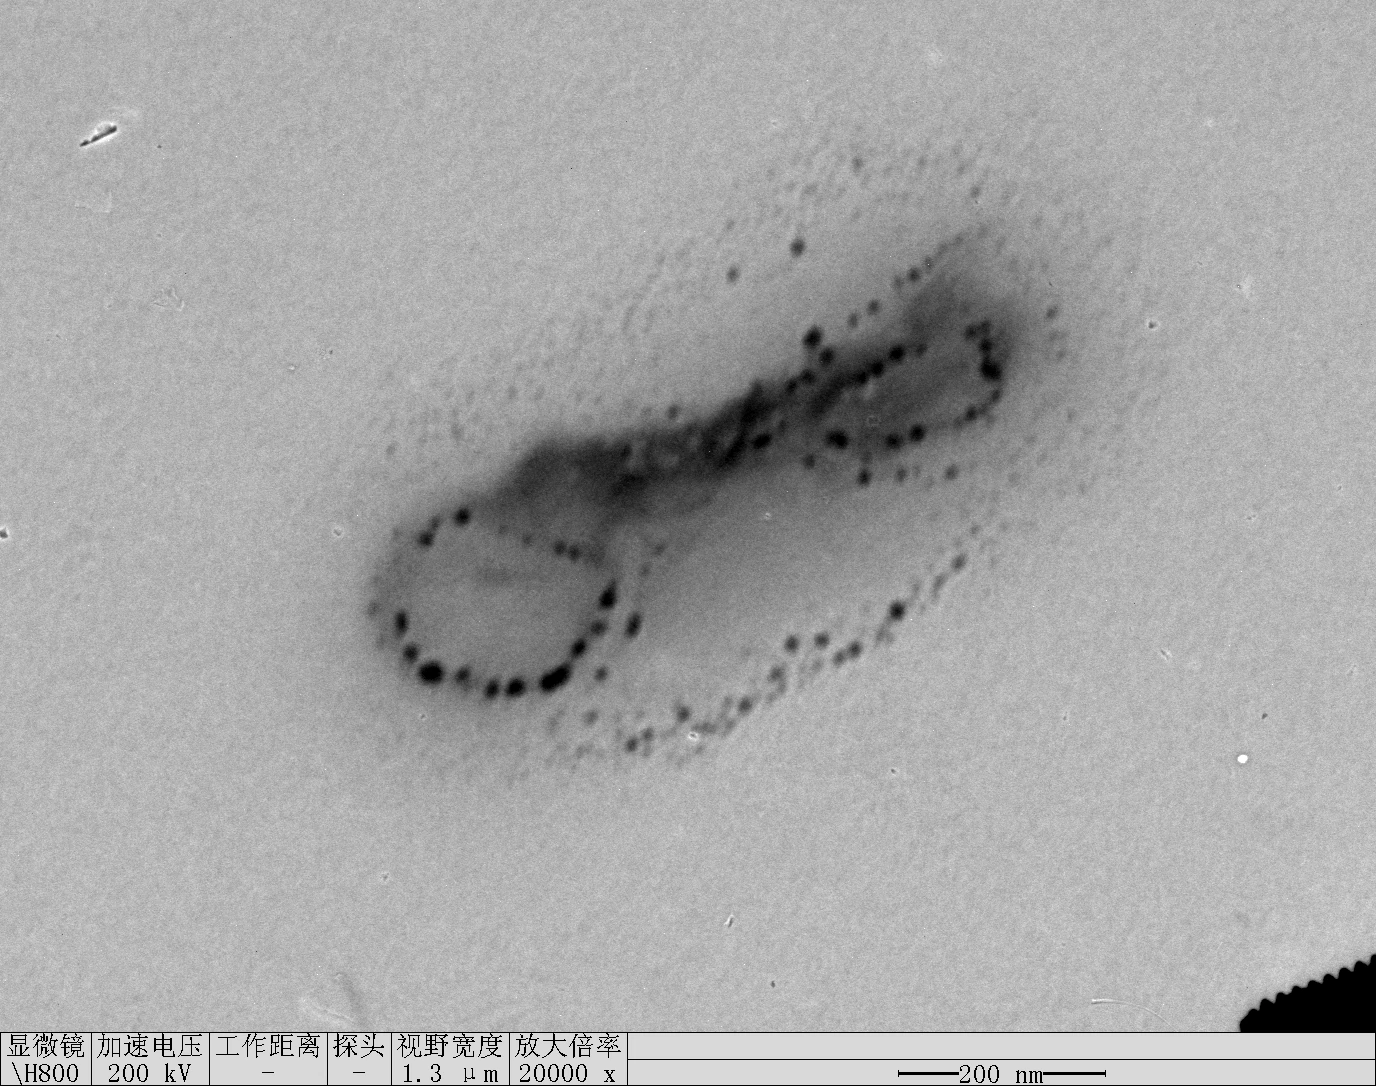
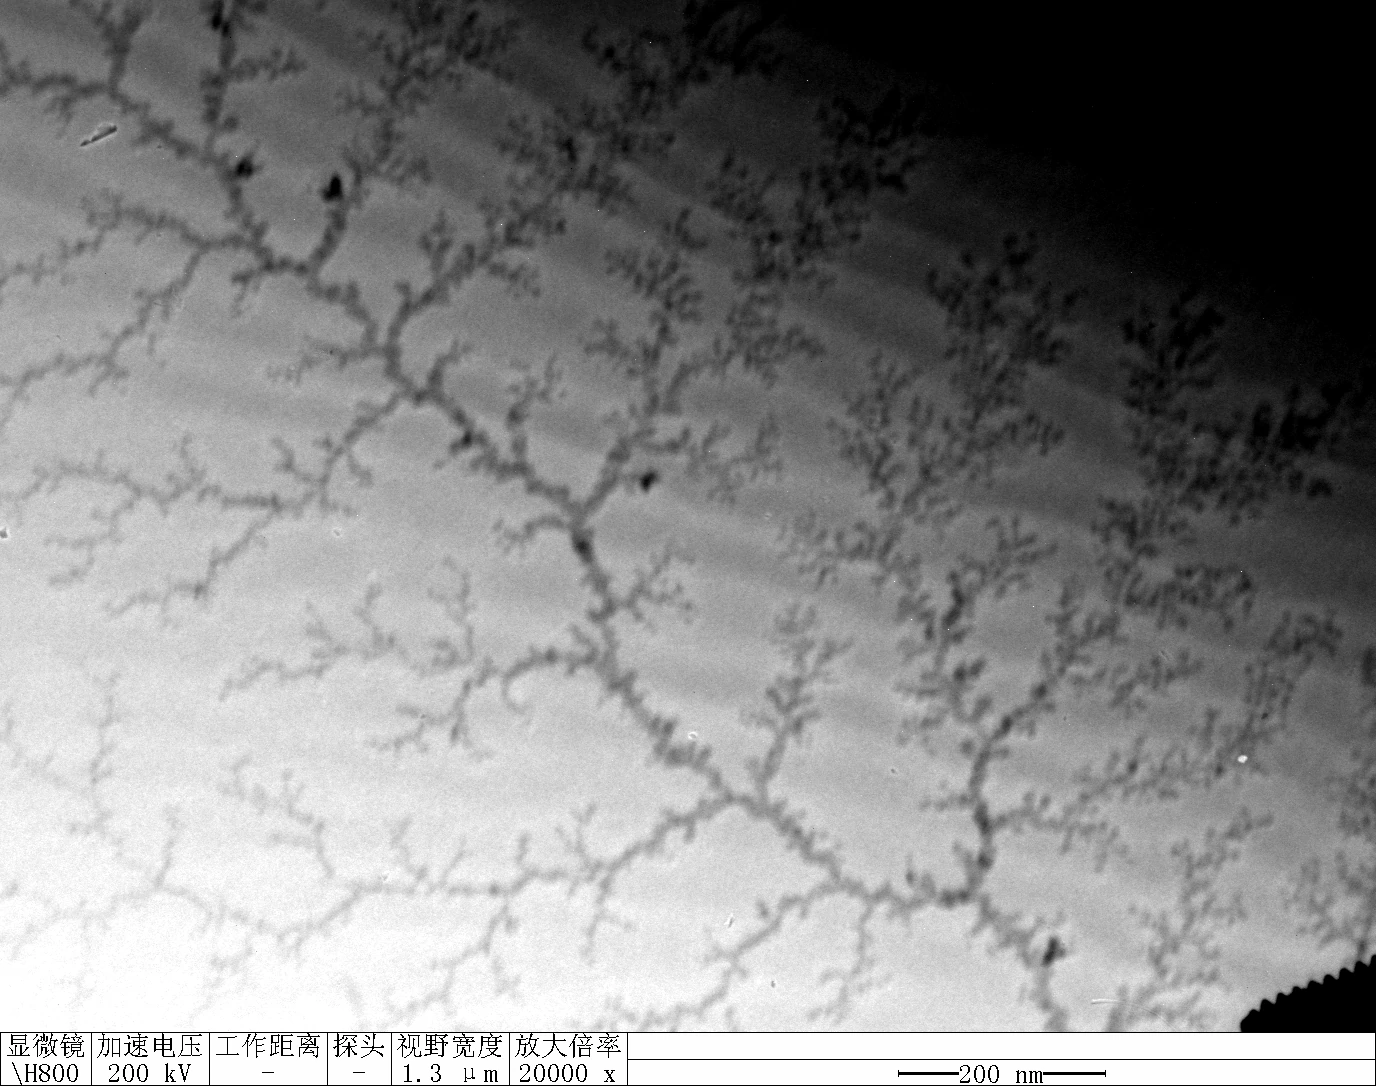
Clean 1 copper grid with plasma for 15 seconds.
Drop 1.5 μL of RDT solution onto the grid, allow adsorption for 2–5 minutes.
Remove excess liquid, air dry. Stain with 10 μL of 2% phosphotungstic acid solution for one minute, then wash off with water and dry again.
Observe under JEM-2100F (120 kV).
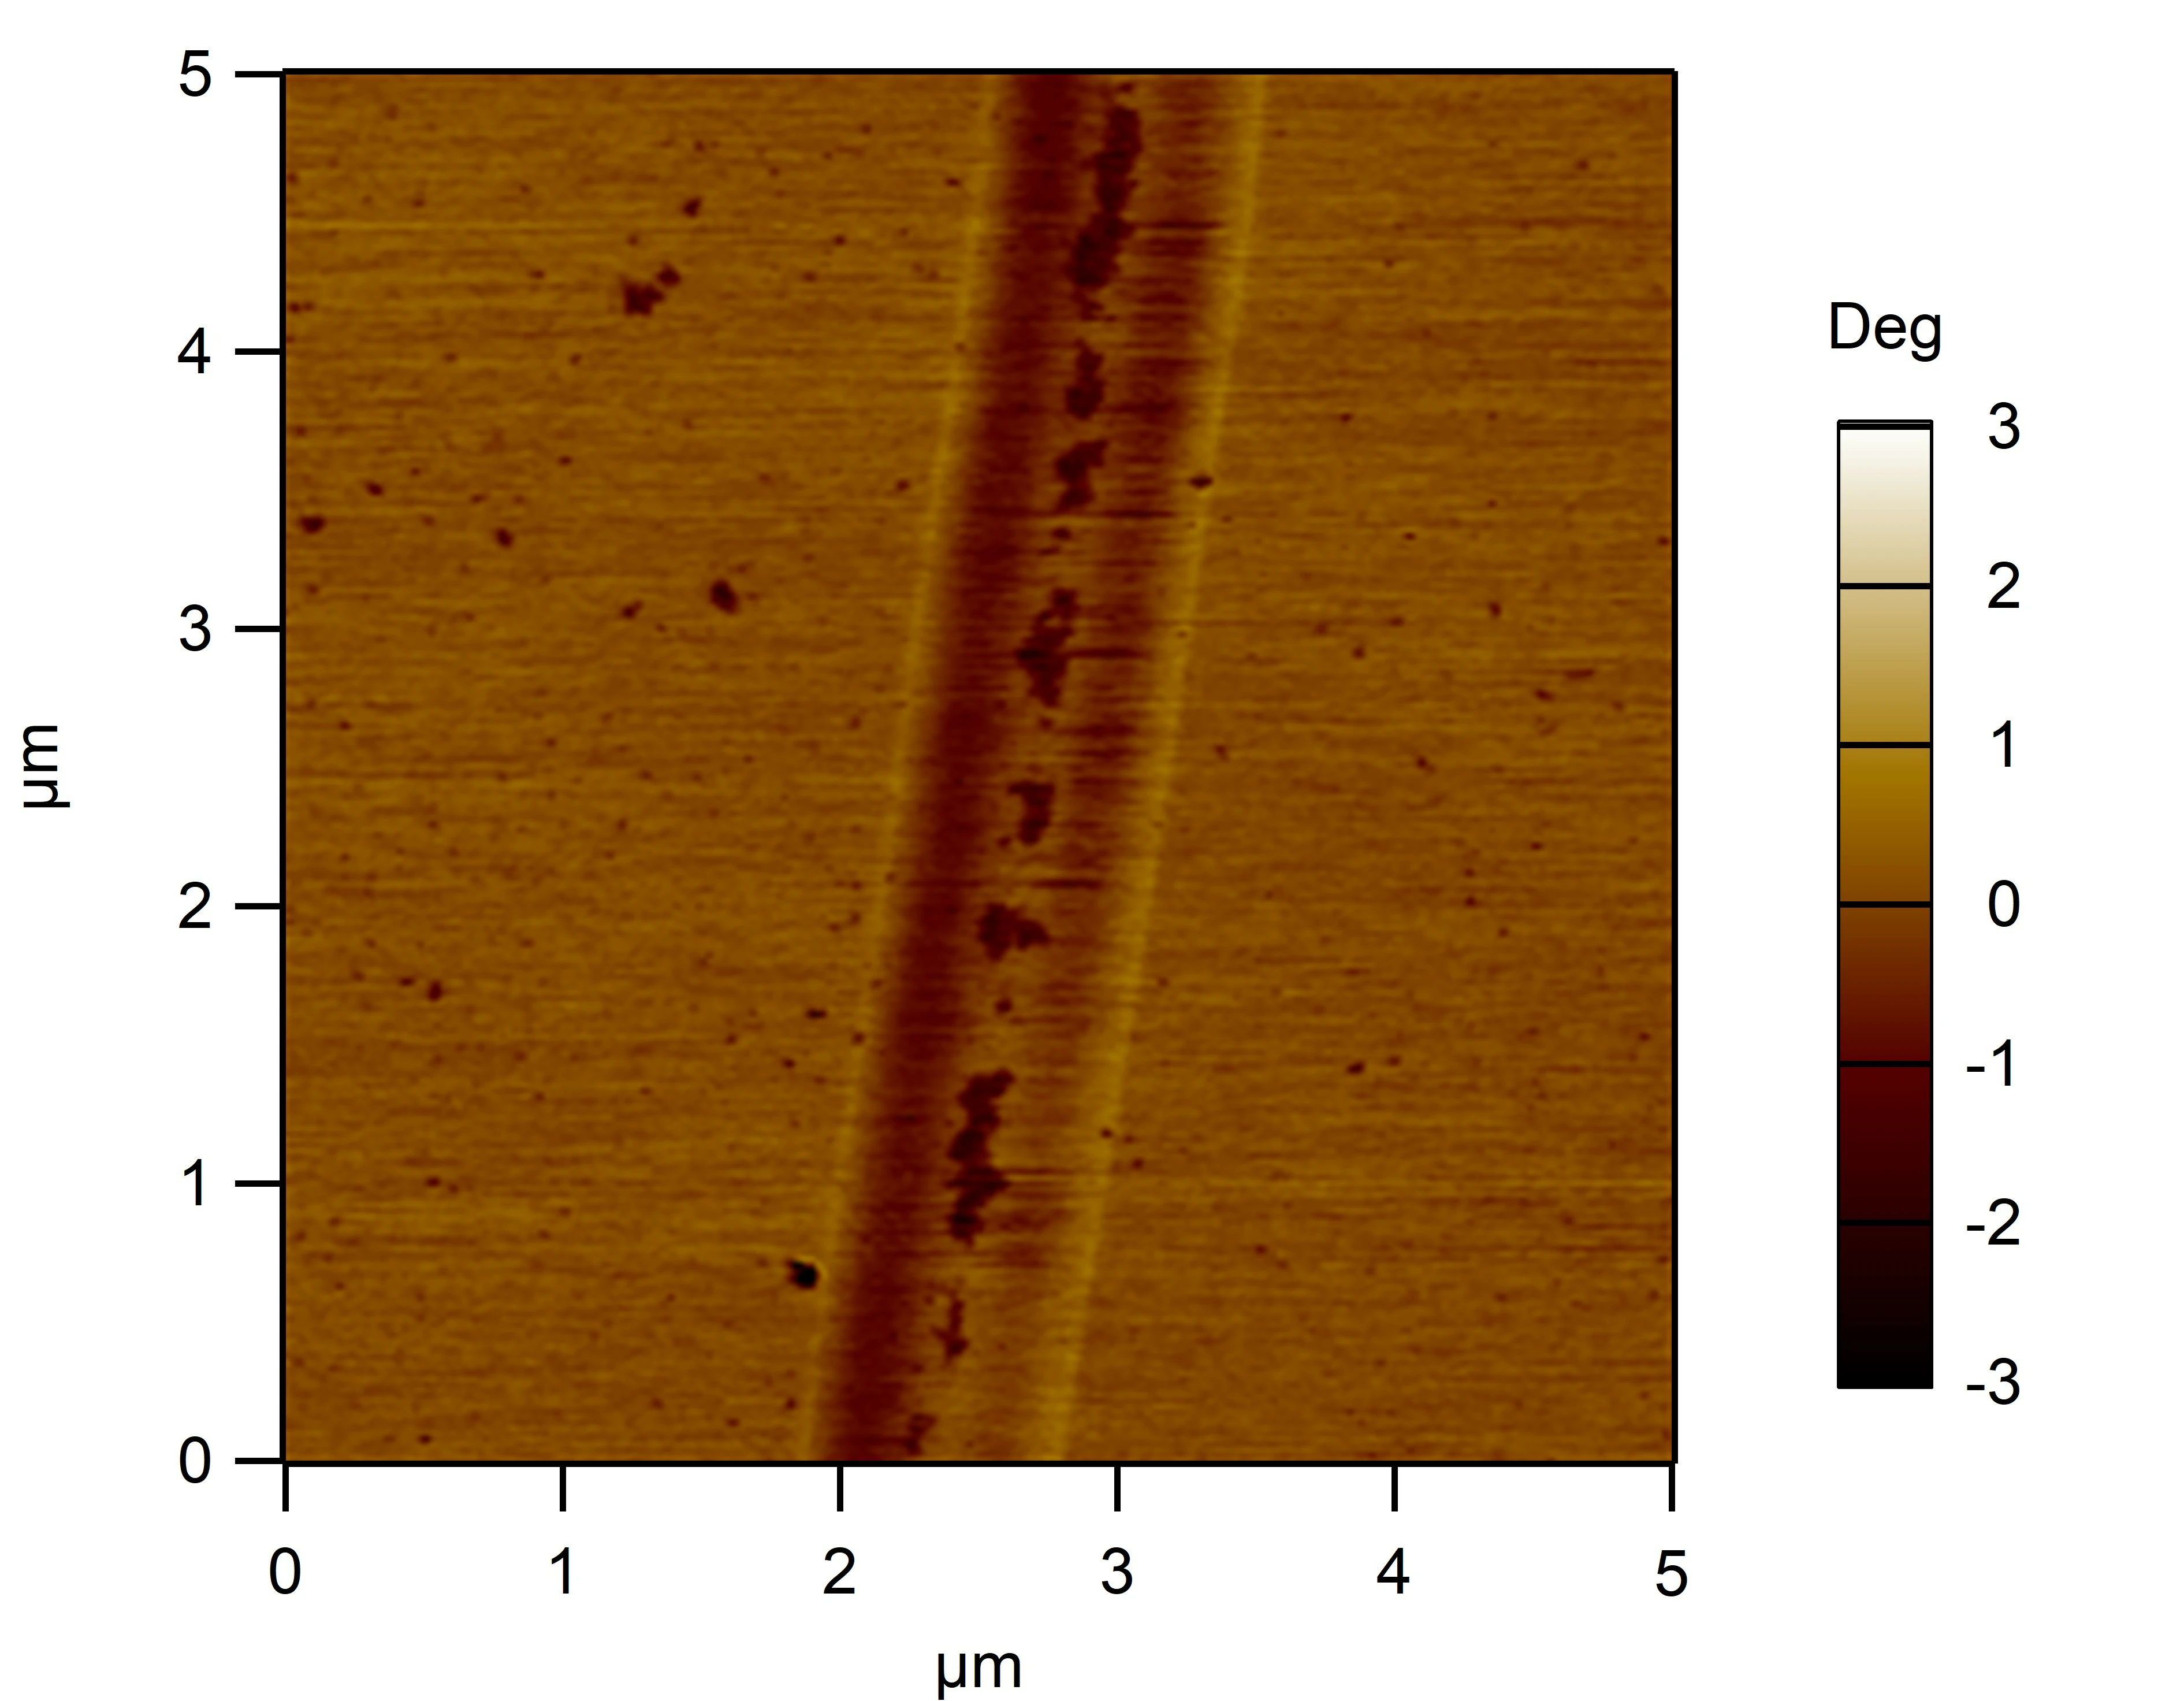
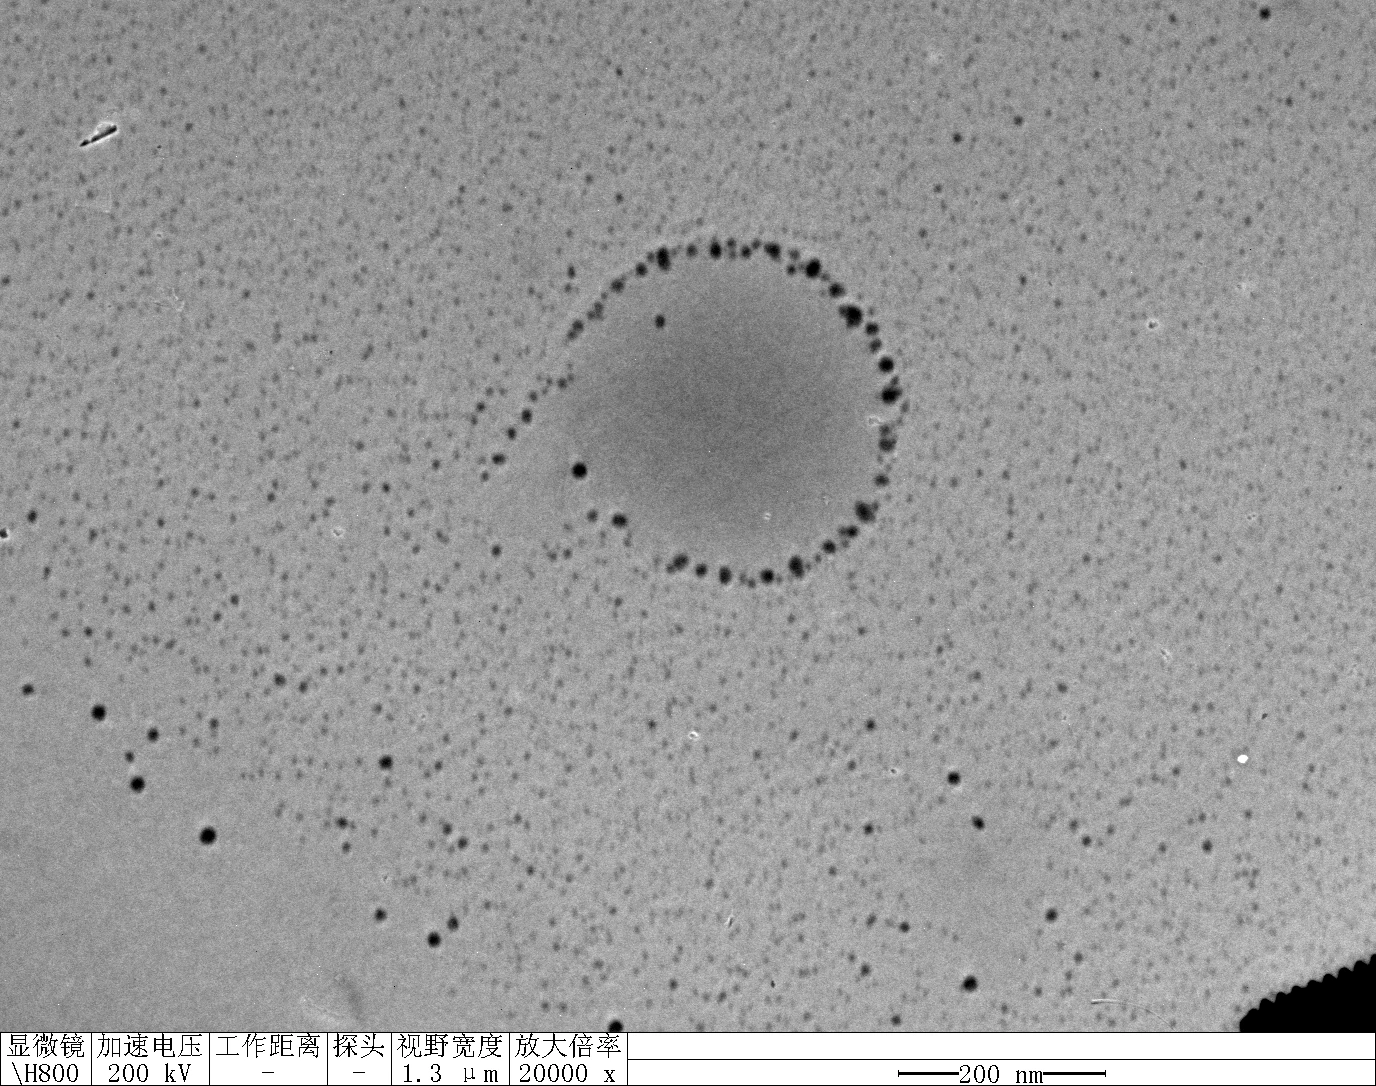
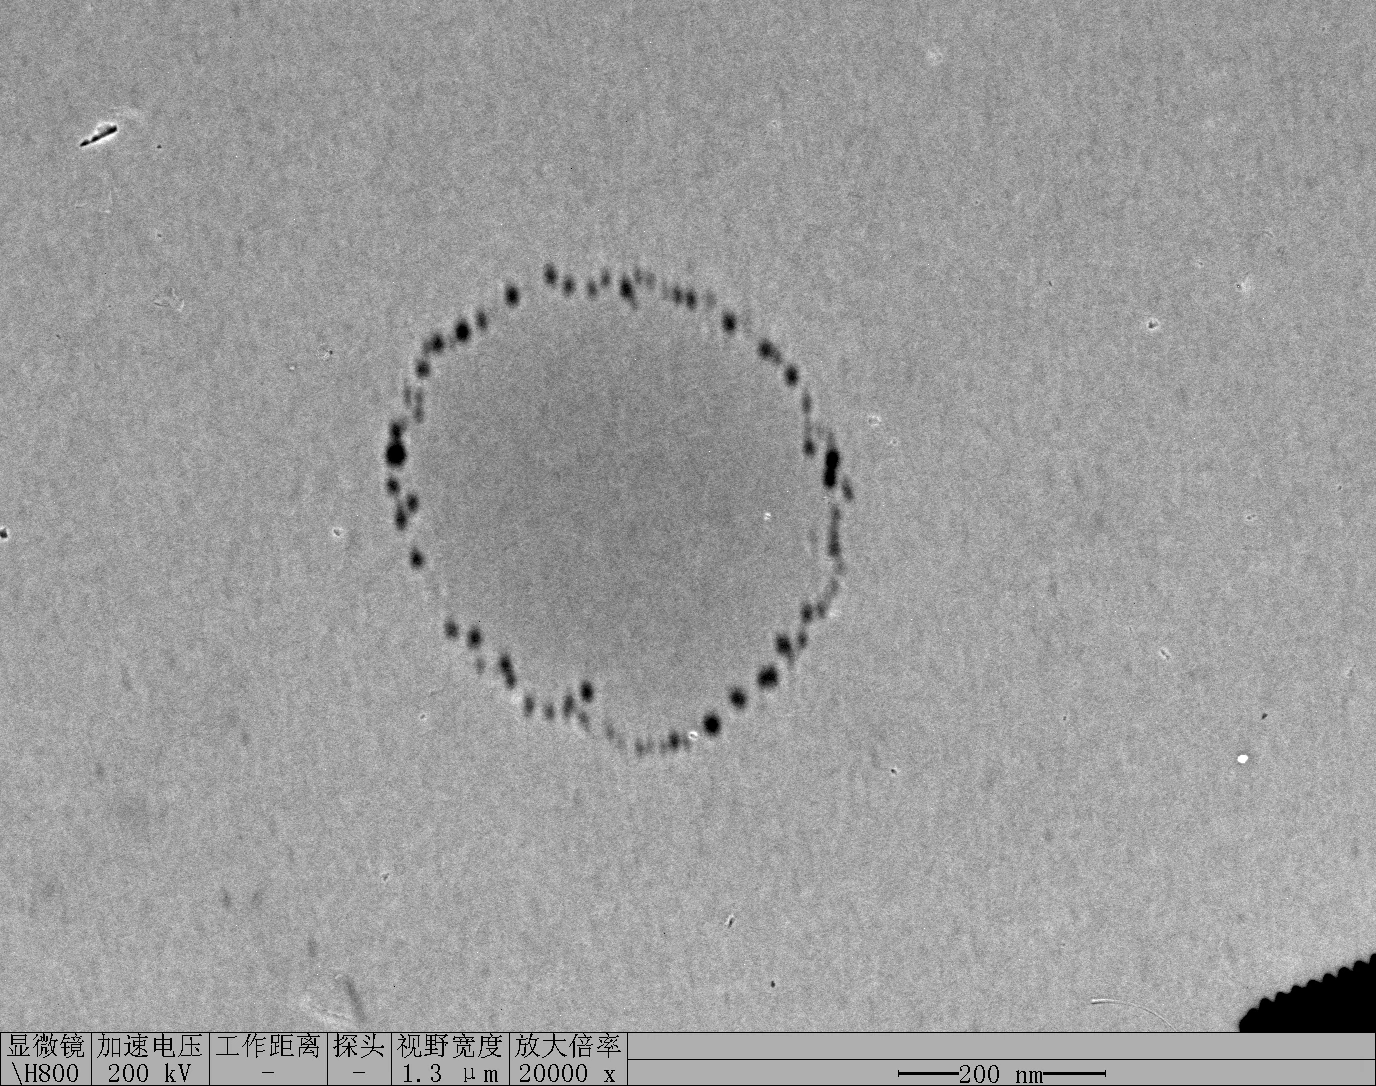
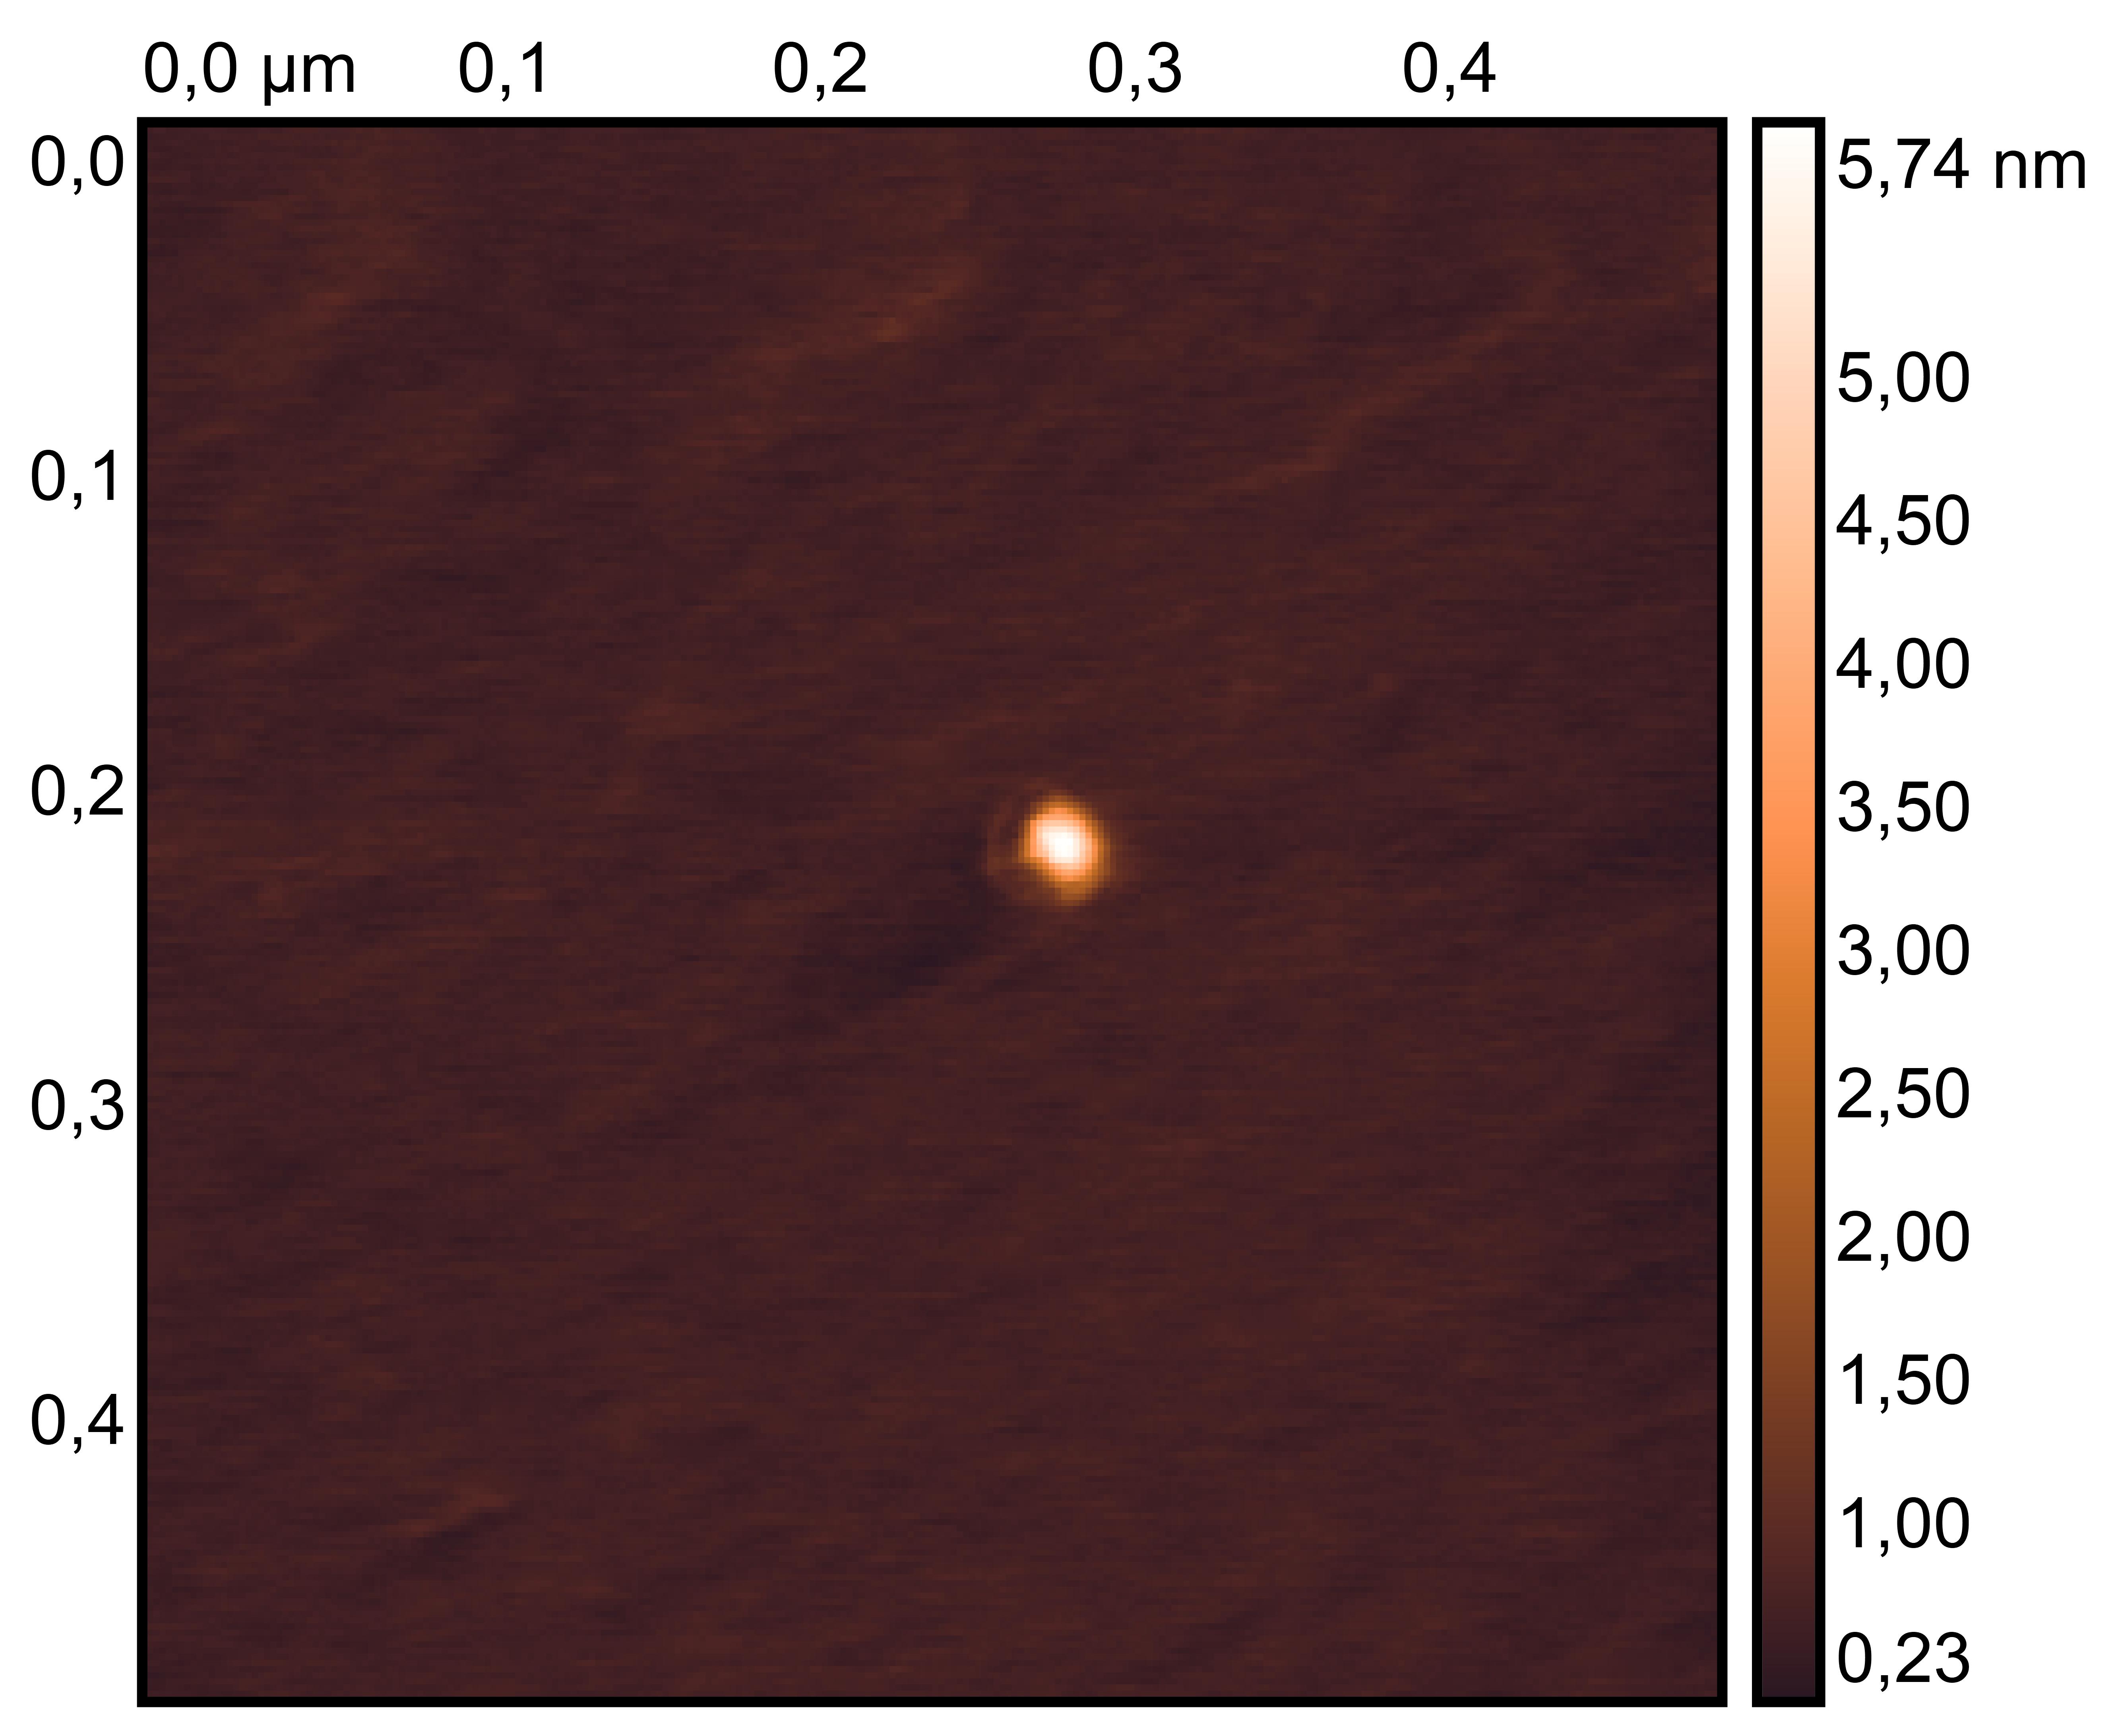
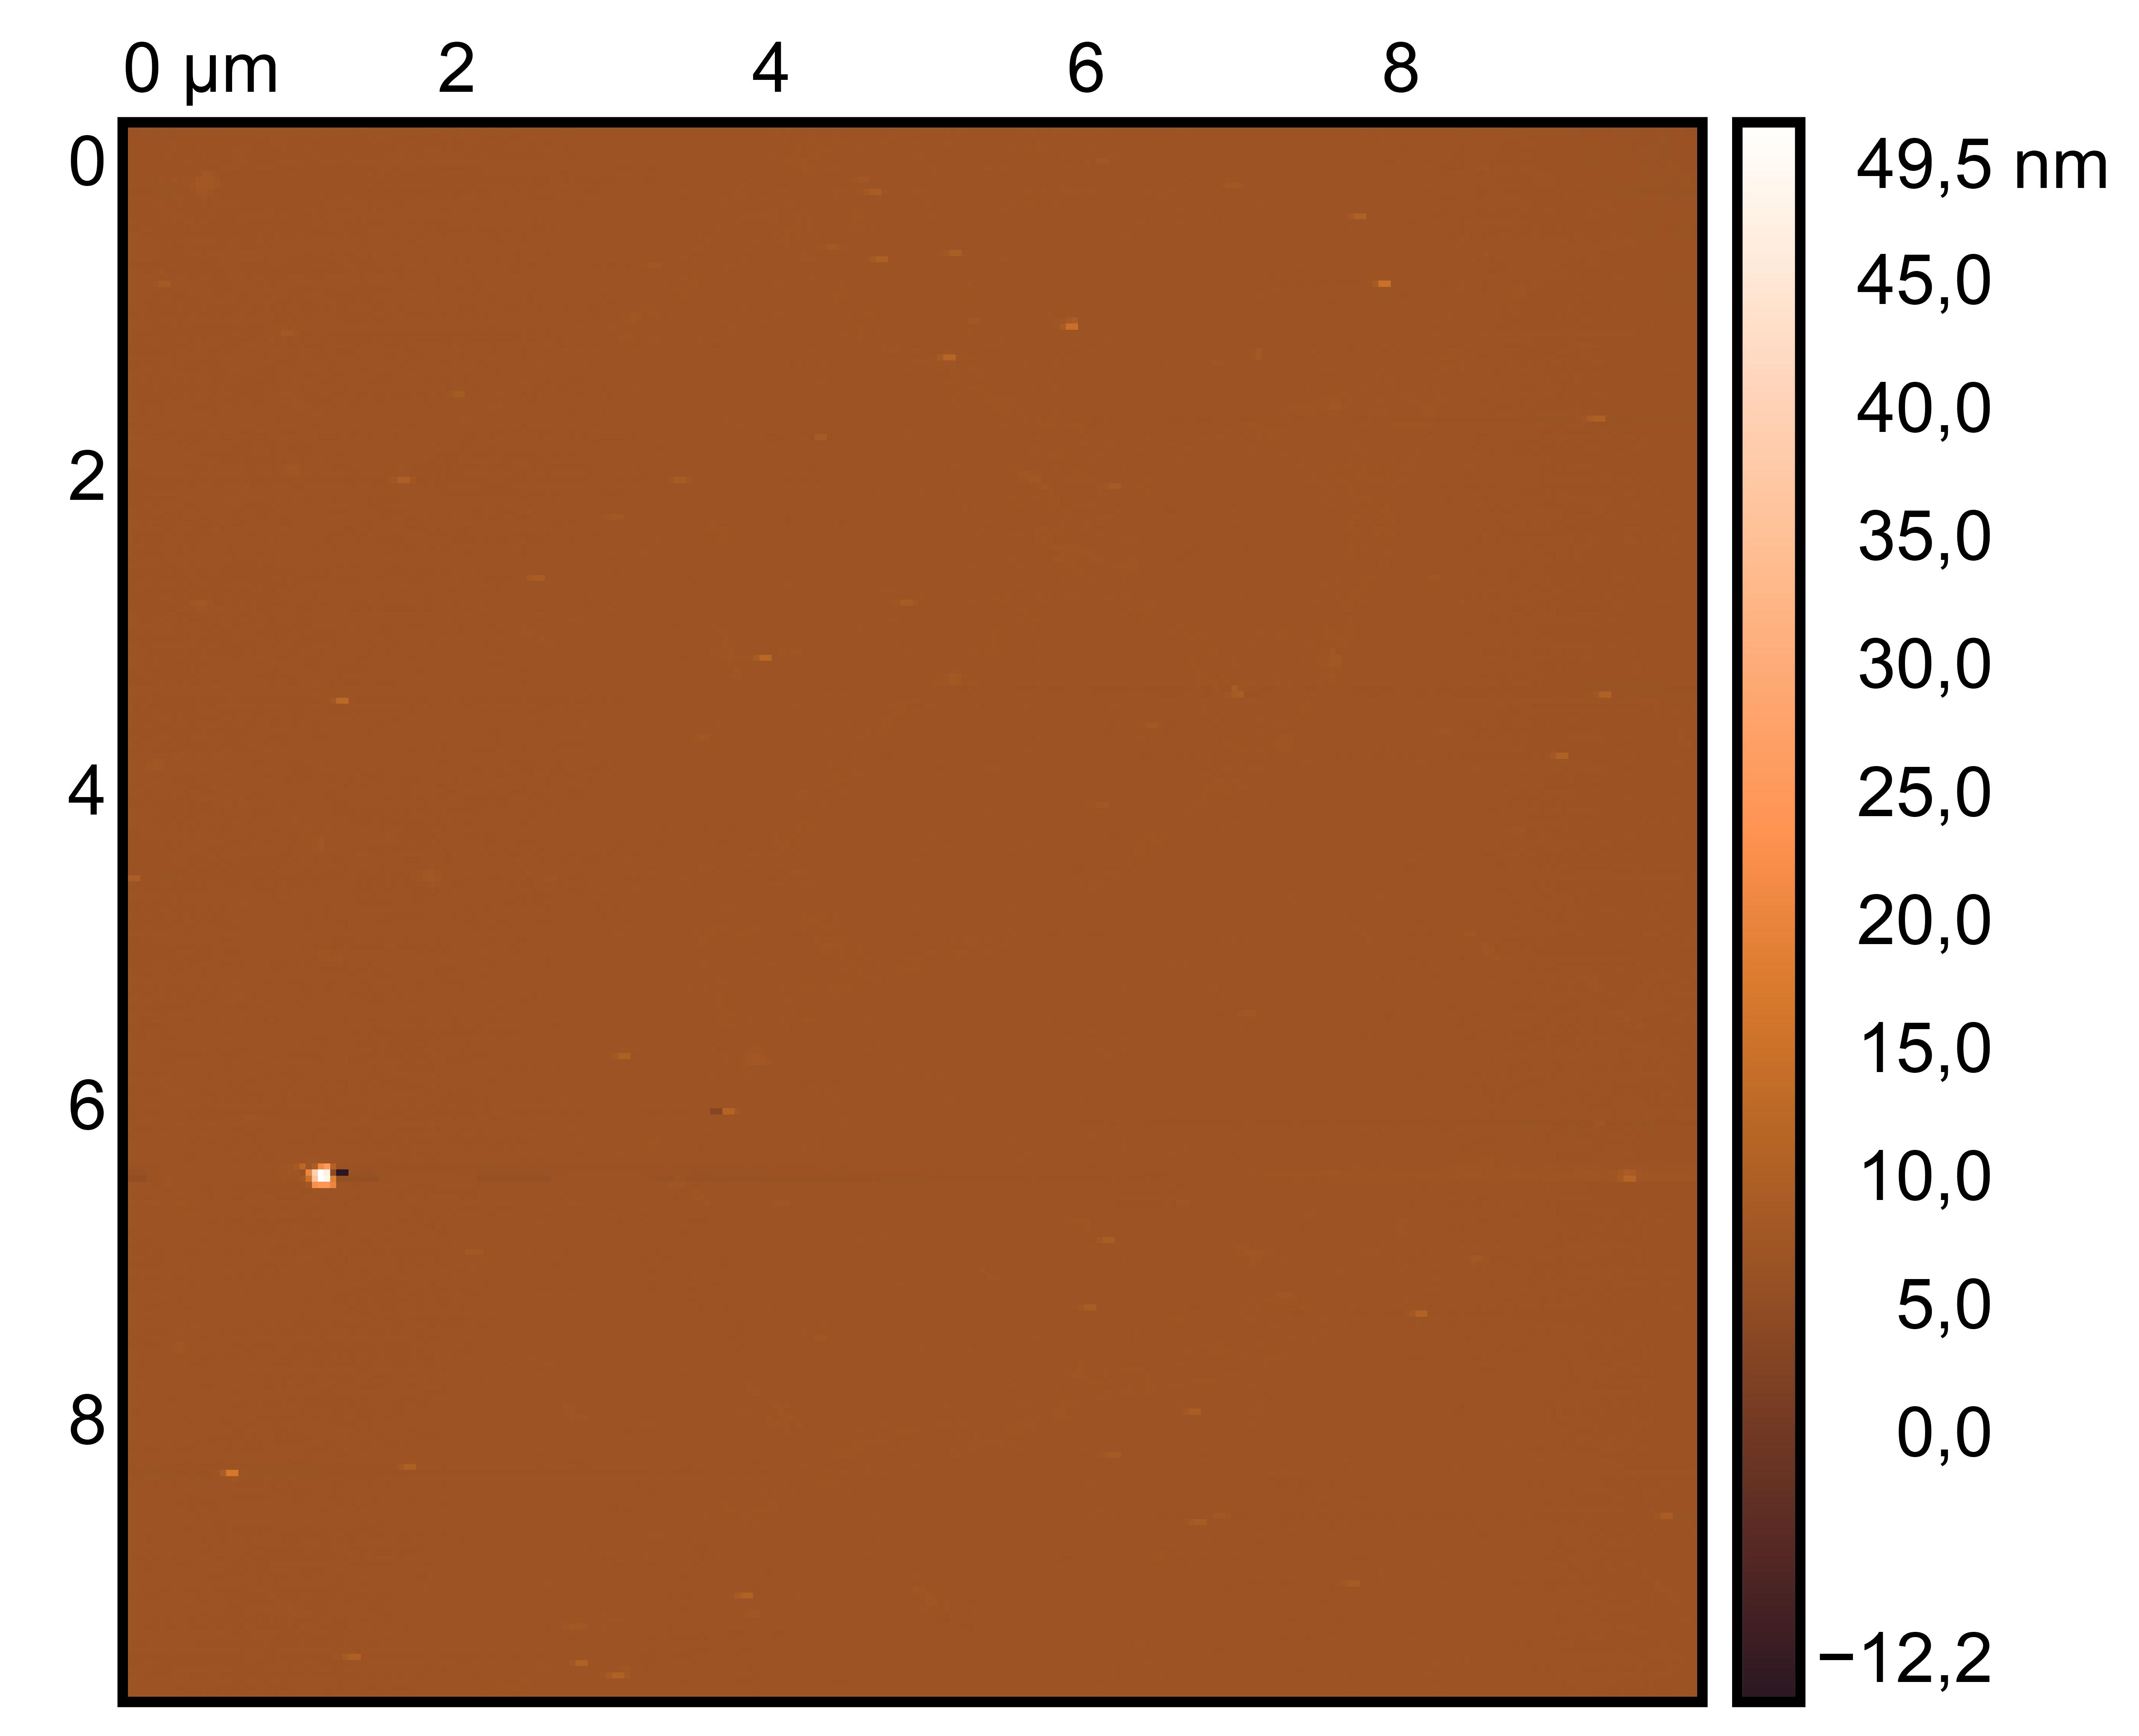
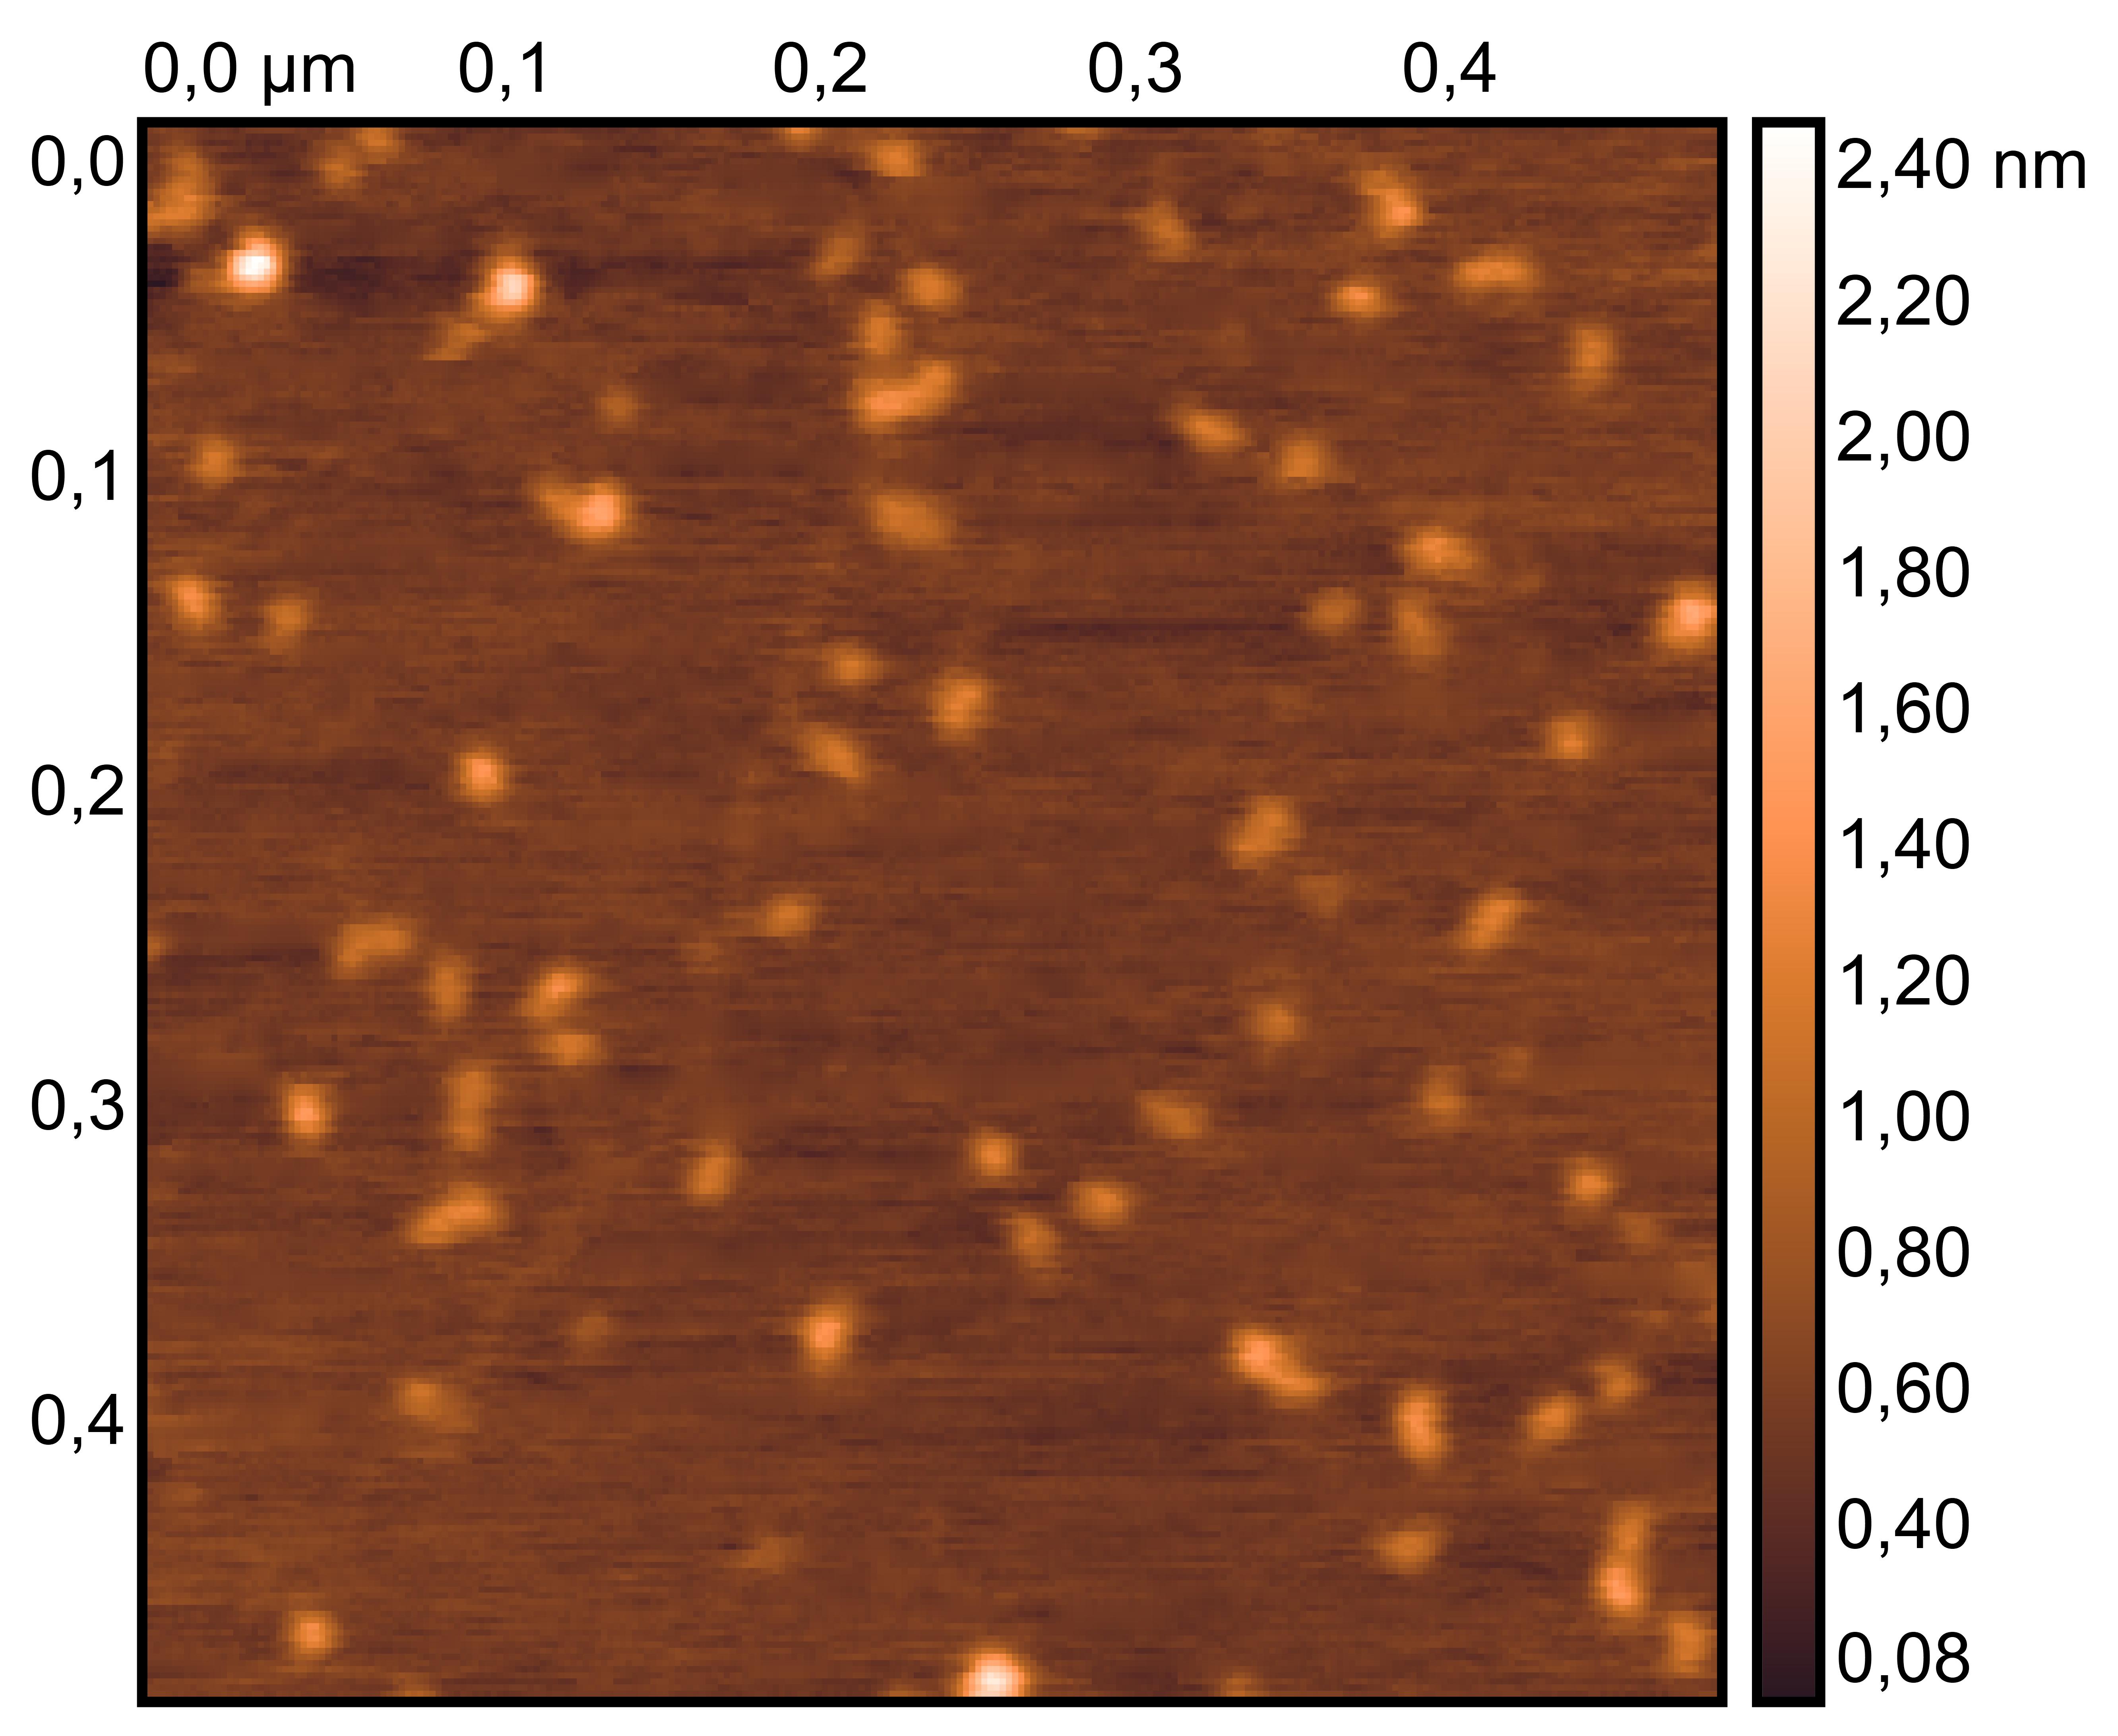
Treat 1 mica with 10 μM NiCl₂ for 3 minutes, rinse.
Drop 10 μL of (RDT + 125 mM K⁺), incubate for 5 minutes.
Wash gently 5 times, dry with nitrogen.
Scan under tapping mode in air.
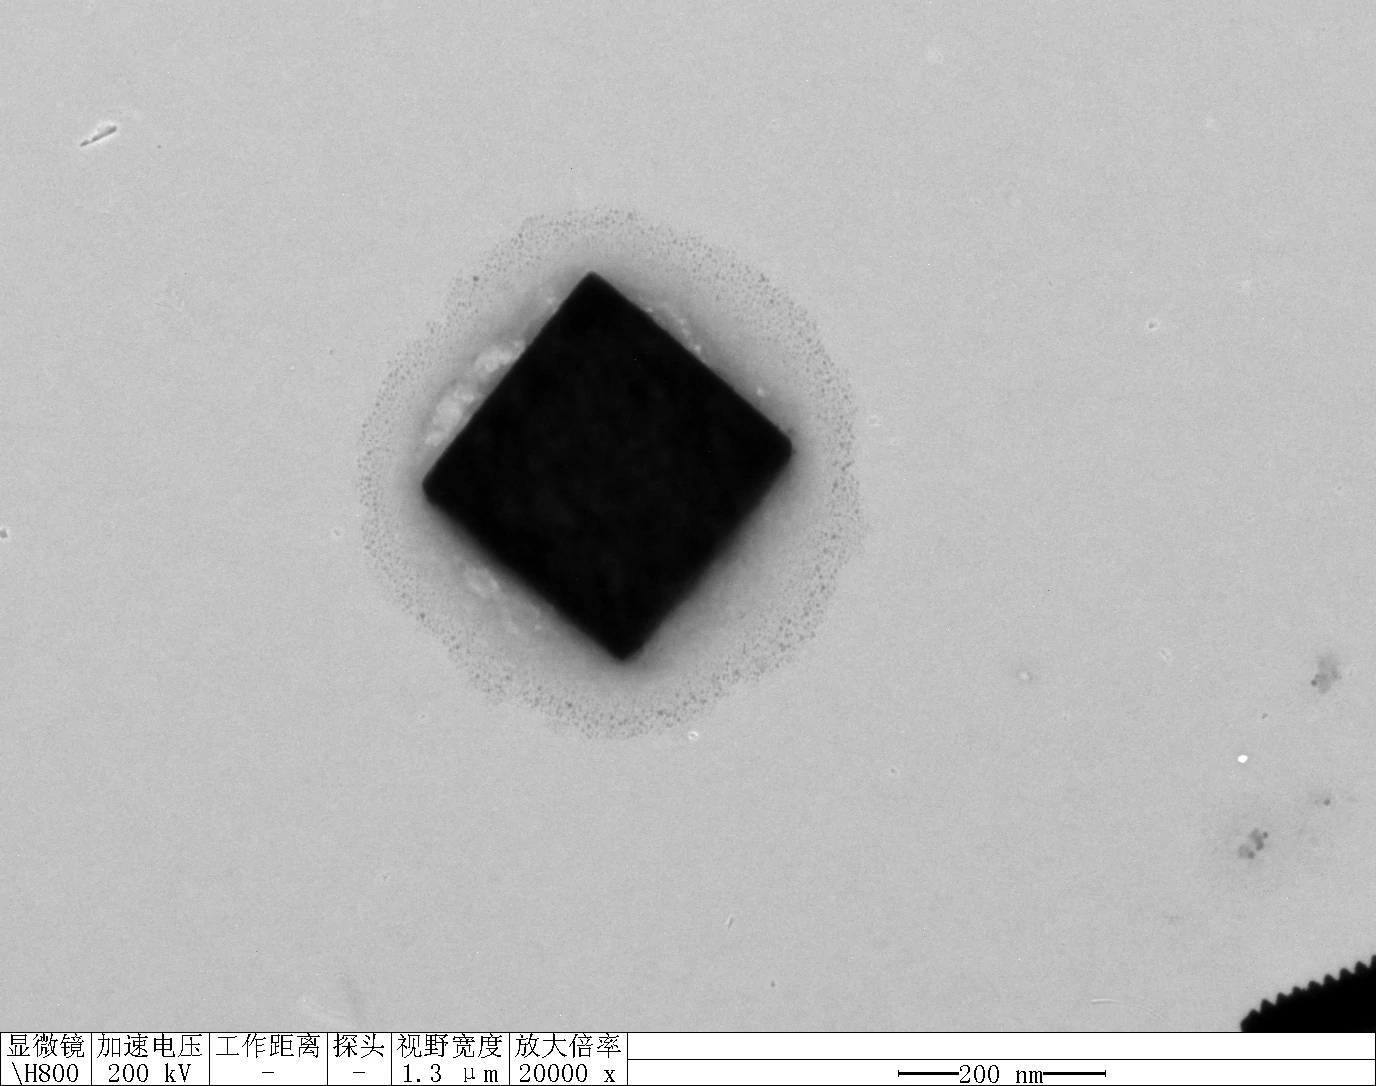
Clean 1 copper grid with plasma for 15 seconds.
Drop 1.5 μL of RDT+125 mM K⁺ onto the grid, allow adsorption for 2–5 minutes.
Remove excess liquid, air dry. Stain with 10 μL of 2% phosphotungstic acid solution for one minute, then wash off with water and dry again.
Observe under JEM-2100F (120 kV).
Prepare the gel with 0.75 g agarose, 25 mL 0.5 × TBE Buffer.
Mix the solutions (solvents) in 200 μL EP tubes according to the table below.
| Sample | 5×DNA Loading Buffer | ddH2O | |
|---|---|---|---|
| 1 | S1 3.1 μL | 2 μL | 4.9 μL |
| 2 | GS2 3.1 μL | 2 μL | 4.9 μL |
| 3 | TDN-strand1.2.3 3.1 μL | 2 μL | 4.9 μL |
| 4 | TDN 3.1 μL | 2 μL | 4.9 μL |
| 5 | TDN 3.1 μL | 2 μL | 4.9 μL |
| 6 | TDN 3.1 μL | 2 μL | 4.9 μL |
Add sample solutions of 10 μL each into the sample holes, according to the table below, Set the voltage to 80 V and run the electrophoresis for 70 min.
| Lane | 1 | 2 | 3 | 4 | 5 | 6 |
|---|---|---|---|---|---|---|
| Sample | S1 3.1 μL | GS2 3.1 μL | TDN-strand1.2.3 3.1 μL | TDN 3.1 μL | TDN 3.1 μL | TDN 3.1 μL |
Obtain the electrophoretogram.
Prepare the gel with 0.125 g agarose, 25 mL 0.5 × TBE Buffer.
Mix the solutions (solvents) in 200 μL EP tubes according to the table below.
| Sample | 5×DNA Loading Buffer | ddH2O | |
|---|---|---|---|
| 1 | Two-face ligation band 3.1 μL | 2 μL | 4.9 μL |
| 2 | Two-face ligation band 3.1 μL | 2 μL | 4.9 μL |
| 3 | A+B+C 3.1 μL | 2 μL | 4.9 μL |
| 4 | RDT 3.1 μL | 2 μL | 4.9 μL |
| 5 | Marker(50-1031 bp) 6 μL | 2 μL | 2 μL |
Add sample solutions of 10 μL each into the sample holes, according to the table below, Set the voltage to 80 V and run the electrophoresis for 70 min.
| Lane | 1 | 2 | 3 | 4 | 5 |
|---|---|---|---|---|---|
| Sample | Two-face ligation band 3.1 μL | Two-face ligation band 3.1 μL | A+B+C 3.1 μL | RDT 3.1 μL | Marker(50-1031 bp) 6 μL |
Obtain the electrophoretogram.
| Face A | Face B | Face C | Face D | |
|---|---|---|---|---|
| X1-strand(10 μM) | 2 μL | 2 μL | 2 μL | 2 μL |
| X2-strand(10 μM) | 2 μL | 2 μL | 2 μL | 2 μL |
| X3-strand(10 μM) | 2 μL | 2 μL | 2 μL | 2 μL |
| dd H2O | 3 μL | 3 μL | 3 μL | 3 μL |
| 10 × T4 Buffer | 1 μL | 1 μL | 1 μL | 1 μL |
Follow the table to prepare the solution mixture
Heat to 90 °C for 5 min; slowly cool to 4 °C over 6 h.
Store at 4 °C.
Prepare the gel with 0.75 g agarose, 25 mL 0.5 × TBE Buffer.
Mix the solutions (solvents) in 200 μL EP tubes according to the table below.
| Sample | 5×DNA Loading Buffer | ddH2O | |
|---|---|---|---|
| 1 | Face A 3.1 μL | 2 μL | 4.9 μL |
| 2 | Face B 3.1 μL | 2 μL | 4.9 μL |
| 3 | Face C 3.1 μL | 2 μL | 4.9 μL |
| 4 | Face D 3.1 μL | 2 μL | 4.9 μL |
| 5 | Strand C1 3.1 μL | 2 μL | 4.9 μL |
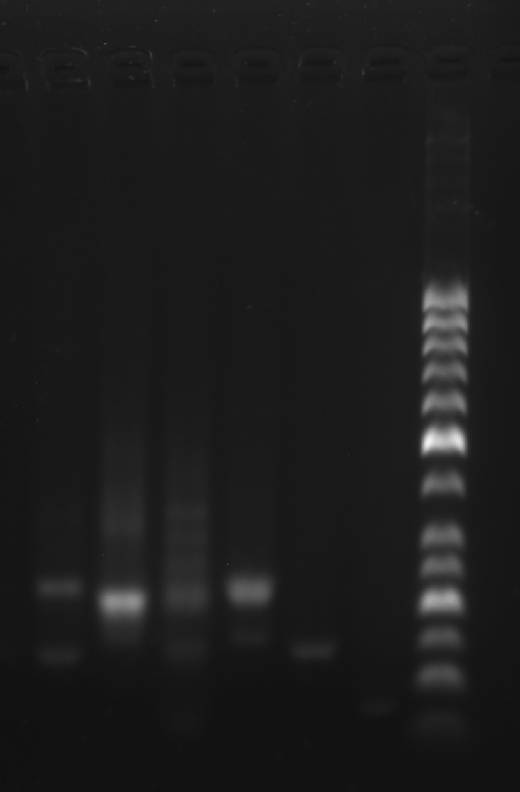
Add sample solutions of 10 μL each into the sample holes, according to the table below, Set the voltage to 80 V and run the electrophoresis for 70 min.
| Lane | 1 | 2 | 3 | 4 | 5 |
|---|---|---|---|---|---|
| Sample | Face A 3.1 μL | Face B 3.1 μL | Face C 3.1 μL | Face D 3.1 μL | Strand C1 3.1 μL |
Obtain the electrophoretogram.
Dilute the RDT solution with a 9-fold volume of 1× TE buffer.
Mix the 0.1 × RDT solution with an equal volume of 250 mM KCl solution and with an equal volume of 1000 mM KCl solution, respectively.
Incubate 24 hours at room temperature.
Proceed to AFM/TEM or DLS/CD measurements.
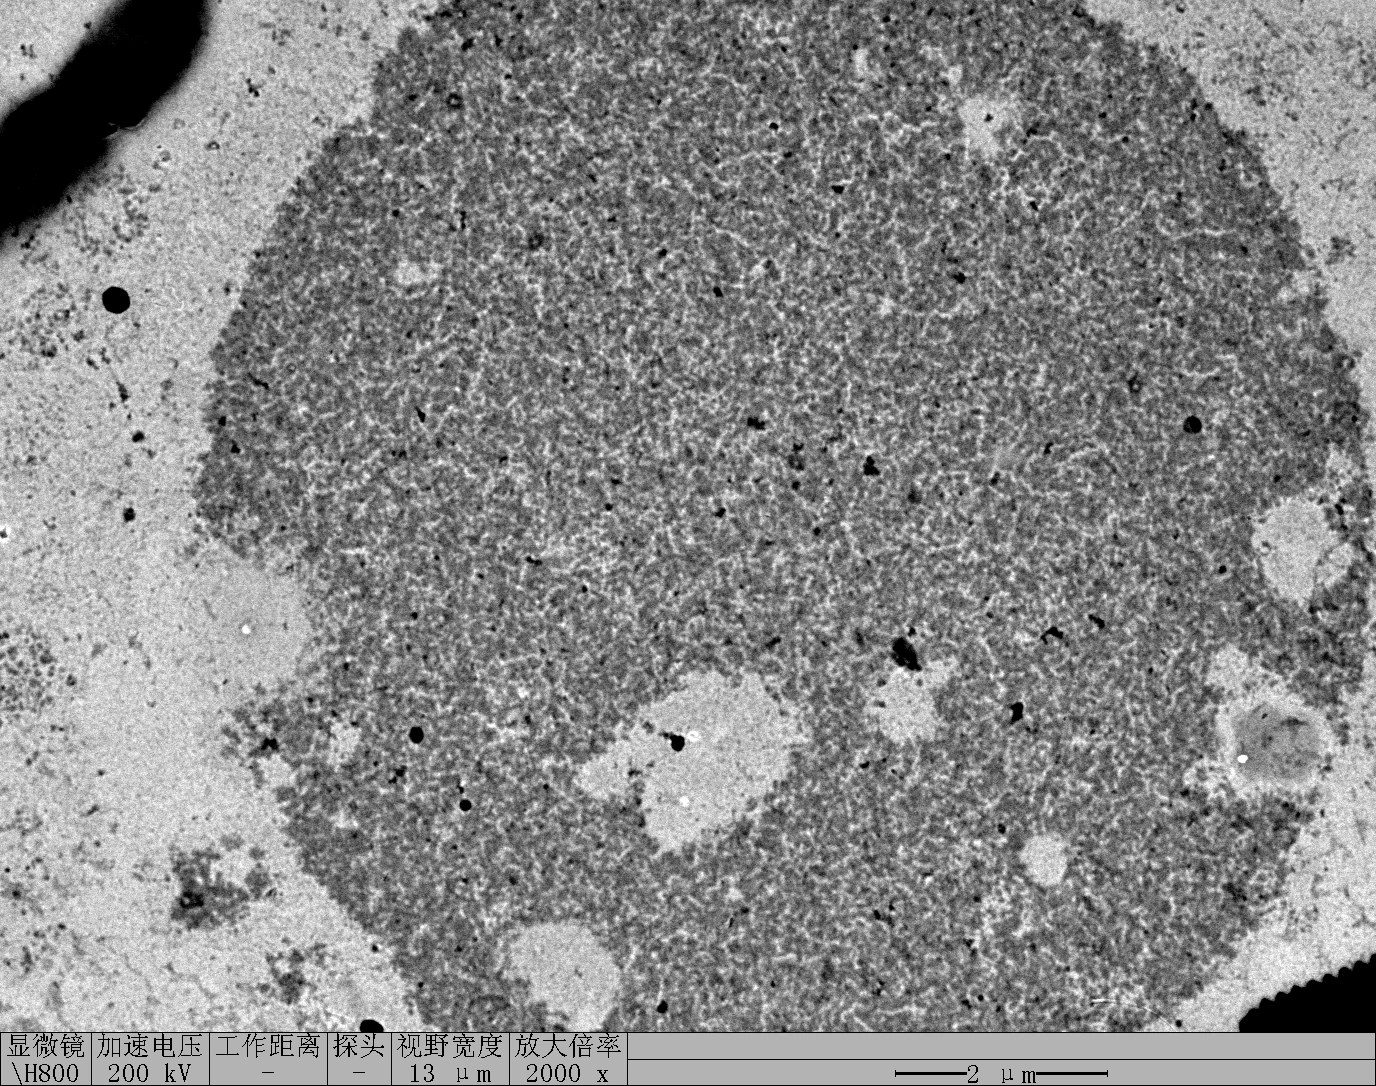
Clean 2 copper grids with plasma for 15 seconds.
Drop 1.5 μL of (0.1 × RDT + 125 mM K⁺, 0.1 × RDT + 500 mM K⁺ ) onto the different grids, allow adsorption for 2–5 minutes.
Remove excess liquid, air dry. Stain with 10 μL of 2% phosphotungstic acid solution for one minute, then wash off with water and dry again.
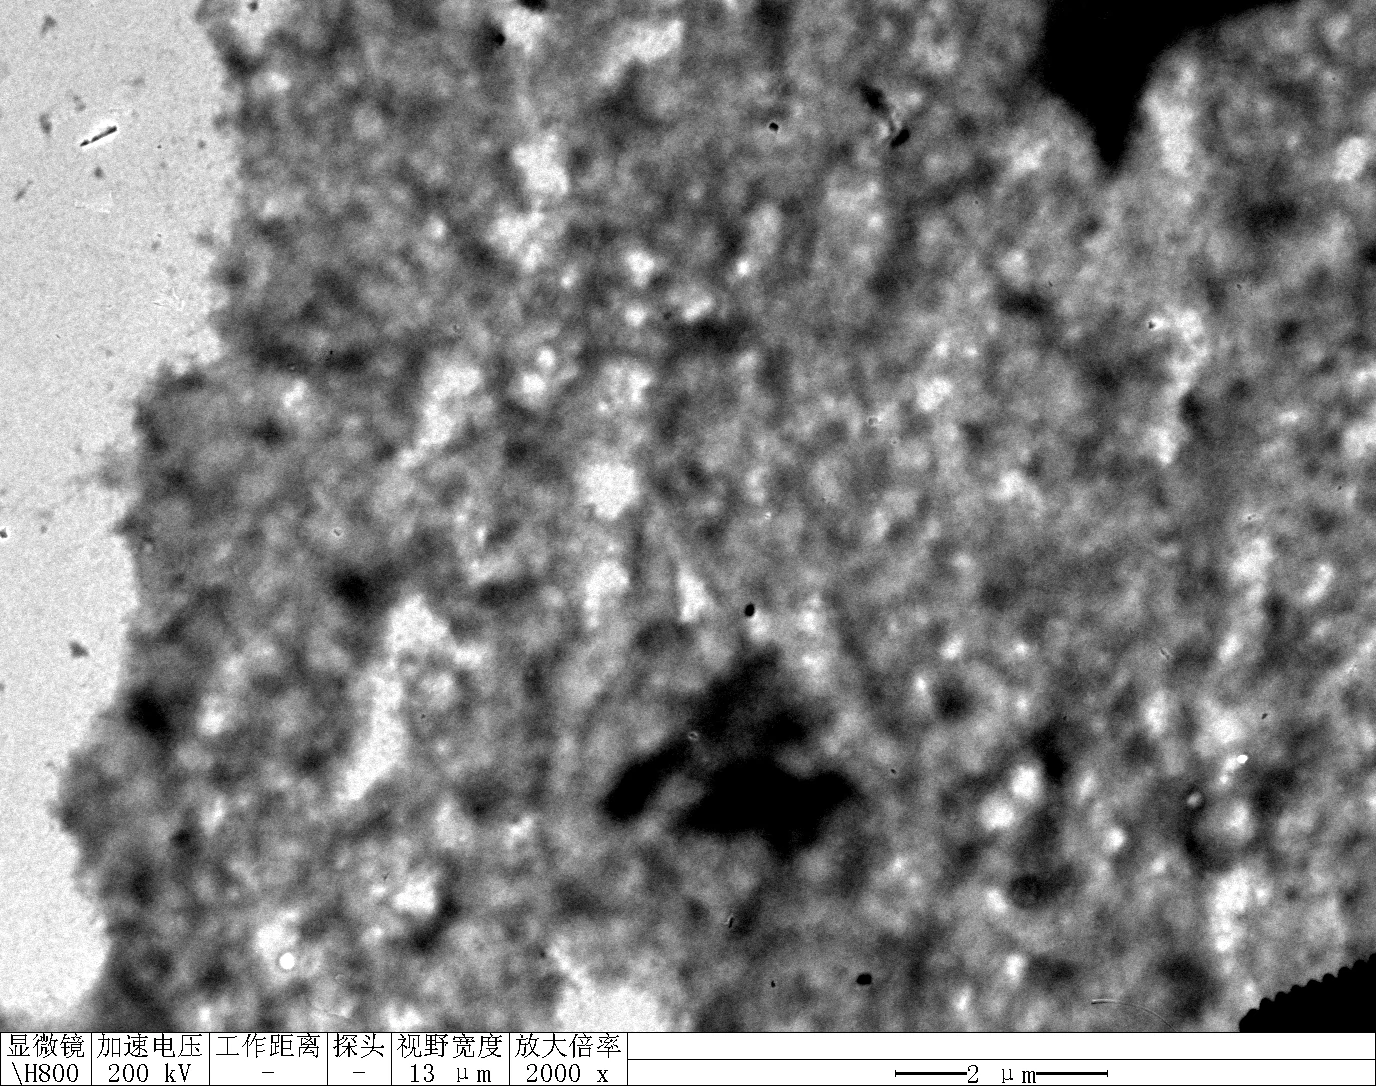
Observe under Hitachi H800 (200 kV).
0.1RDT + 125 mM K⁺
0.1 RDT + 500 mM K⁺
| Face A | Face B | Face C | Face D | |
|---|---|---|---|---|
| X1-strand(10 μM) | 2 μL | 2 μL | 2 μL | 2 μL |
| X2-strand(10 μM) | 2 μL | 2 μL | 2 μL | 2 μL |
| X3-strand(10 μM) | 2 μL | 2 μL | 2 μL | 2 μL |
| dd H2O | 3 μL | 3 μL | 3 μL | 3 μL |
| 10 × T4 Buffer | 1 μL | 1 μL | 1 μL | 1 μL |
Follow the table to prepare the solution mixture
Heat to 90 °C for 5 min; slowly cool to 4 °C over 6 h.
Store at 4 °C.
Mix equal volume S1 GS2 GS3 GS4 solution (10 μM each).
Heat to 90 °C for 5 min; slowly cool to 4 °C over 6 h.(In the same Thermal cycler with RDT Face Thermal Annealing)
Store at 4 °C.
5 μL of each face was mix together and store at room temperature for an hour.
Mix RDT solution with 200 mM KCl solution (1:1).
Incubate 24 hours at room temperature.
Mix TDN solution with 200 mM LiCl solution (1:1).
Incubate 24 hours at room temperature.
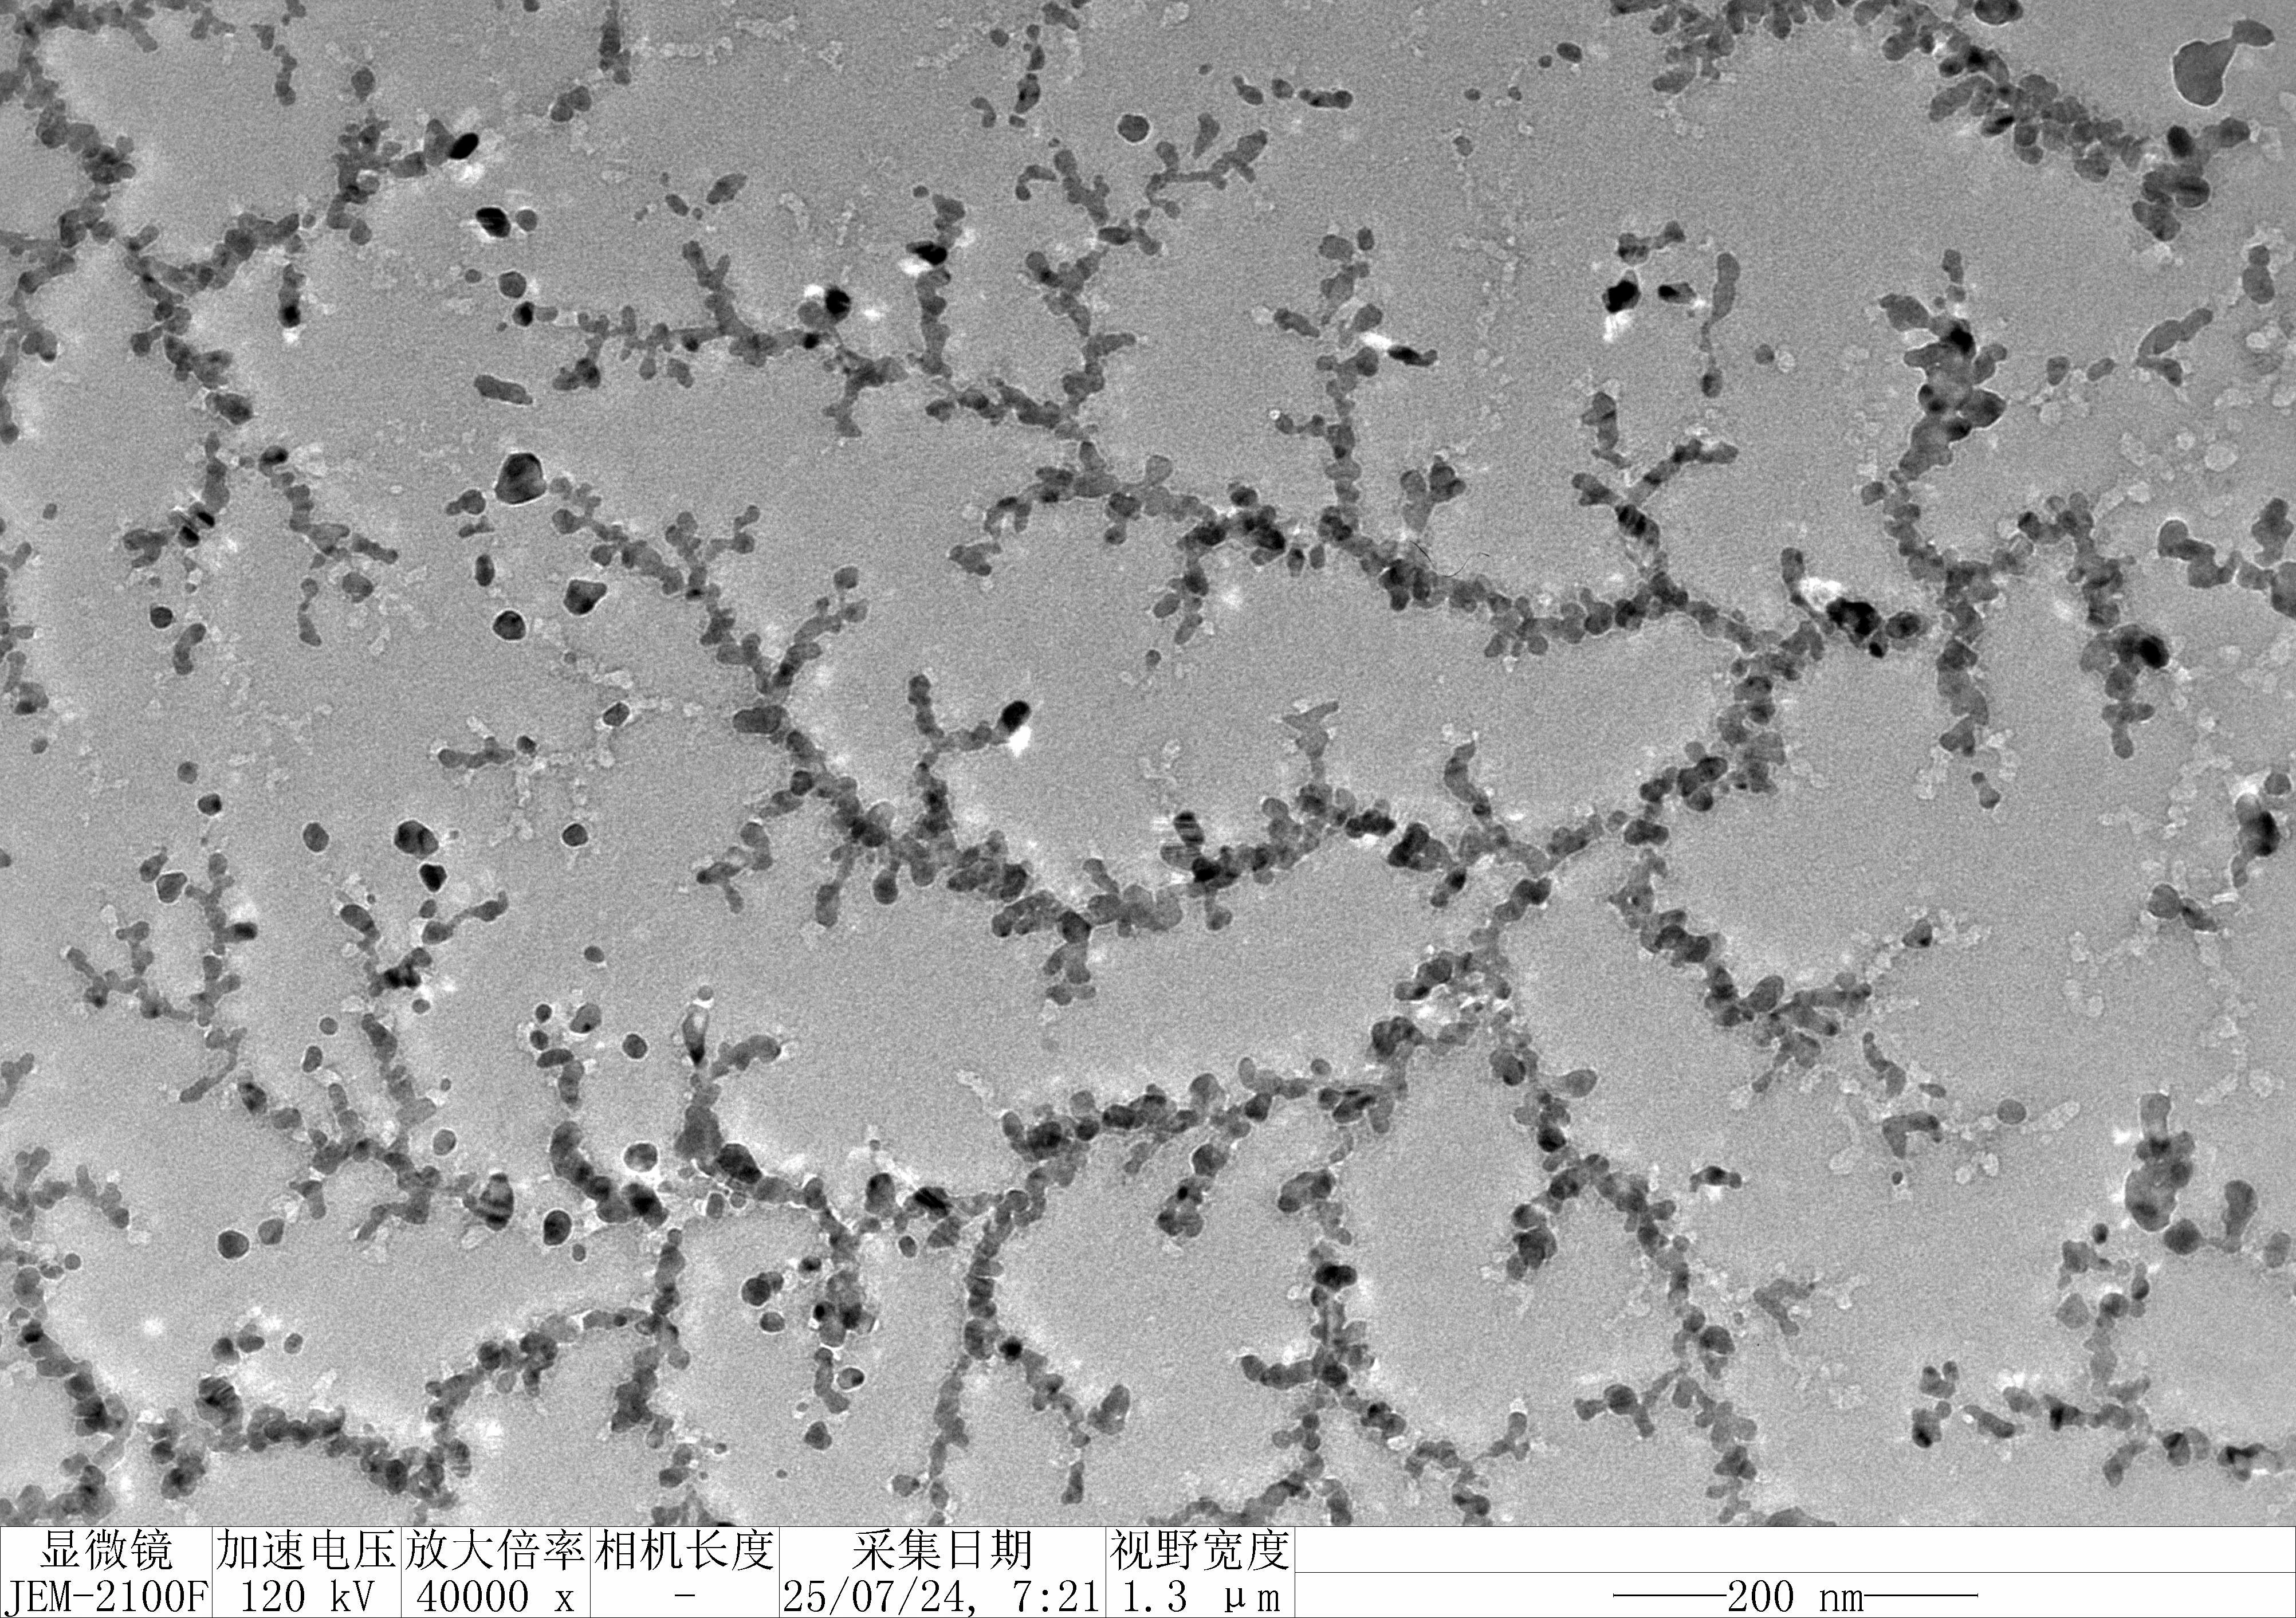
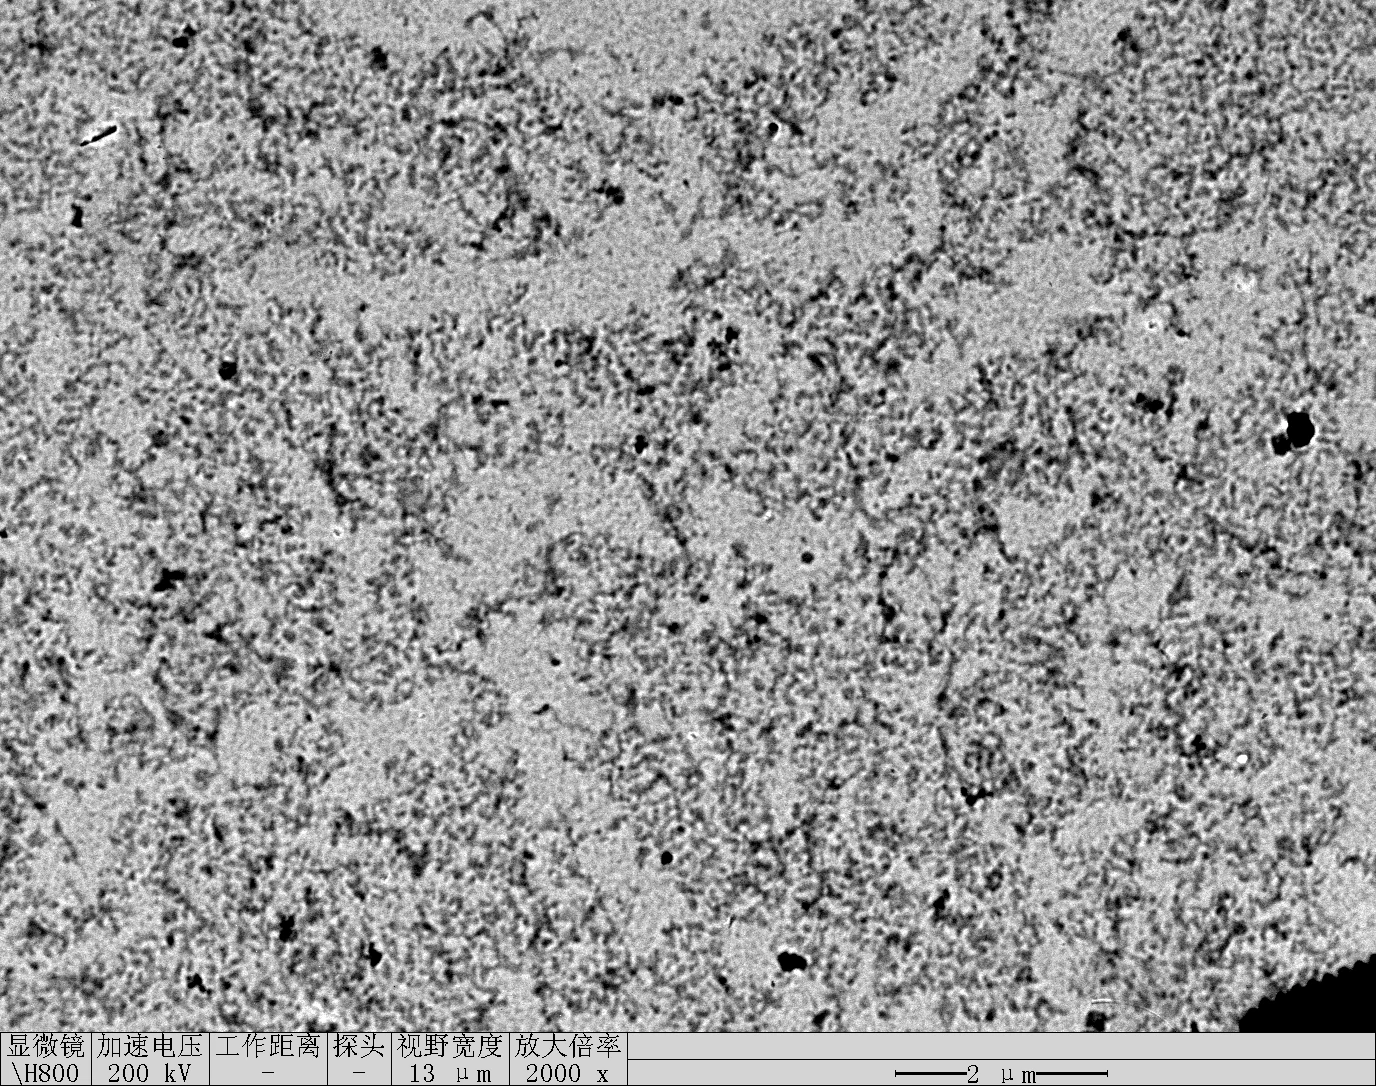
Clean 2 copper grids with plasma for 15 seconds.
Drop 1.5 μL of (RDT + 100 mM K⁺ , TDN + 100 mM Li⁺) onto the different grids, allow adsorption for 2–5 minutes.
Remove excess liquid, air dry. Stain with 10 μL of 2% phosphotungstic acid solution for one minute, then wash off with water and dry again.
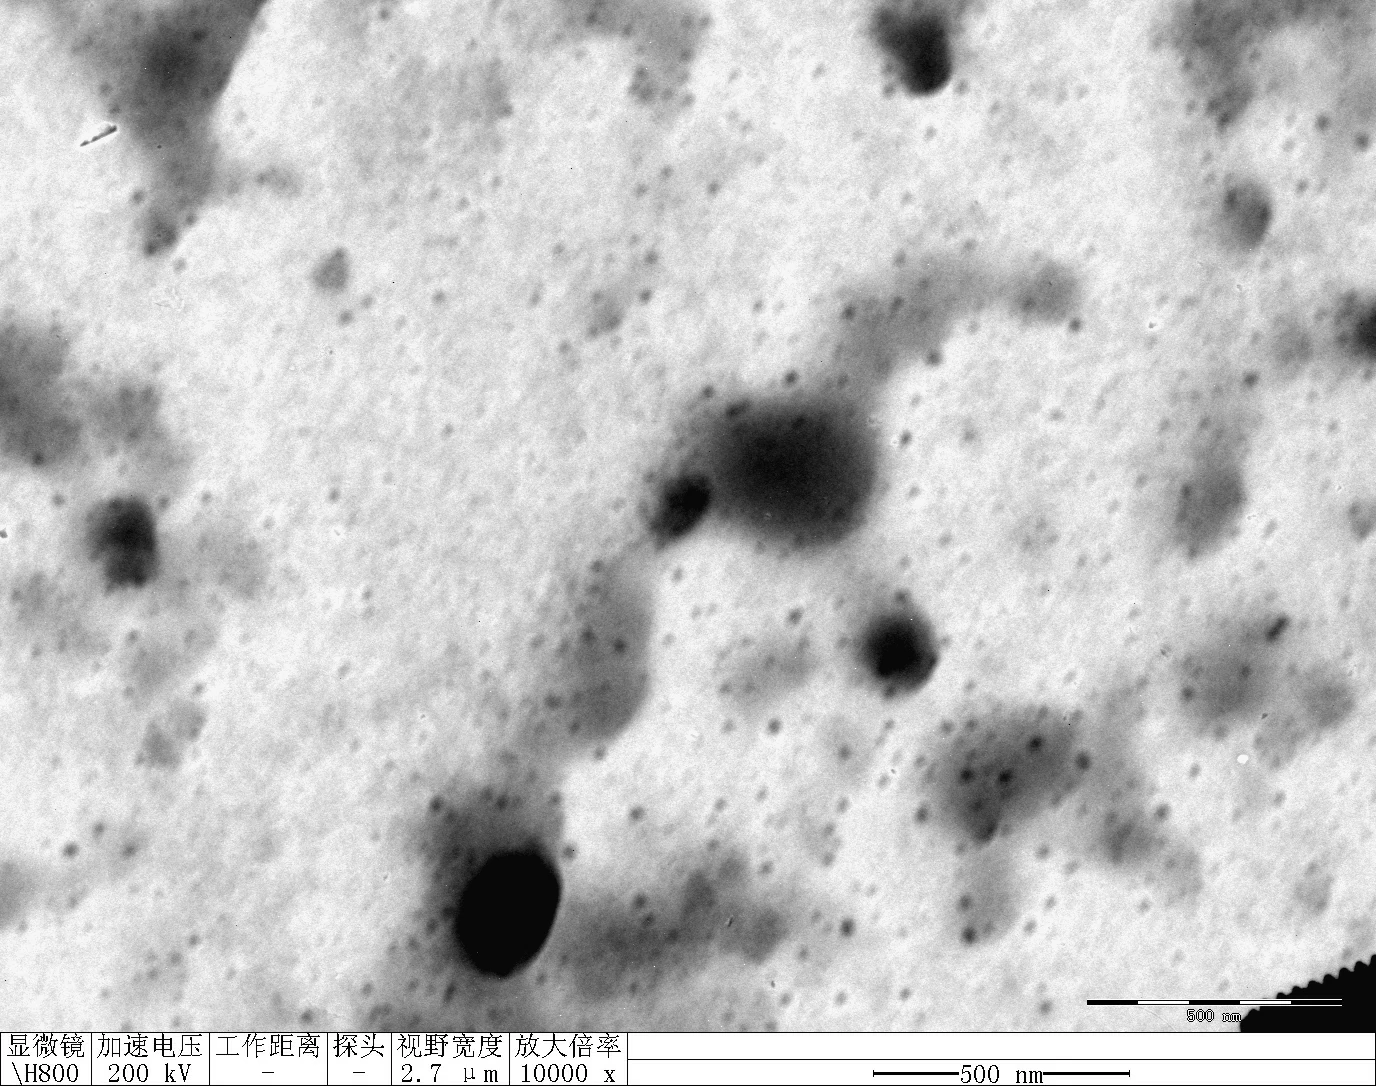
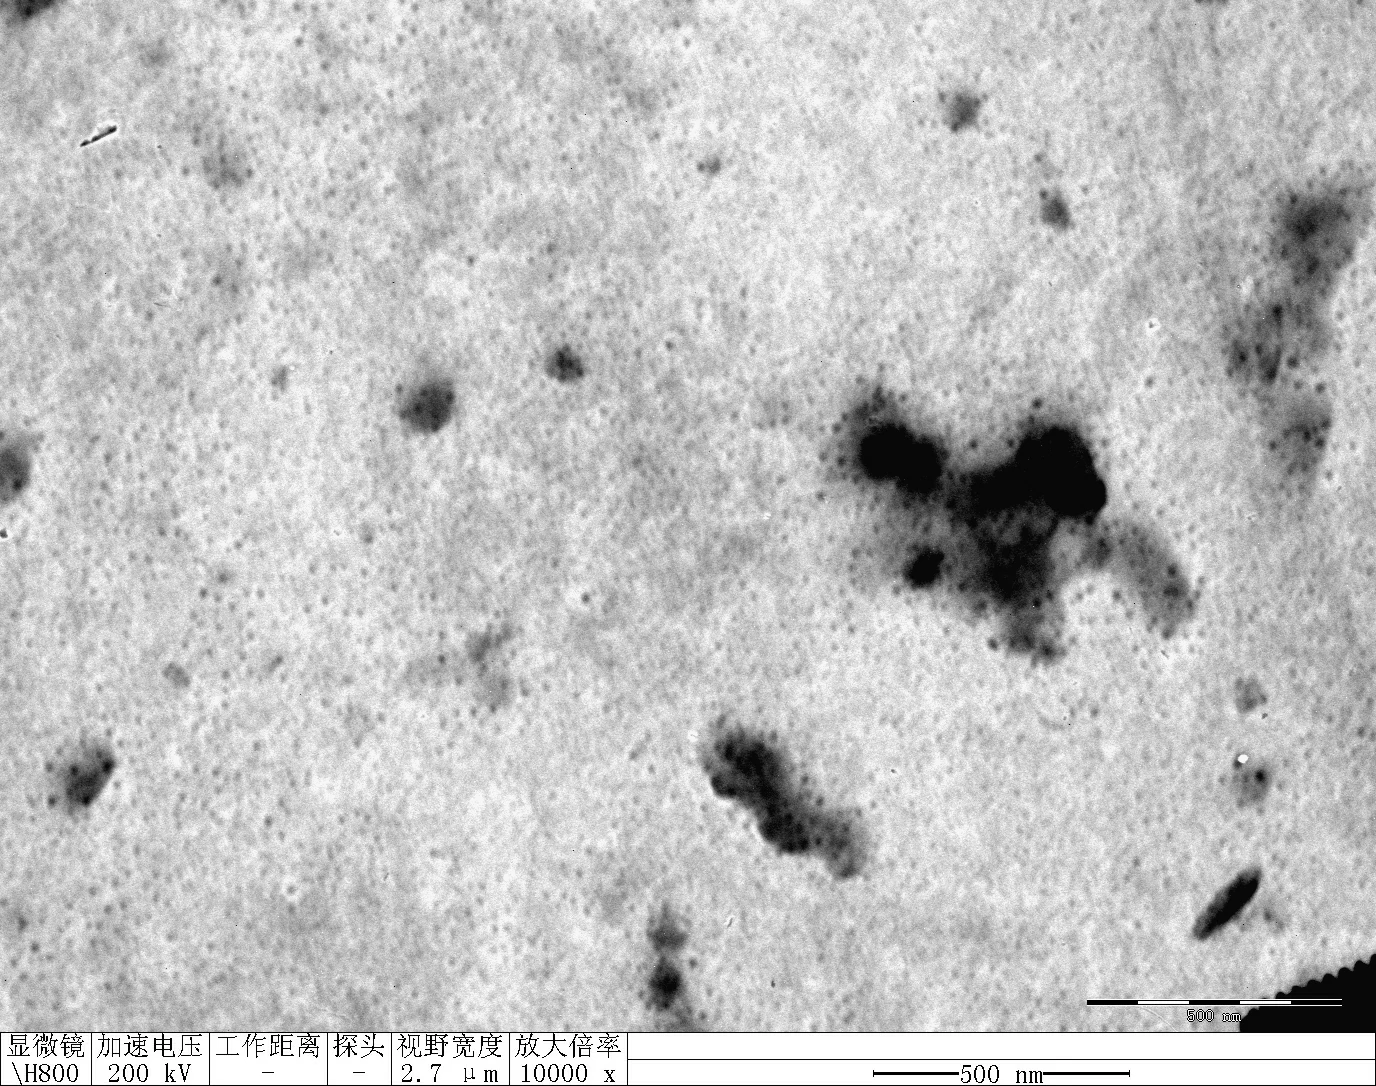
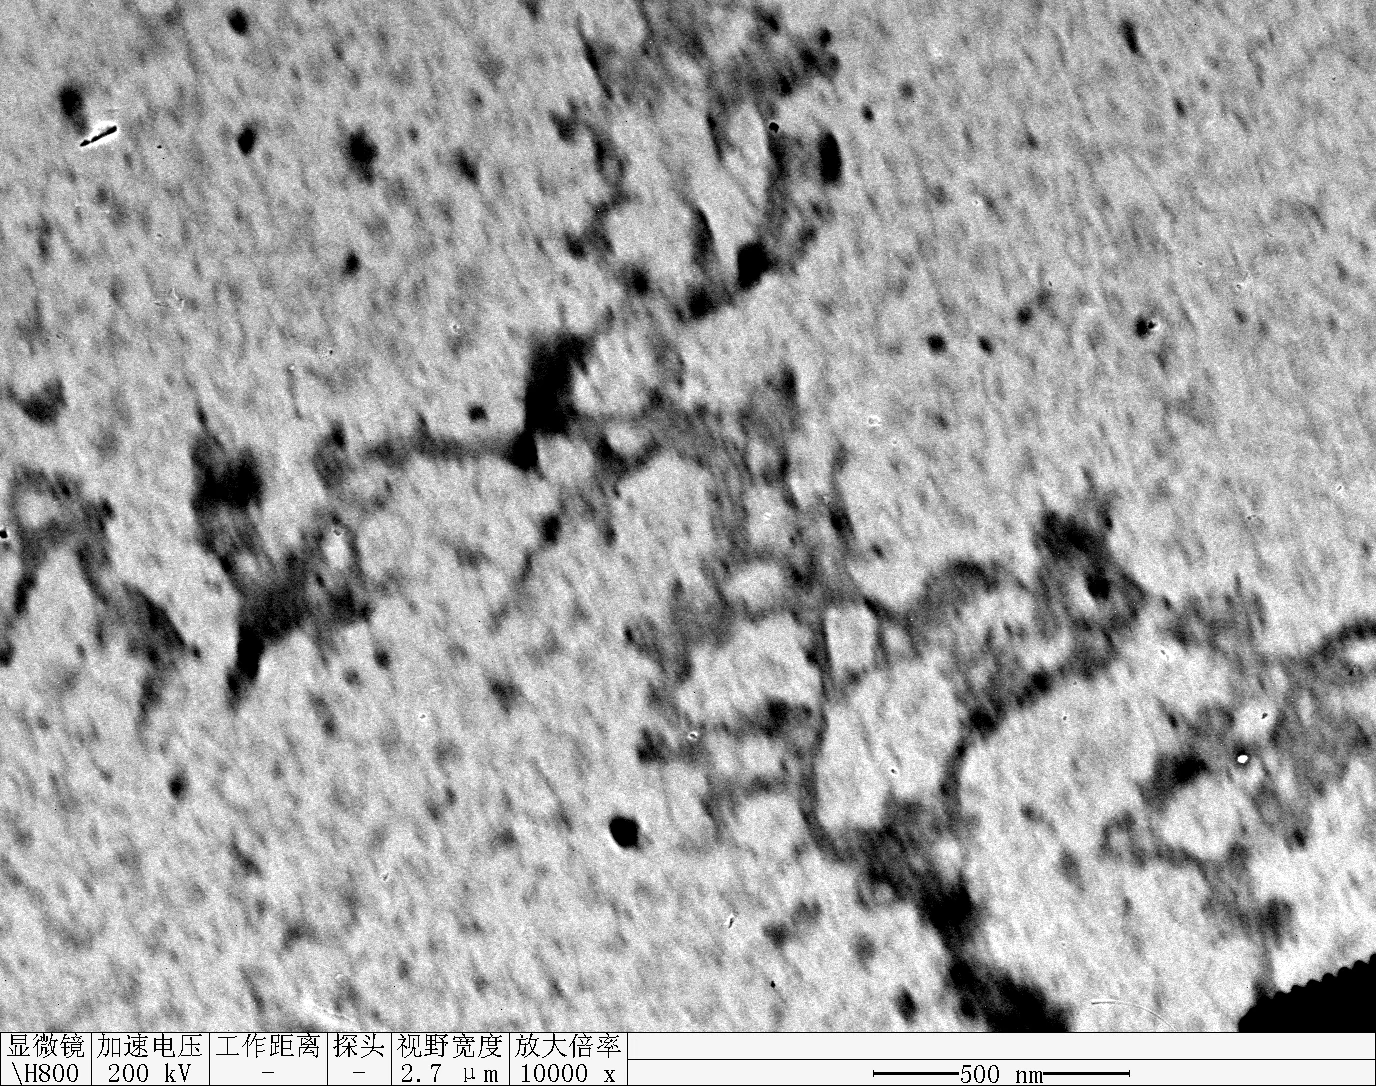
Observe under Hitachi H800 (200 kV).
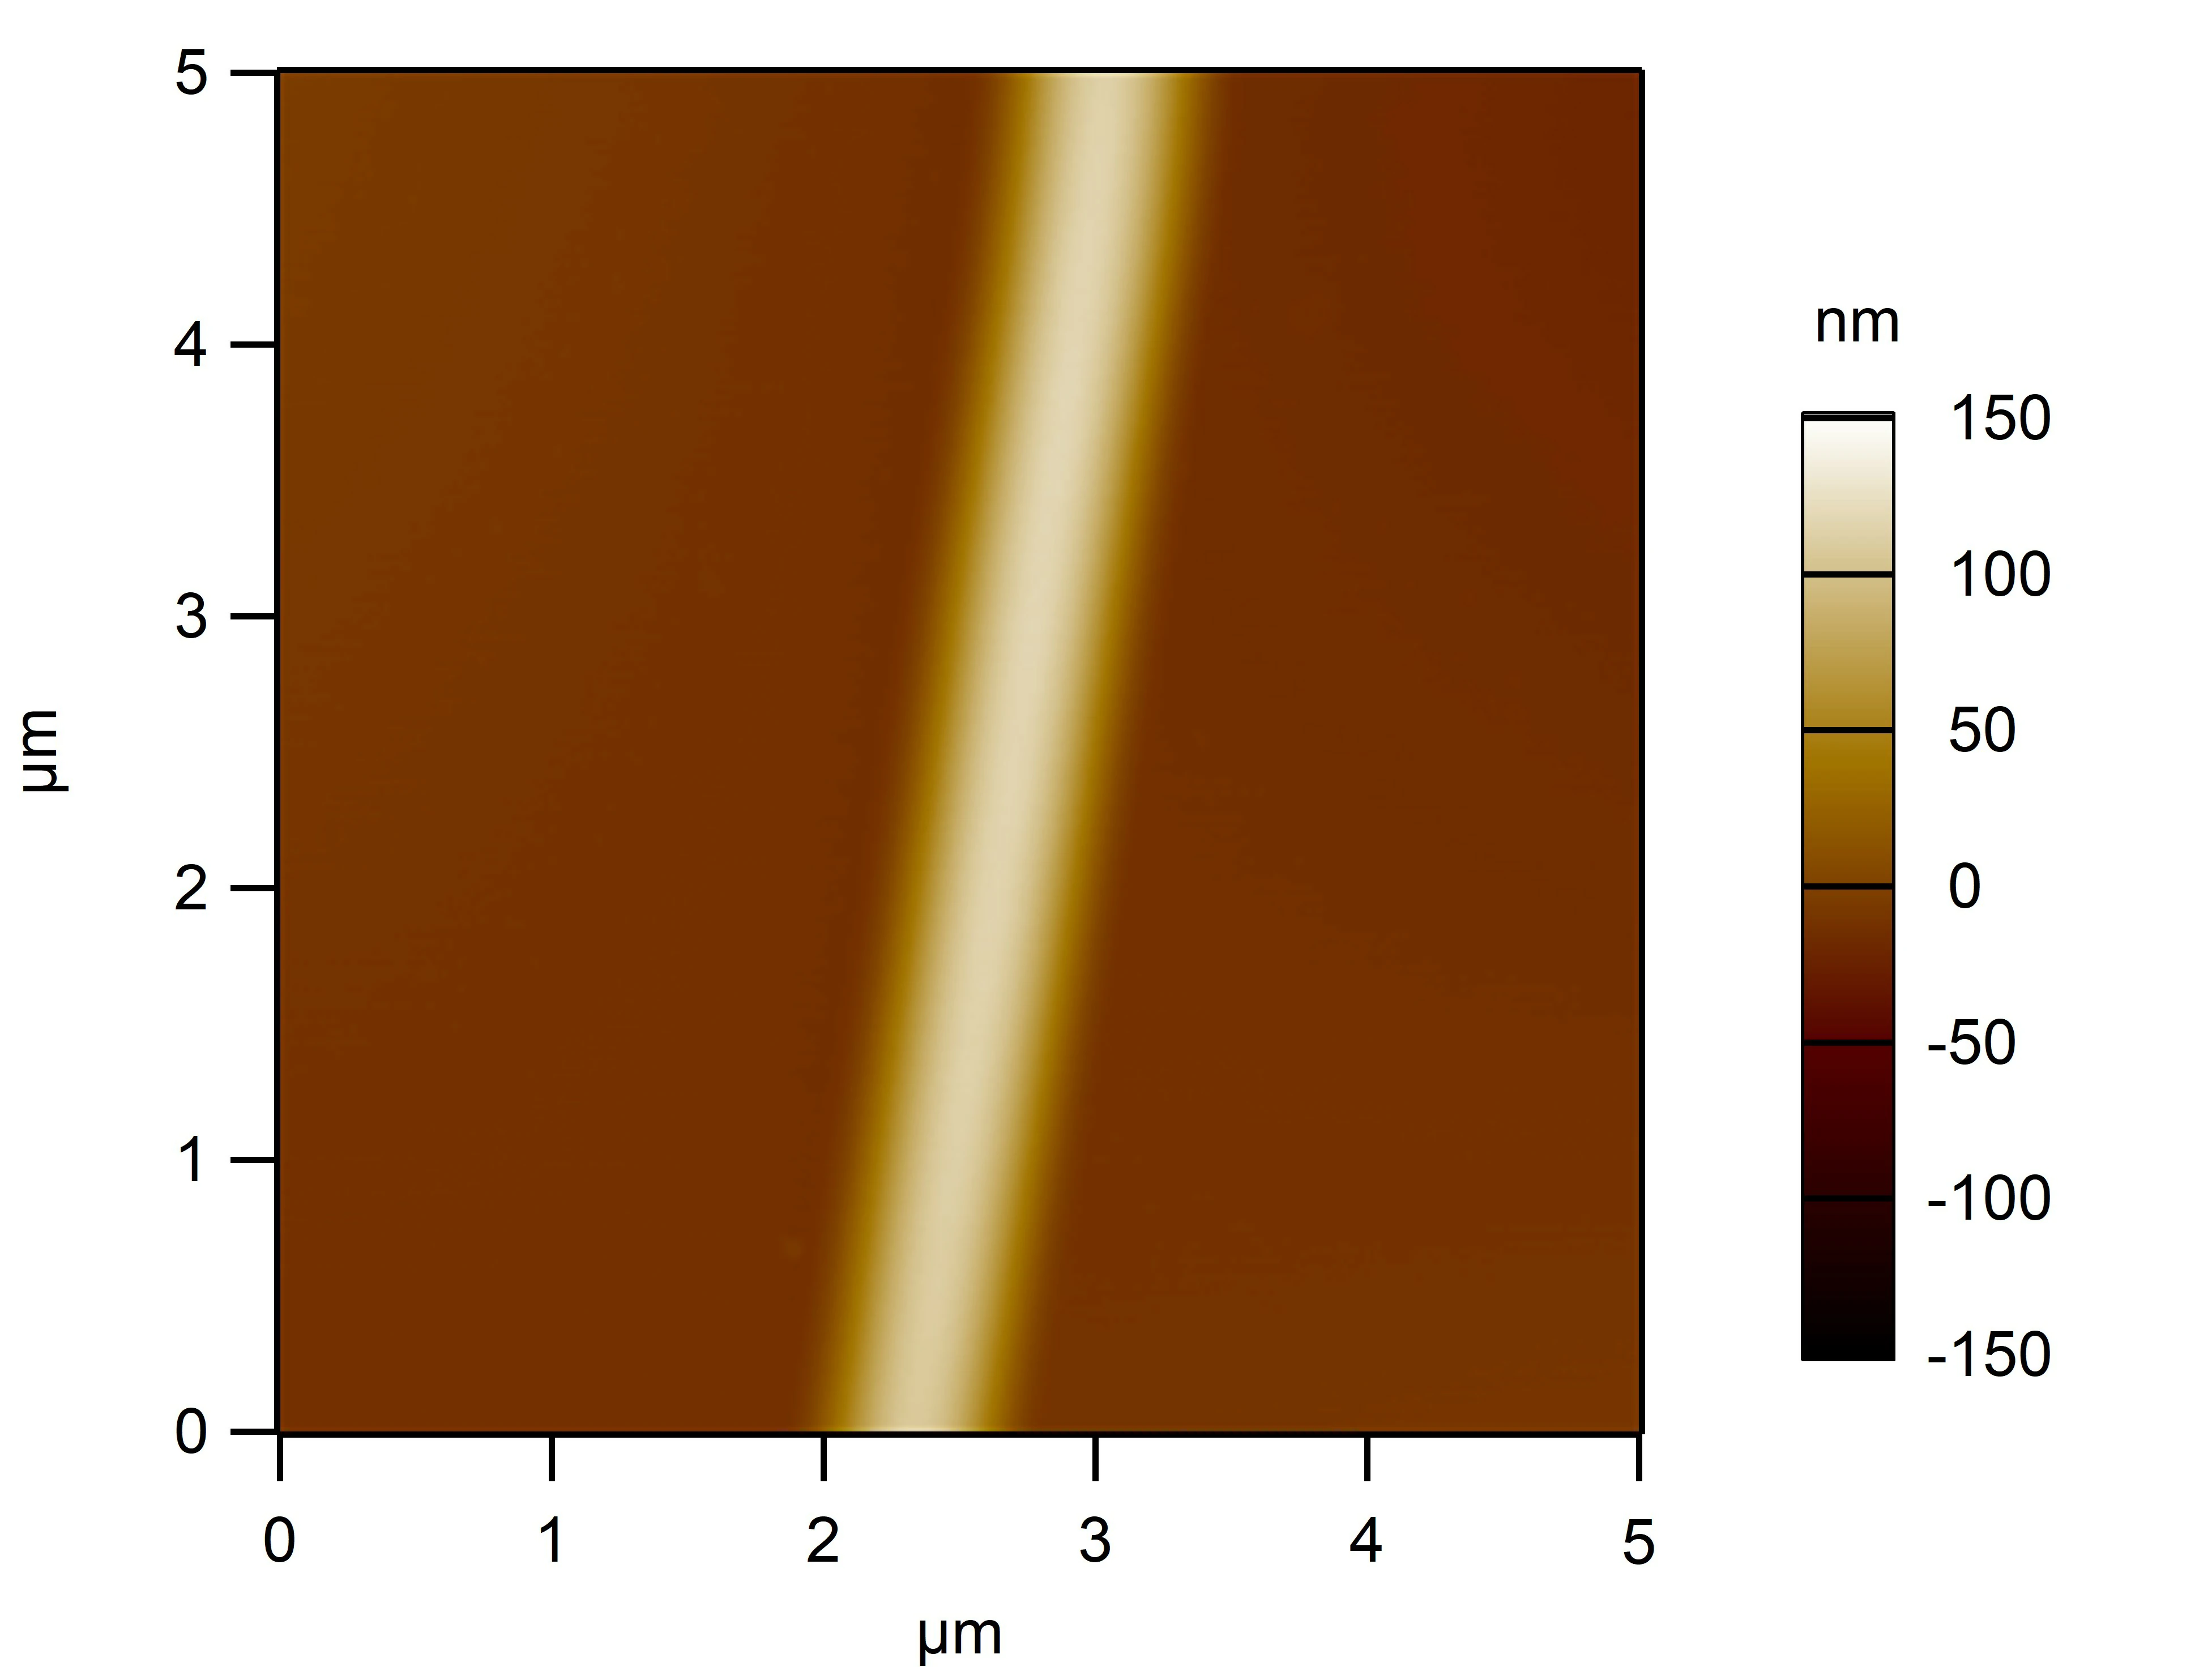
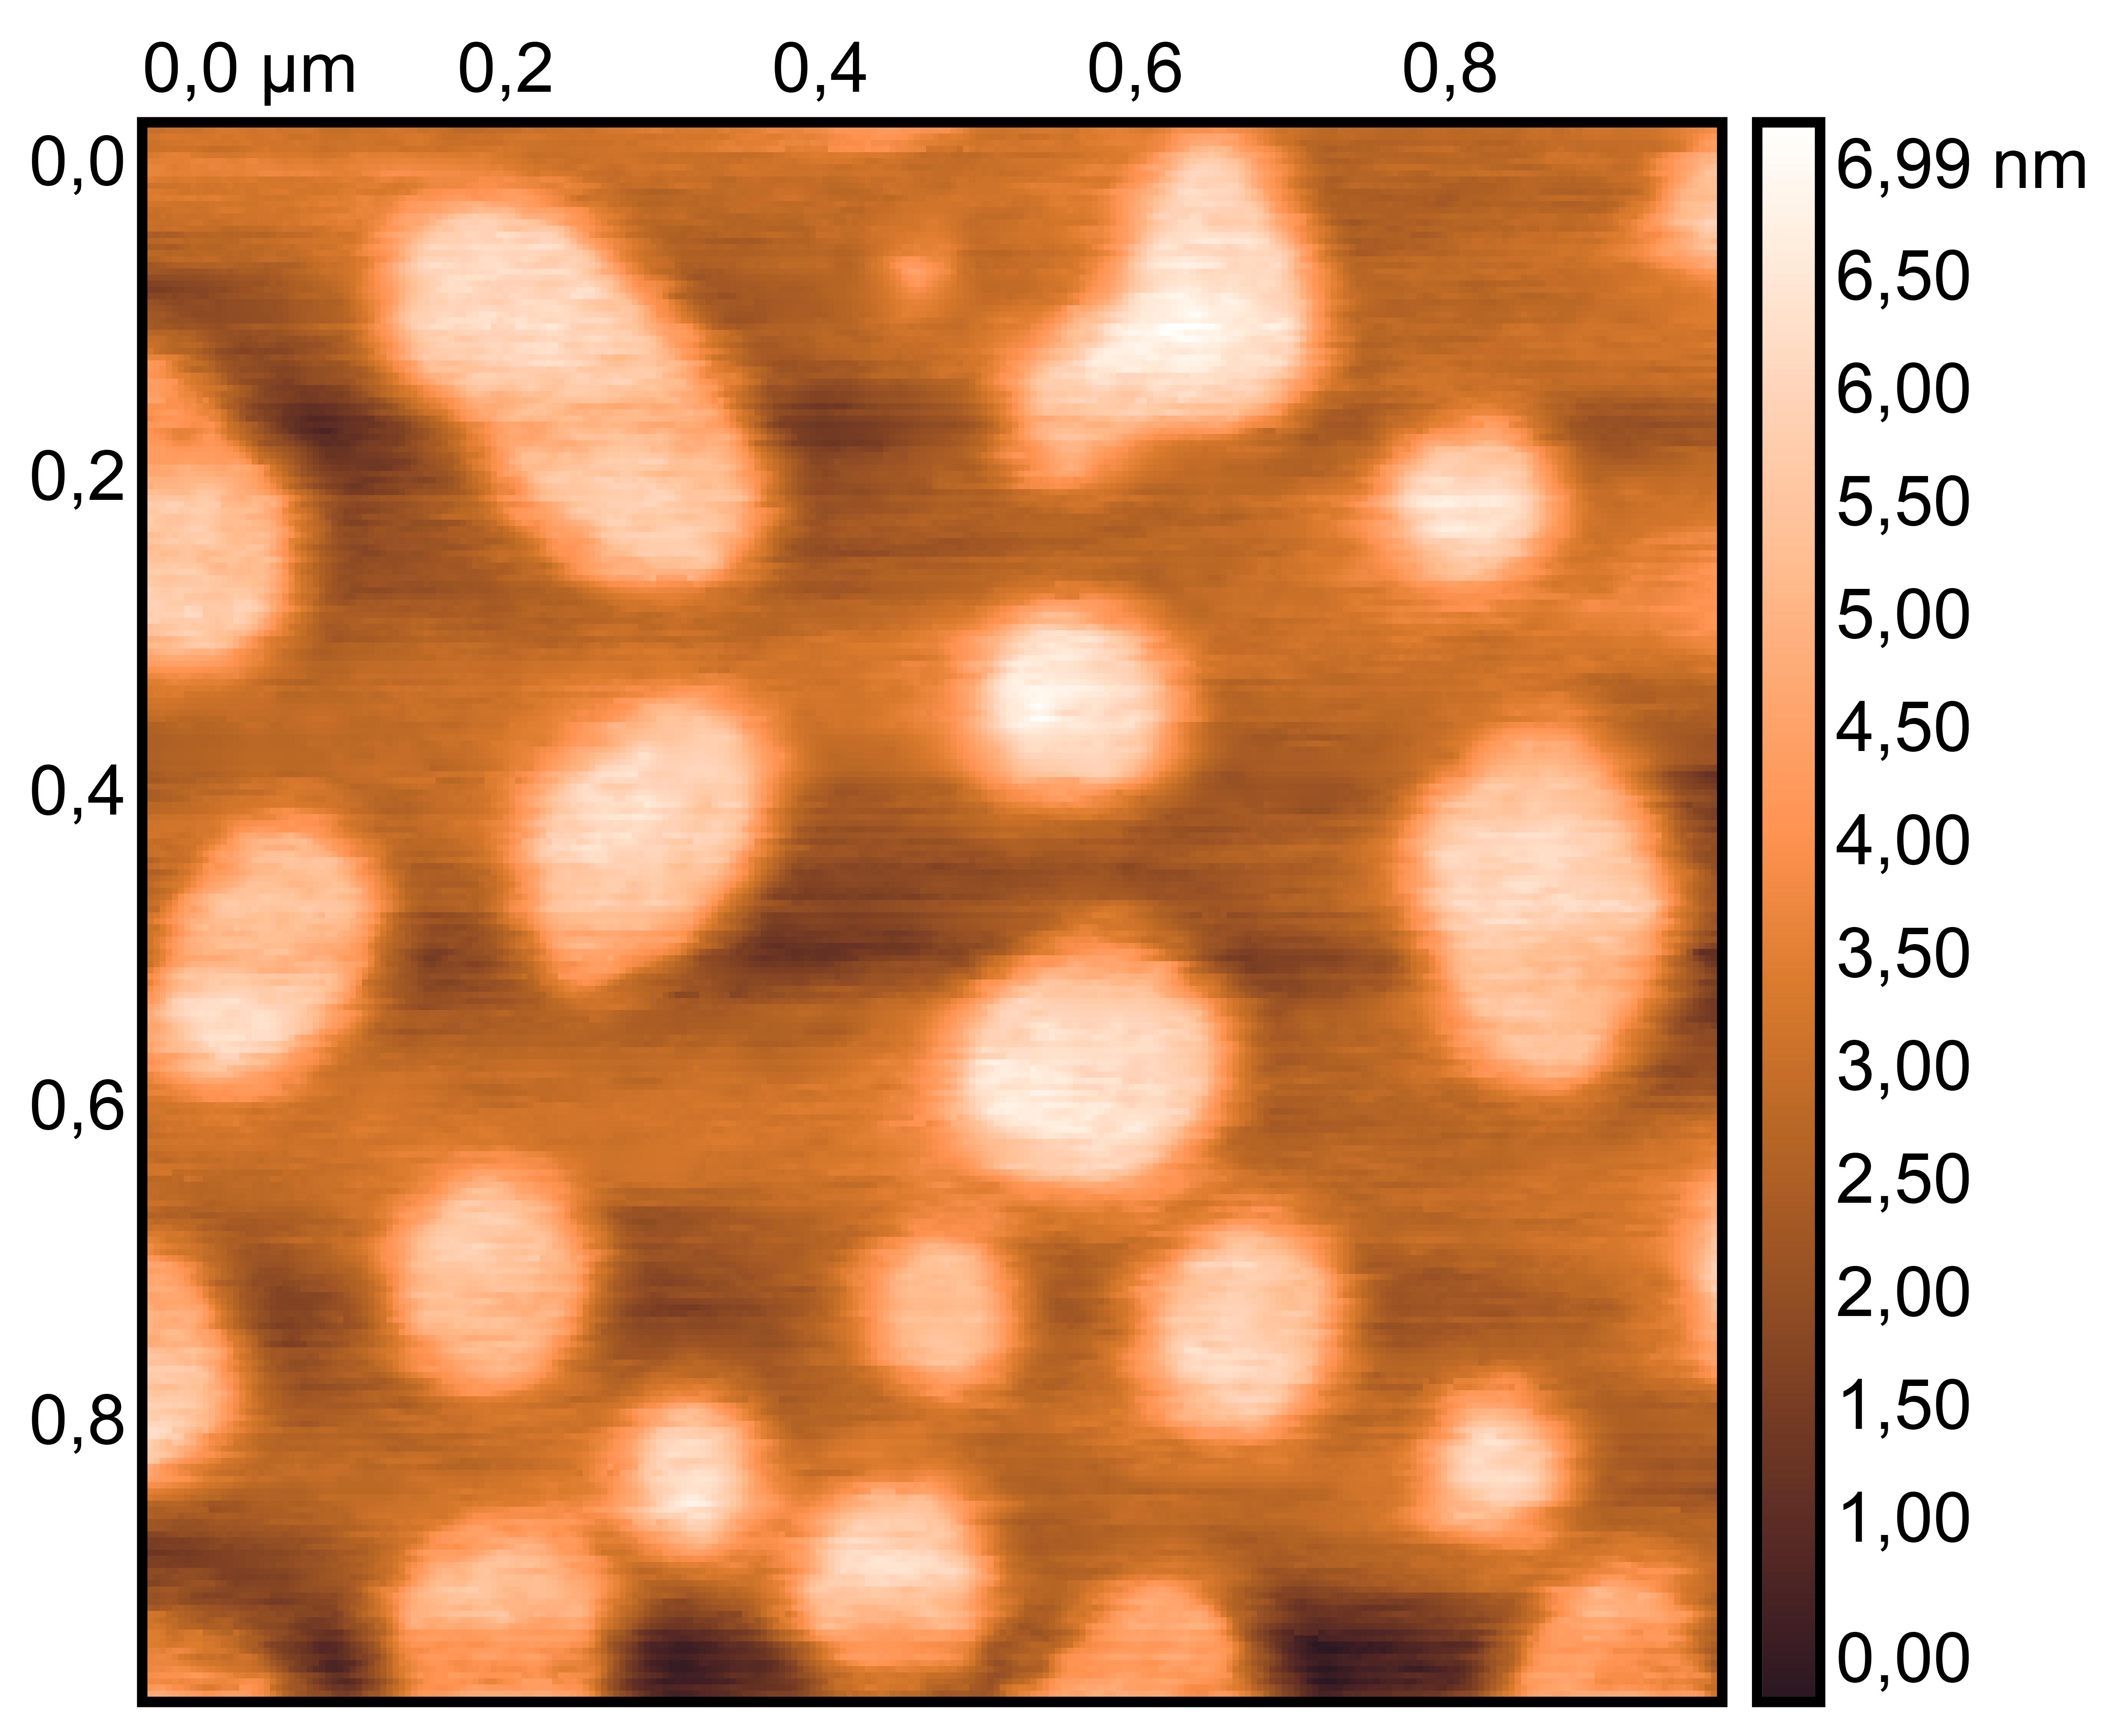
RDT + 100 mM K⁺
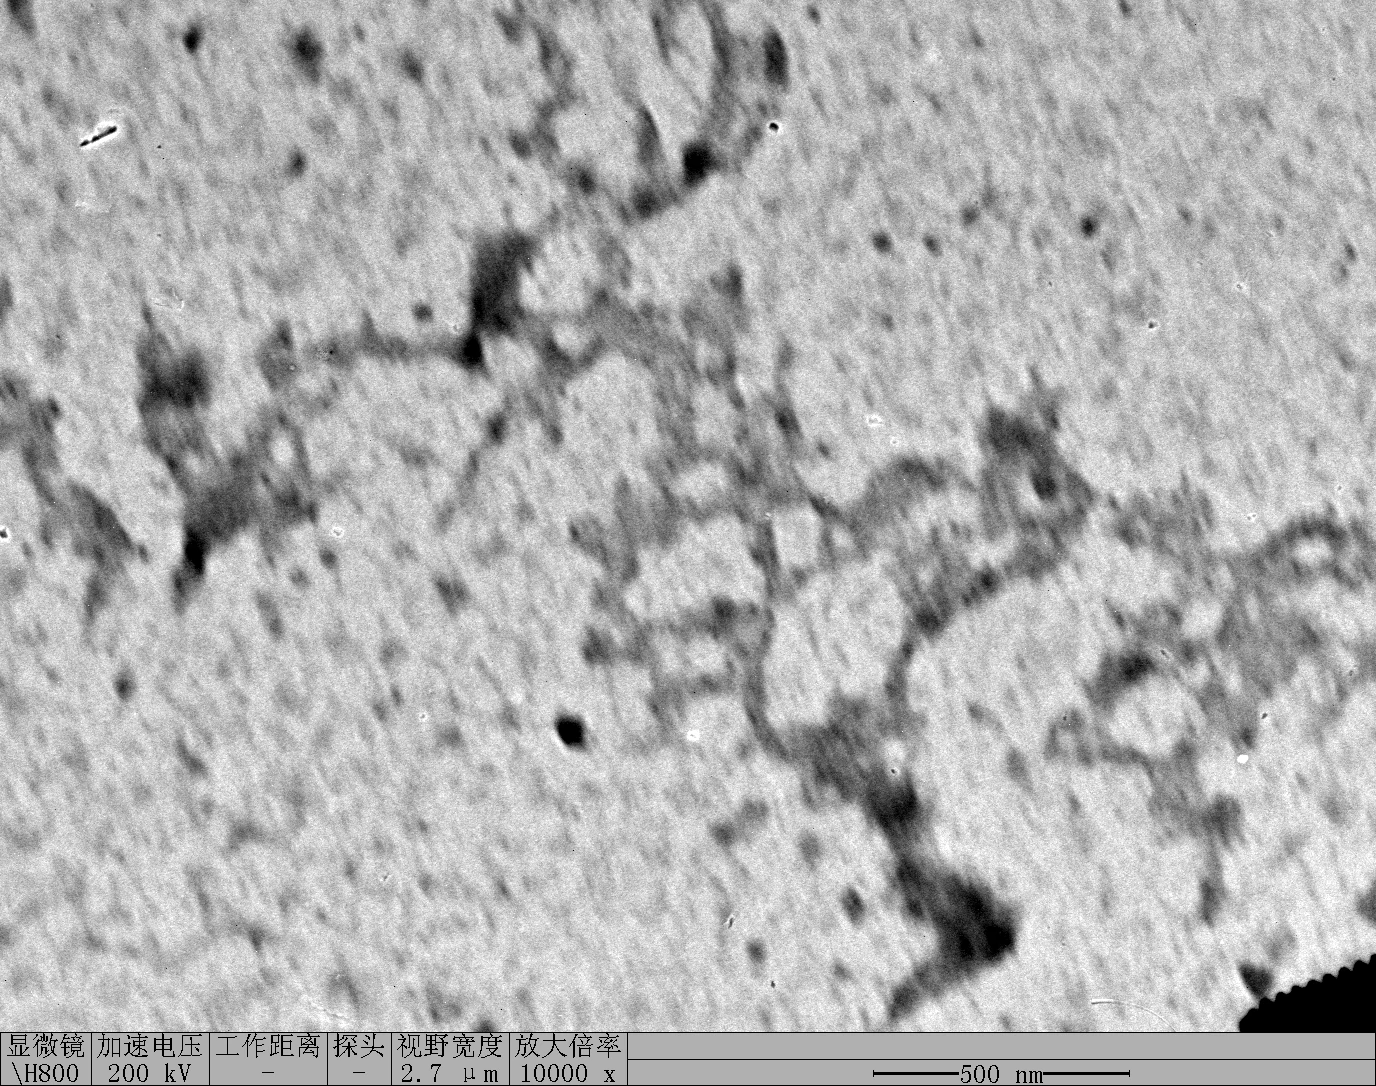
TDN + 100 mM Li⁺
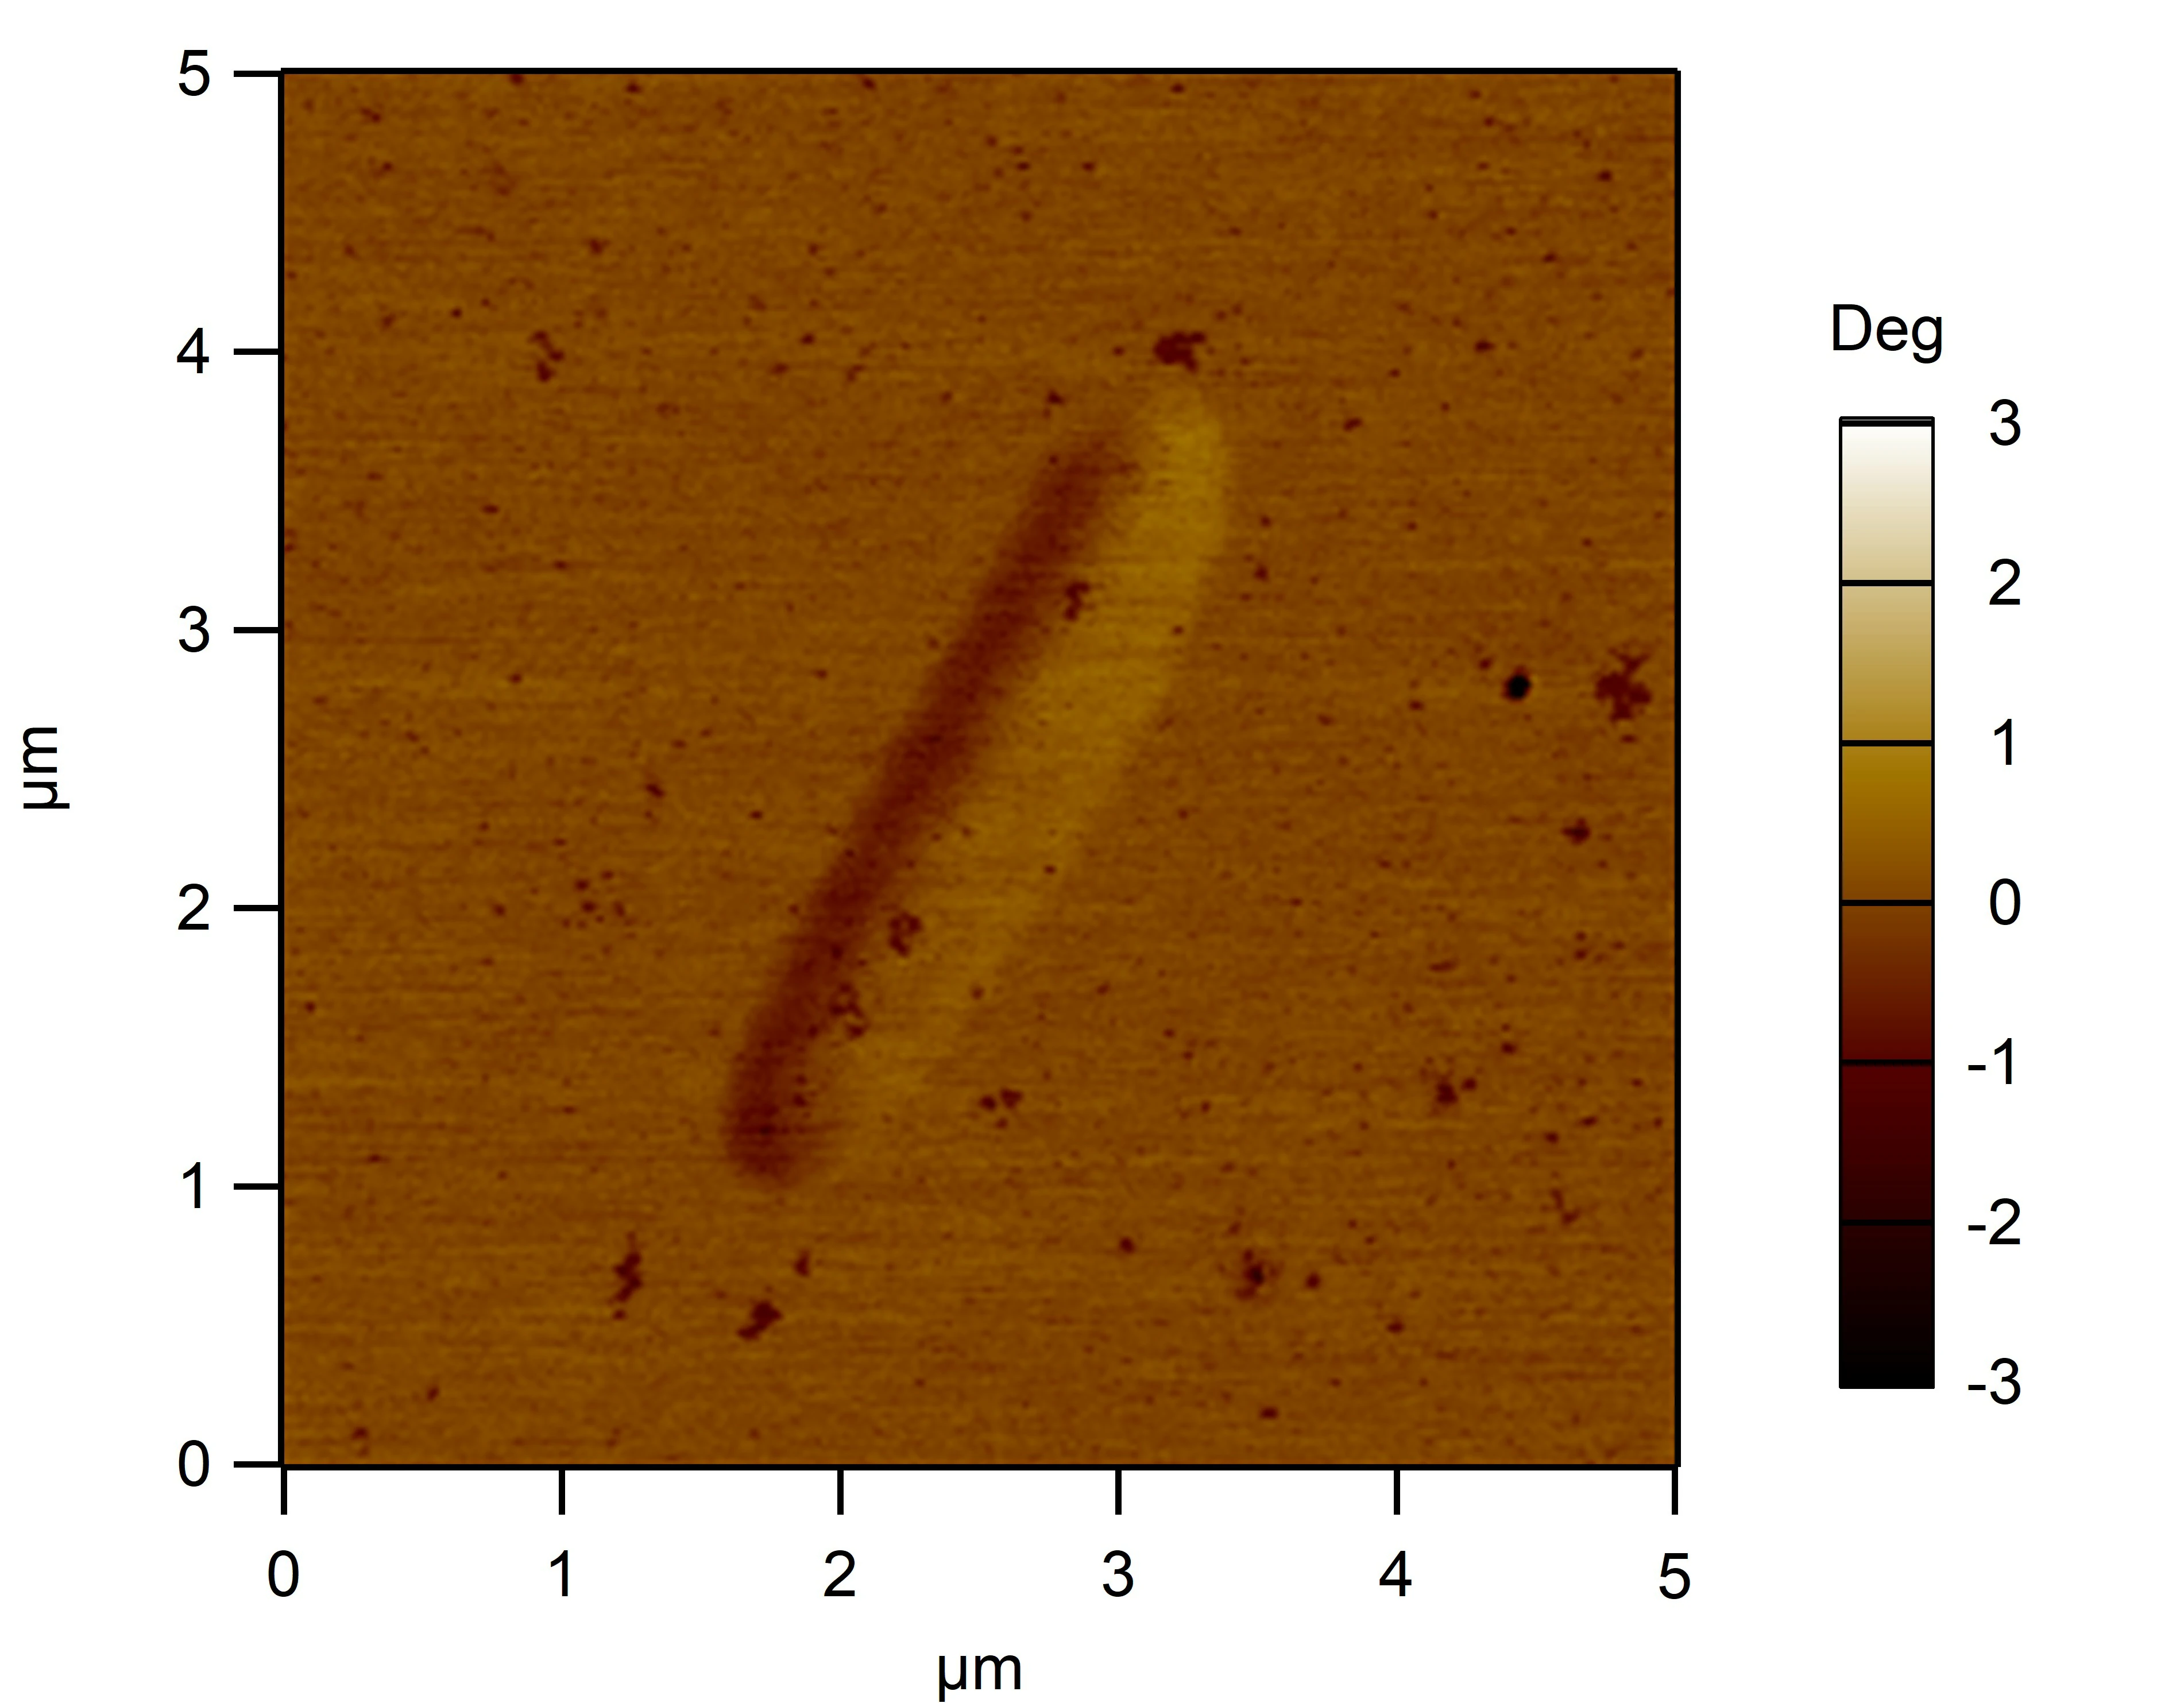
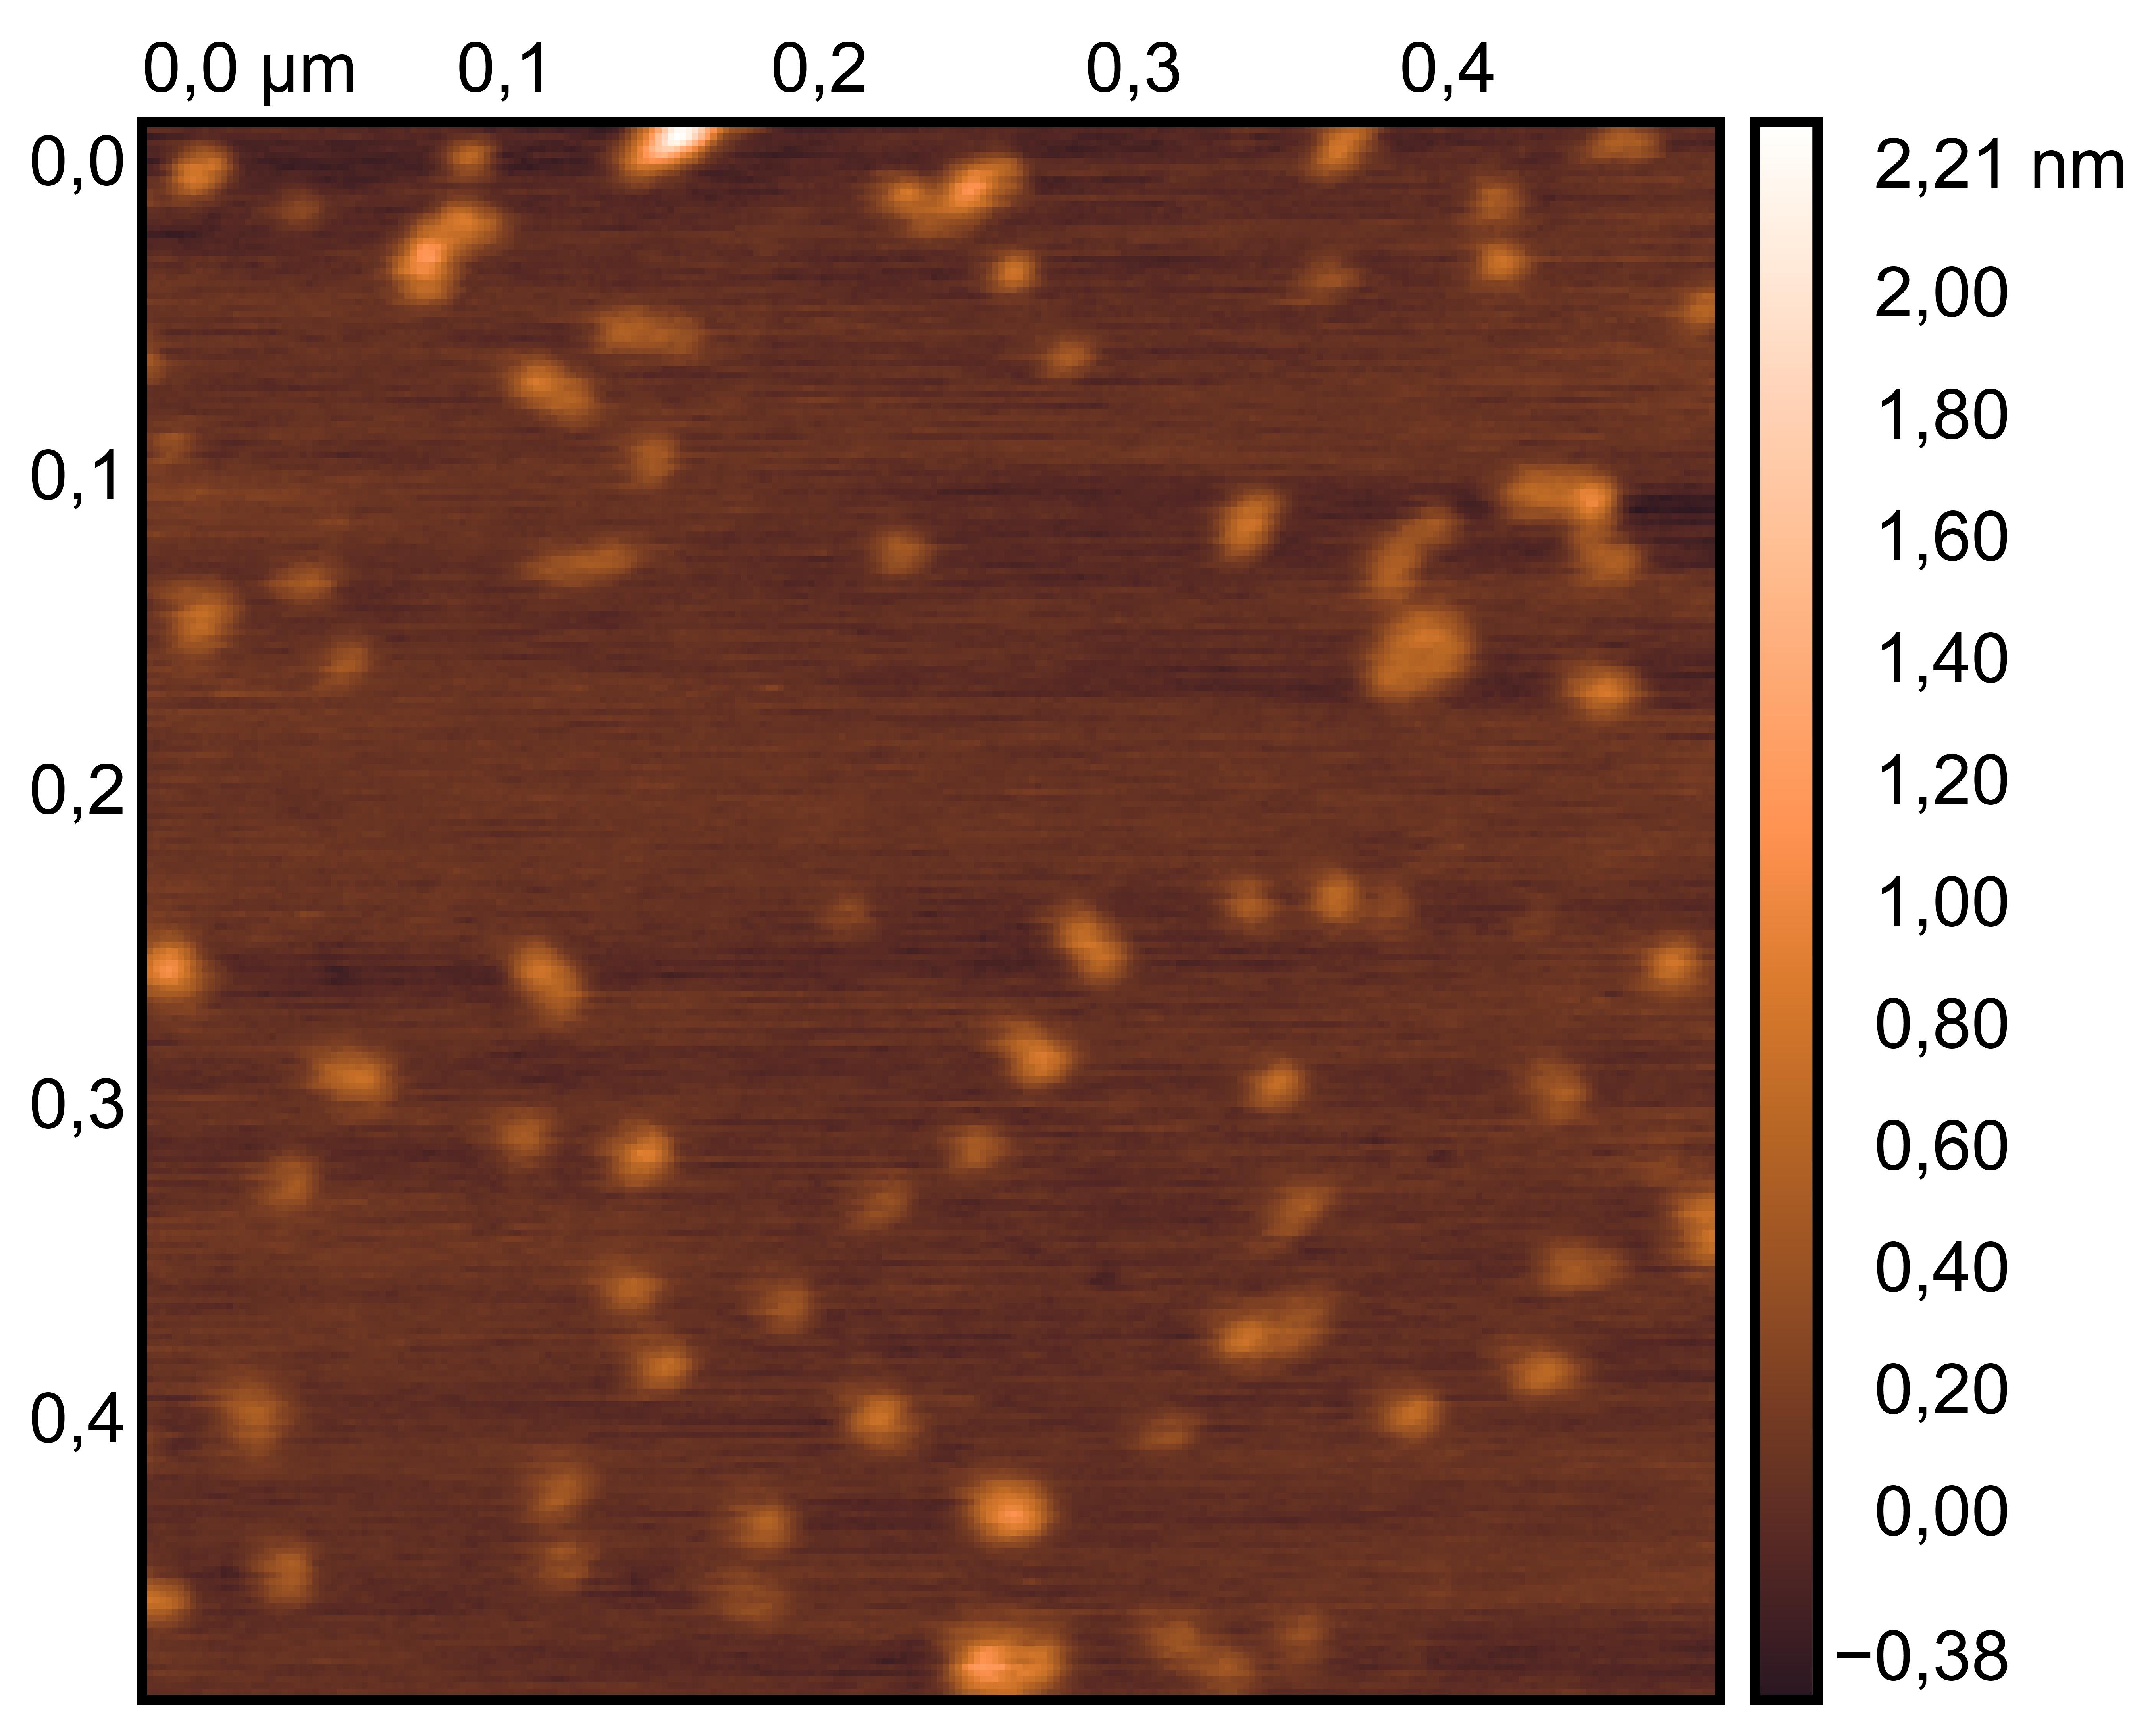
Treat 2 mica with 10 μM NiCl₂ for 3 minutes, rinse.
Drop 10 μL of (TDN + 100 mM Li⁺, RDT + 100 mM K⁺) and incubate for 8 minutes.
Wash gently 5 times, dry with nitrogen.
Scan under tapping mode in air.
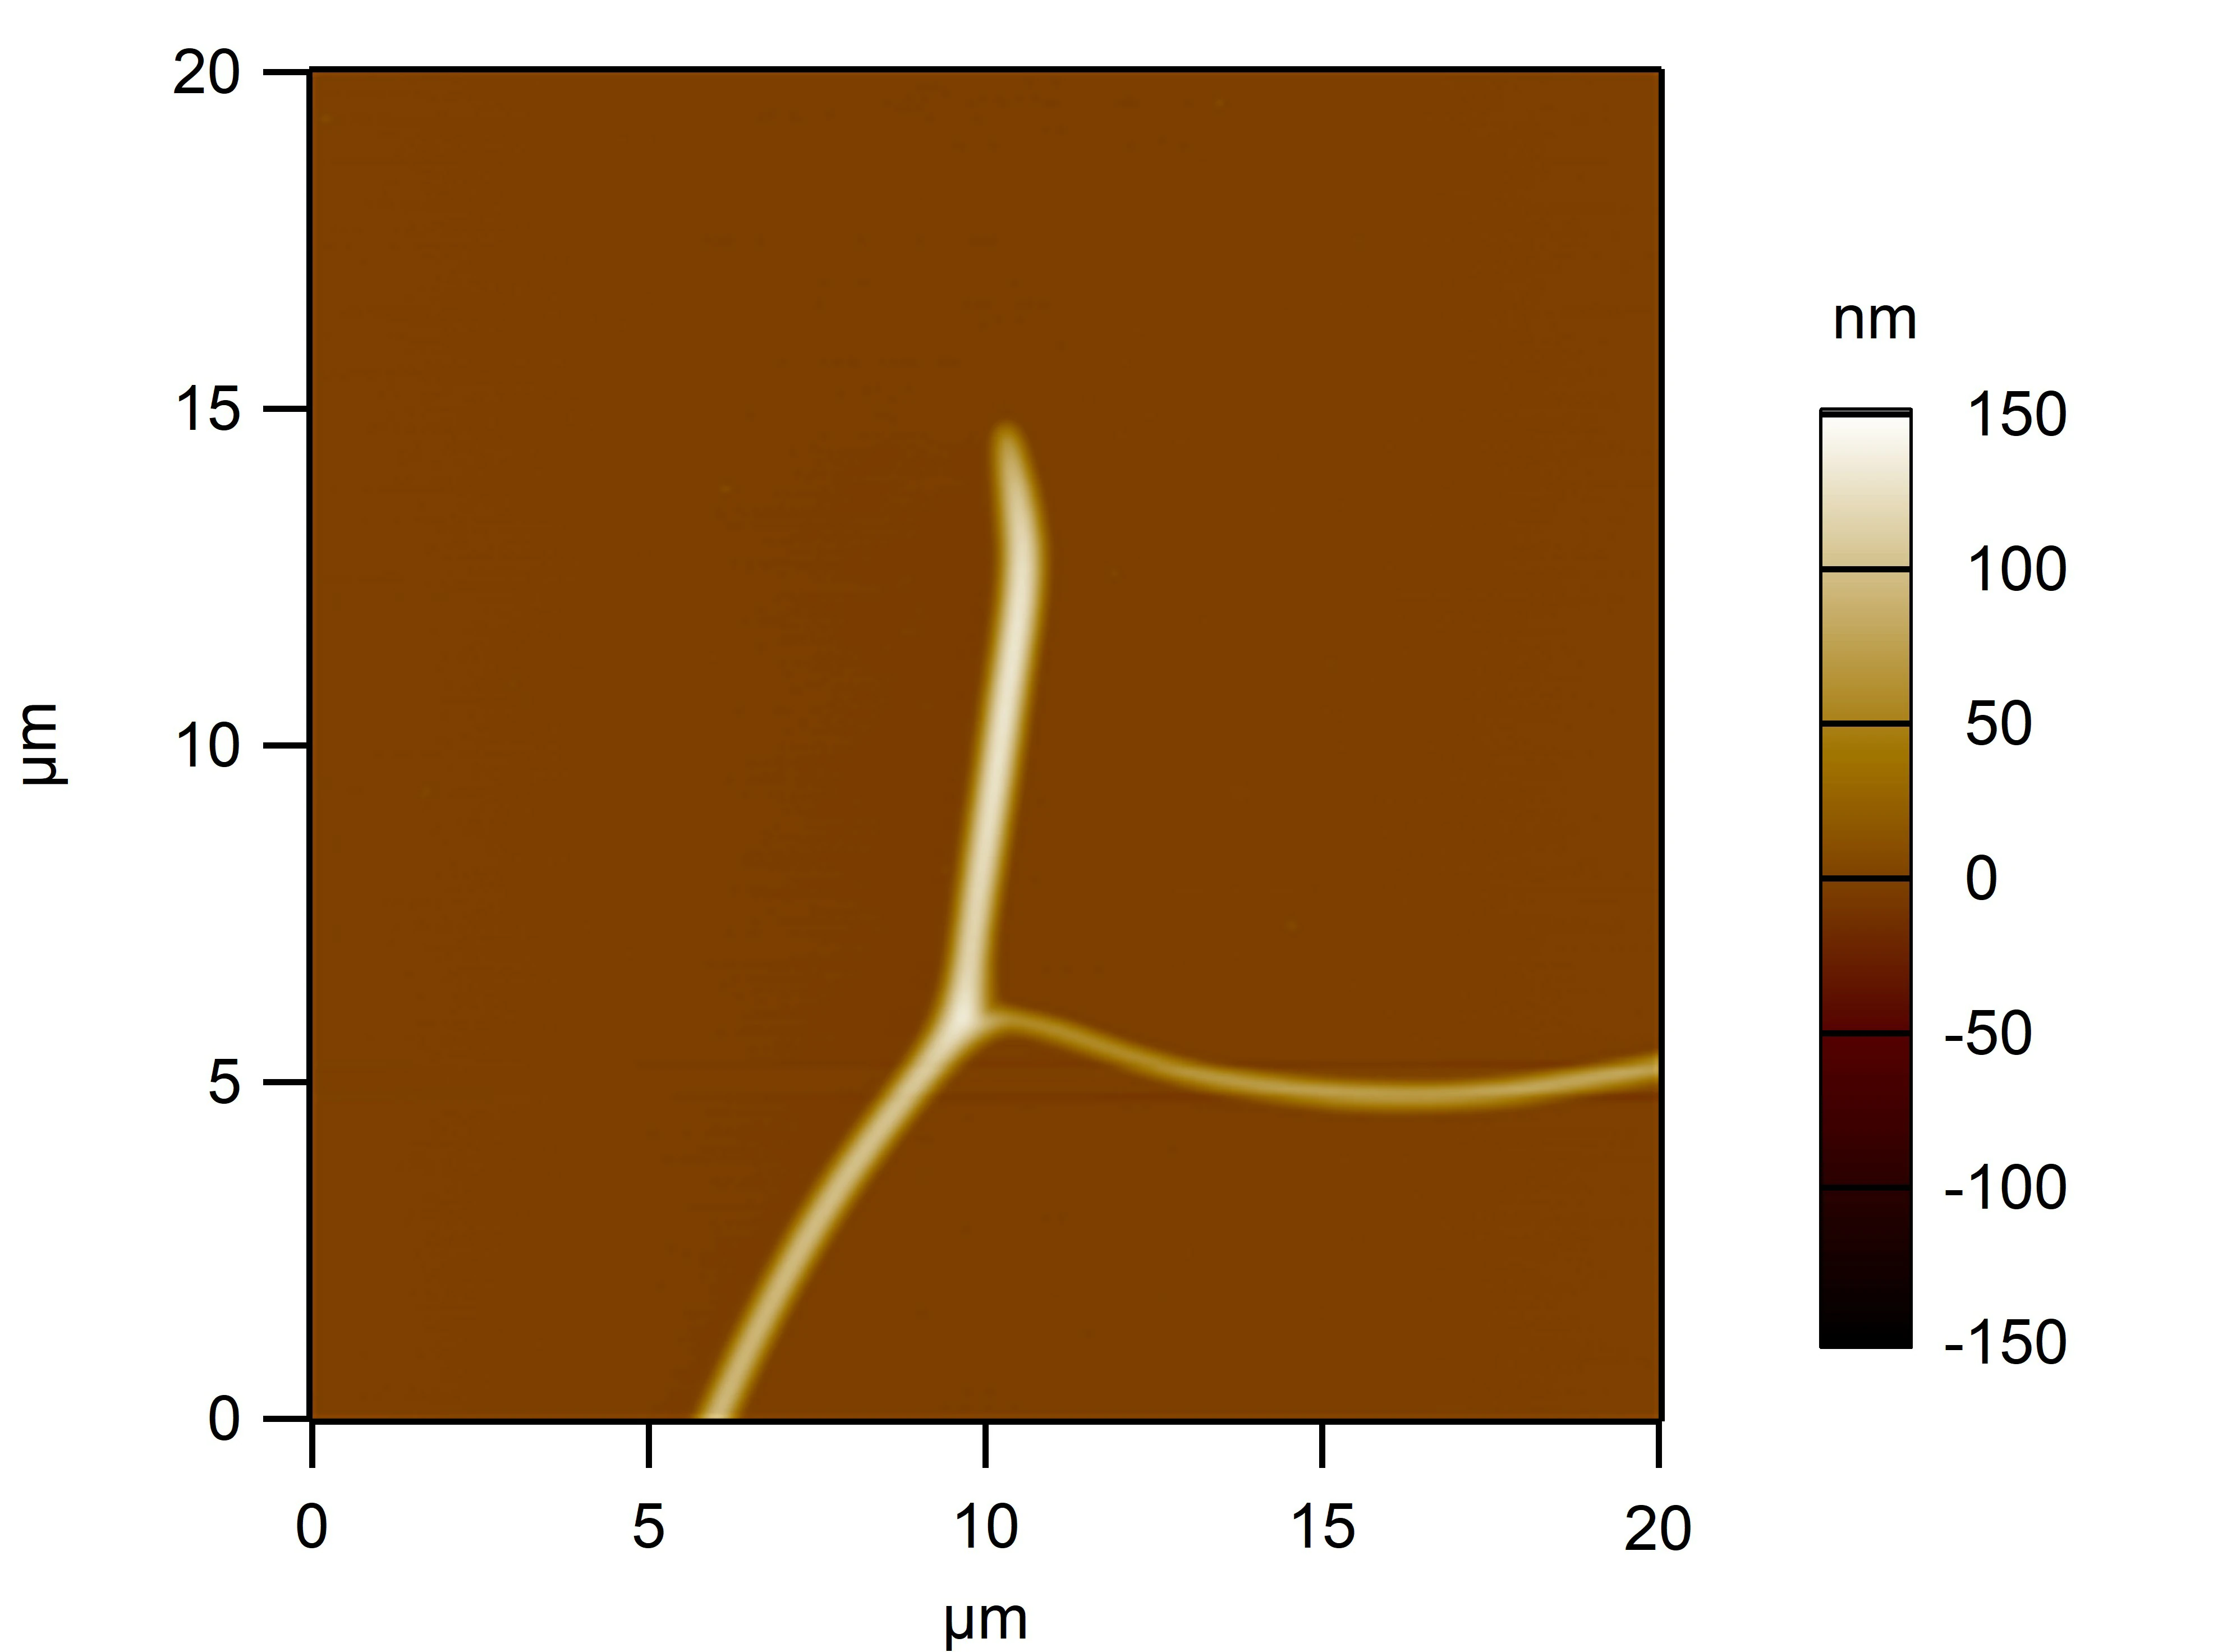
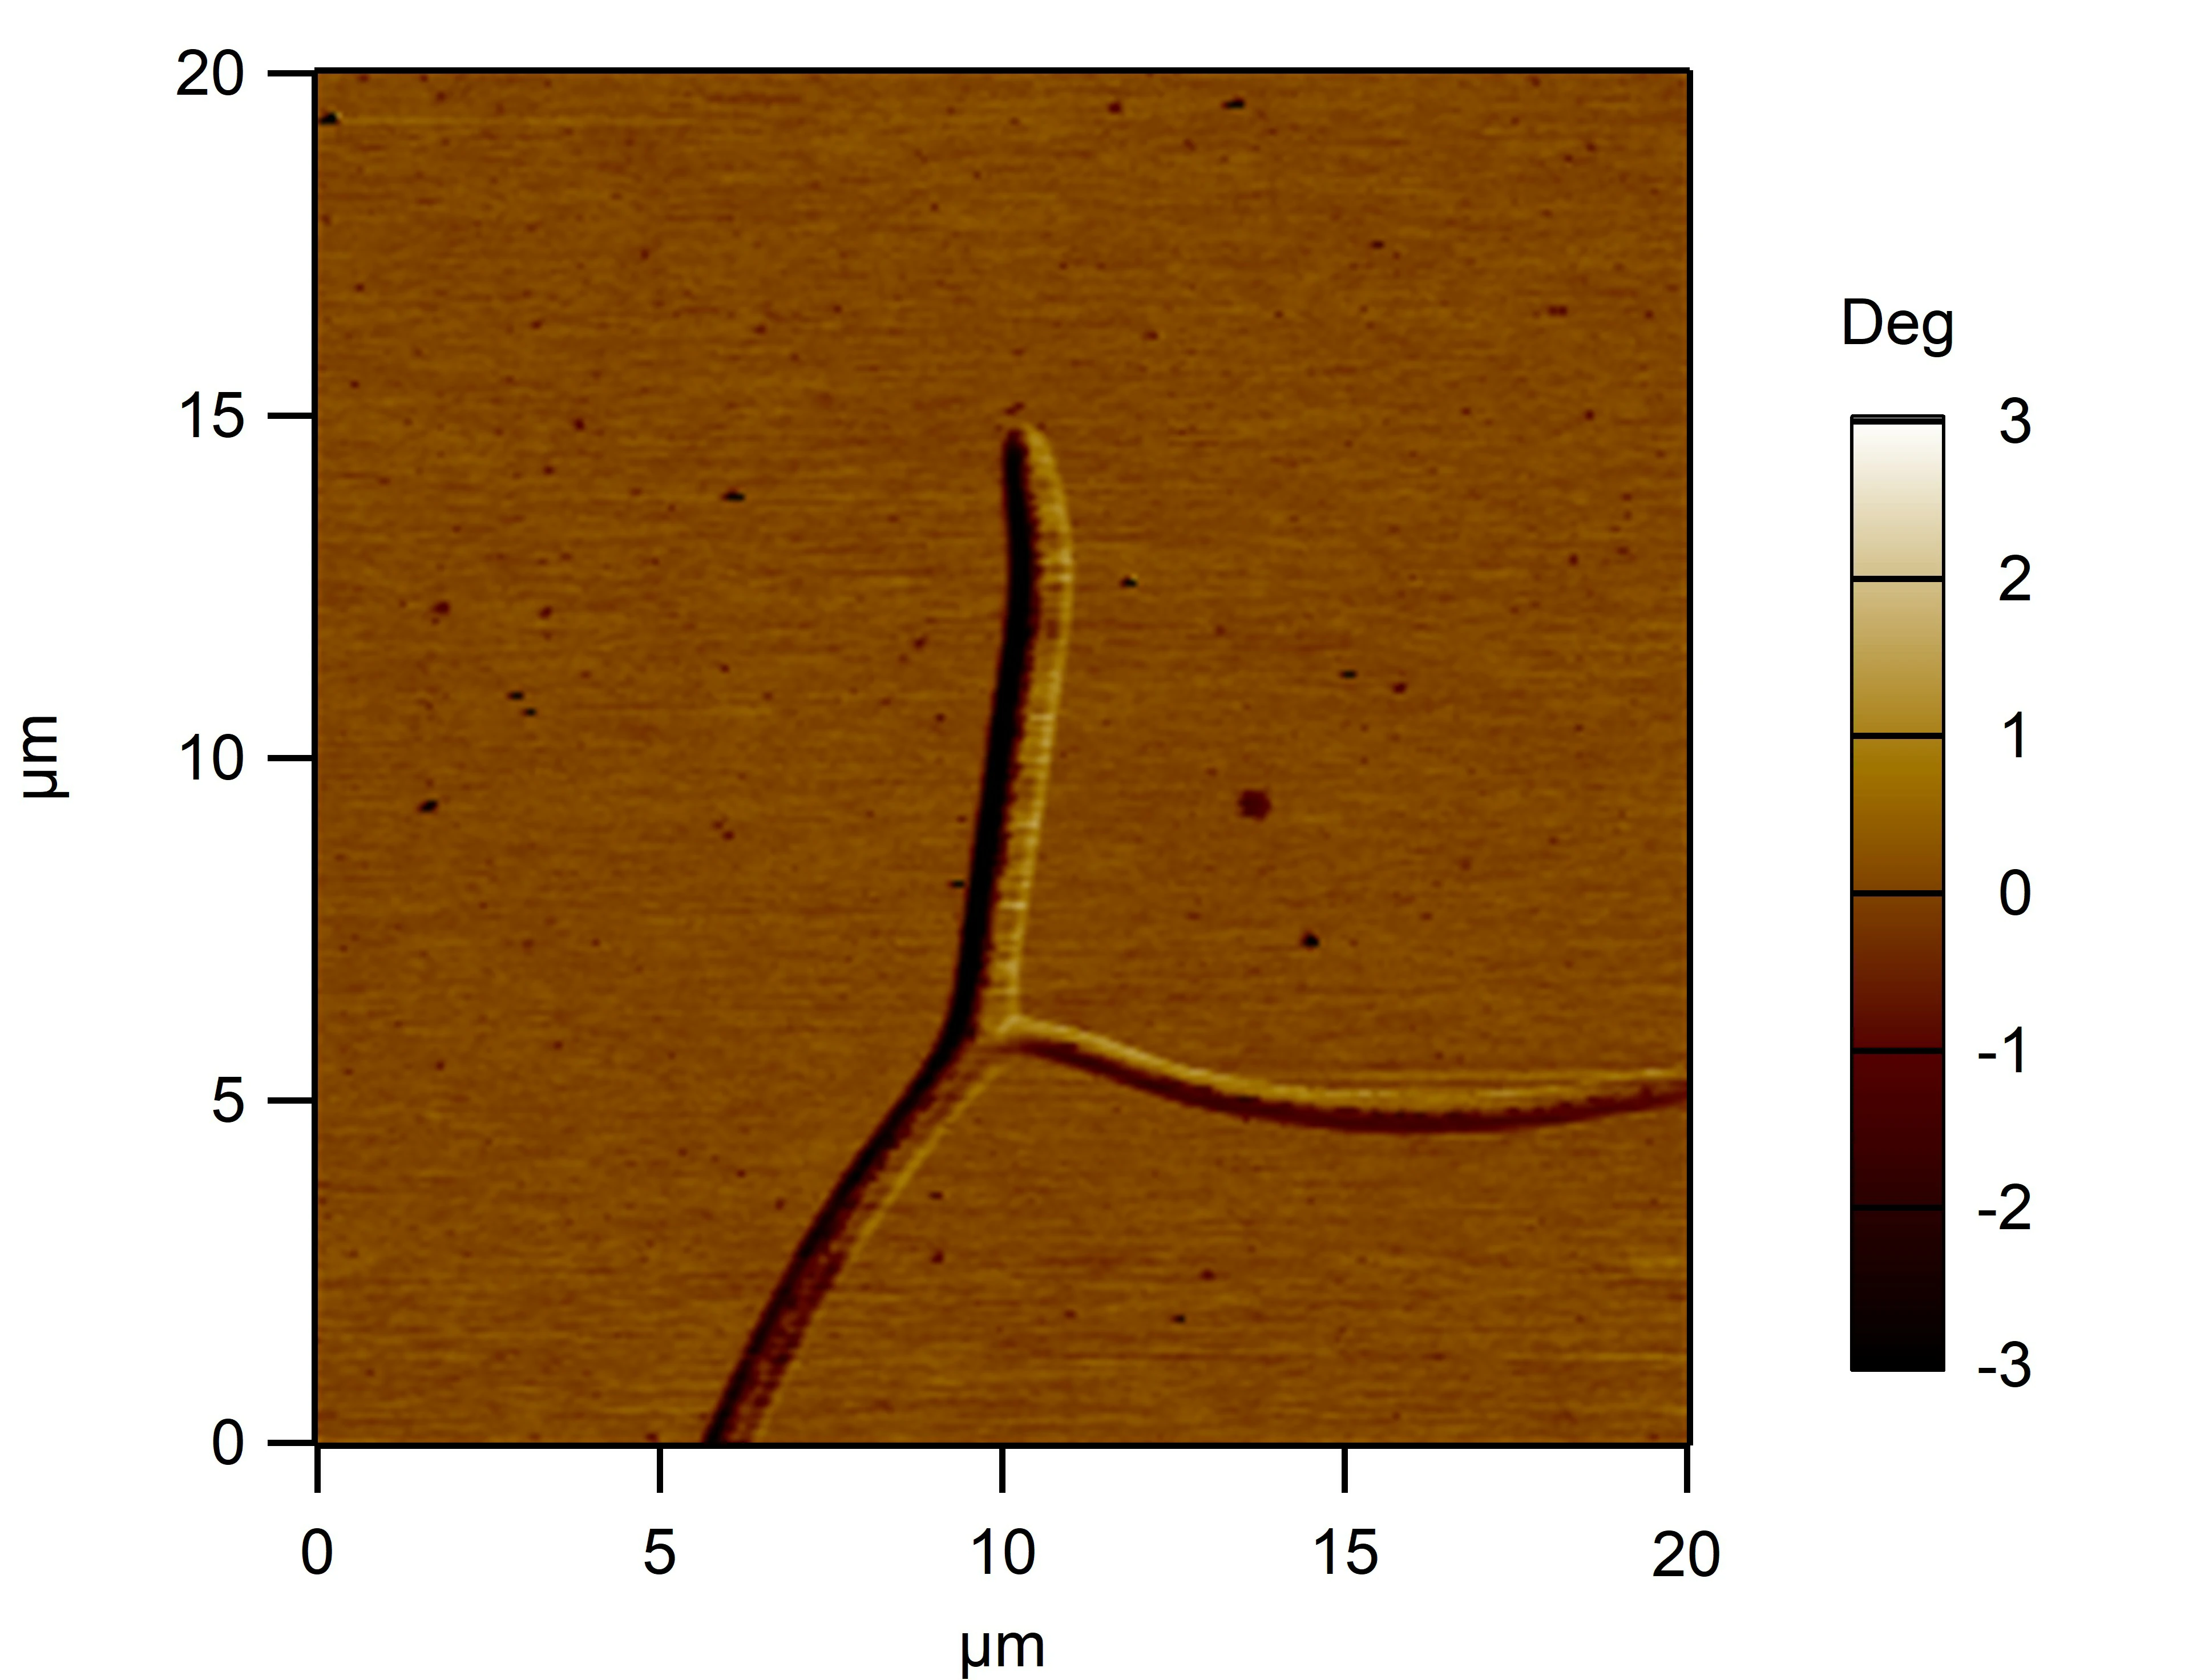
TDN + 100 mM Li⁺

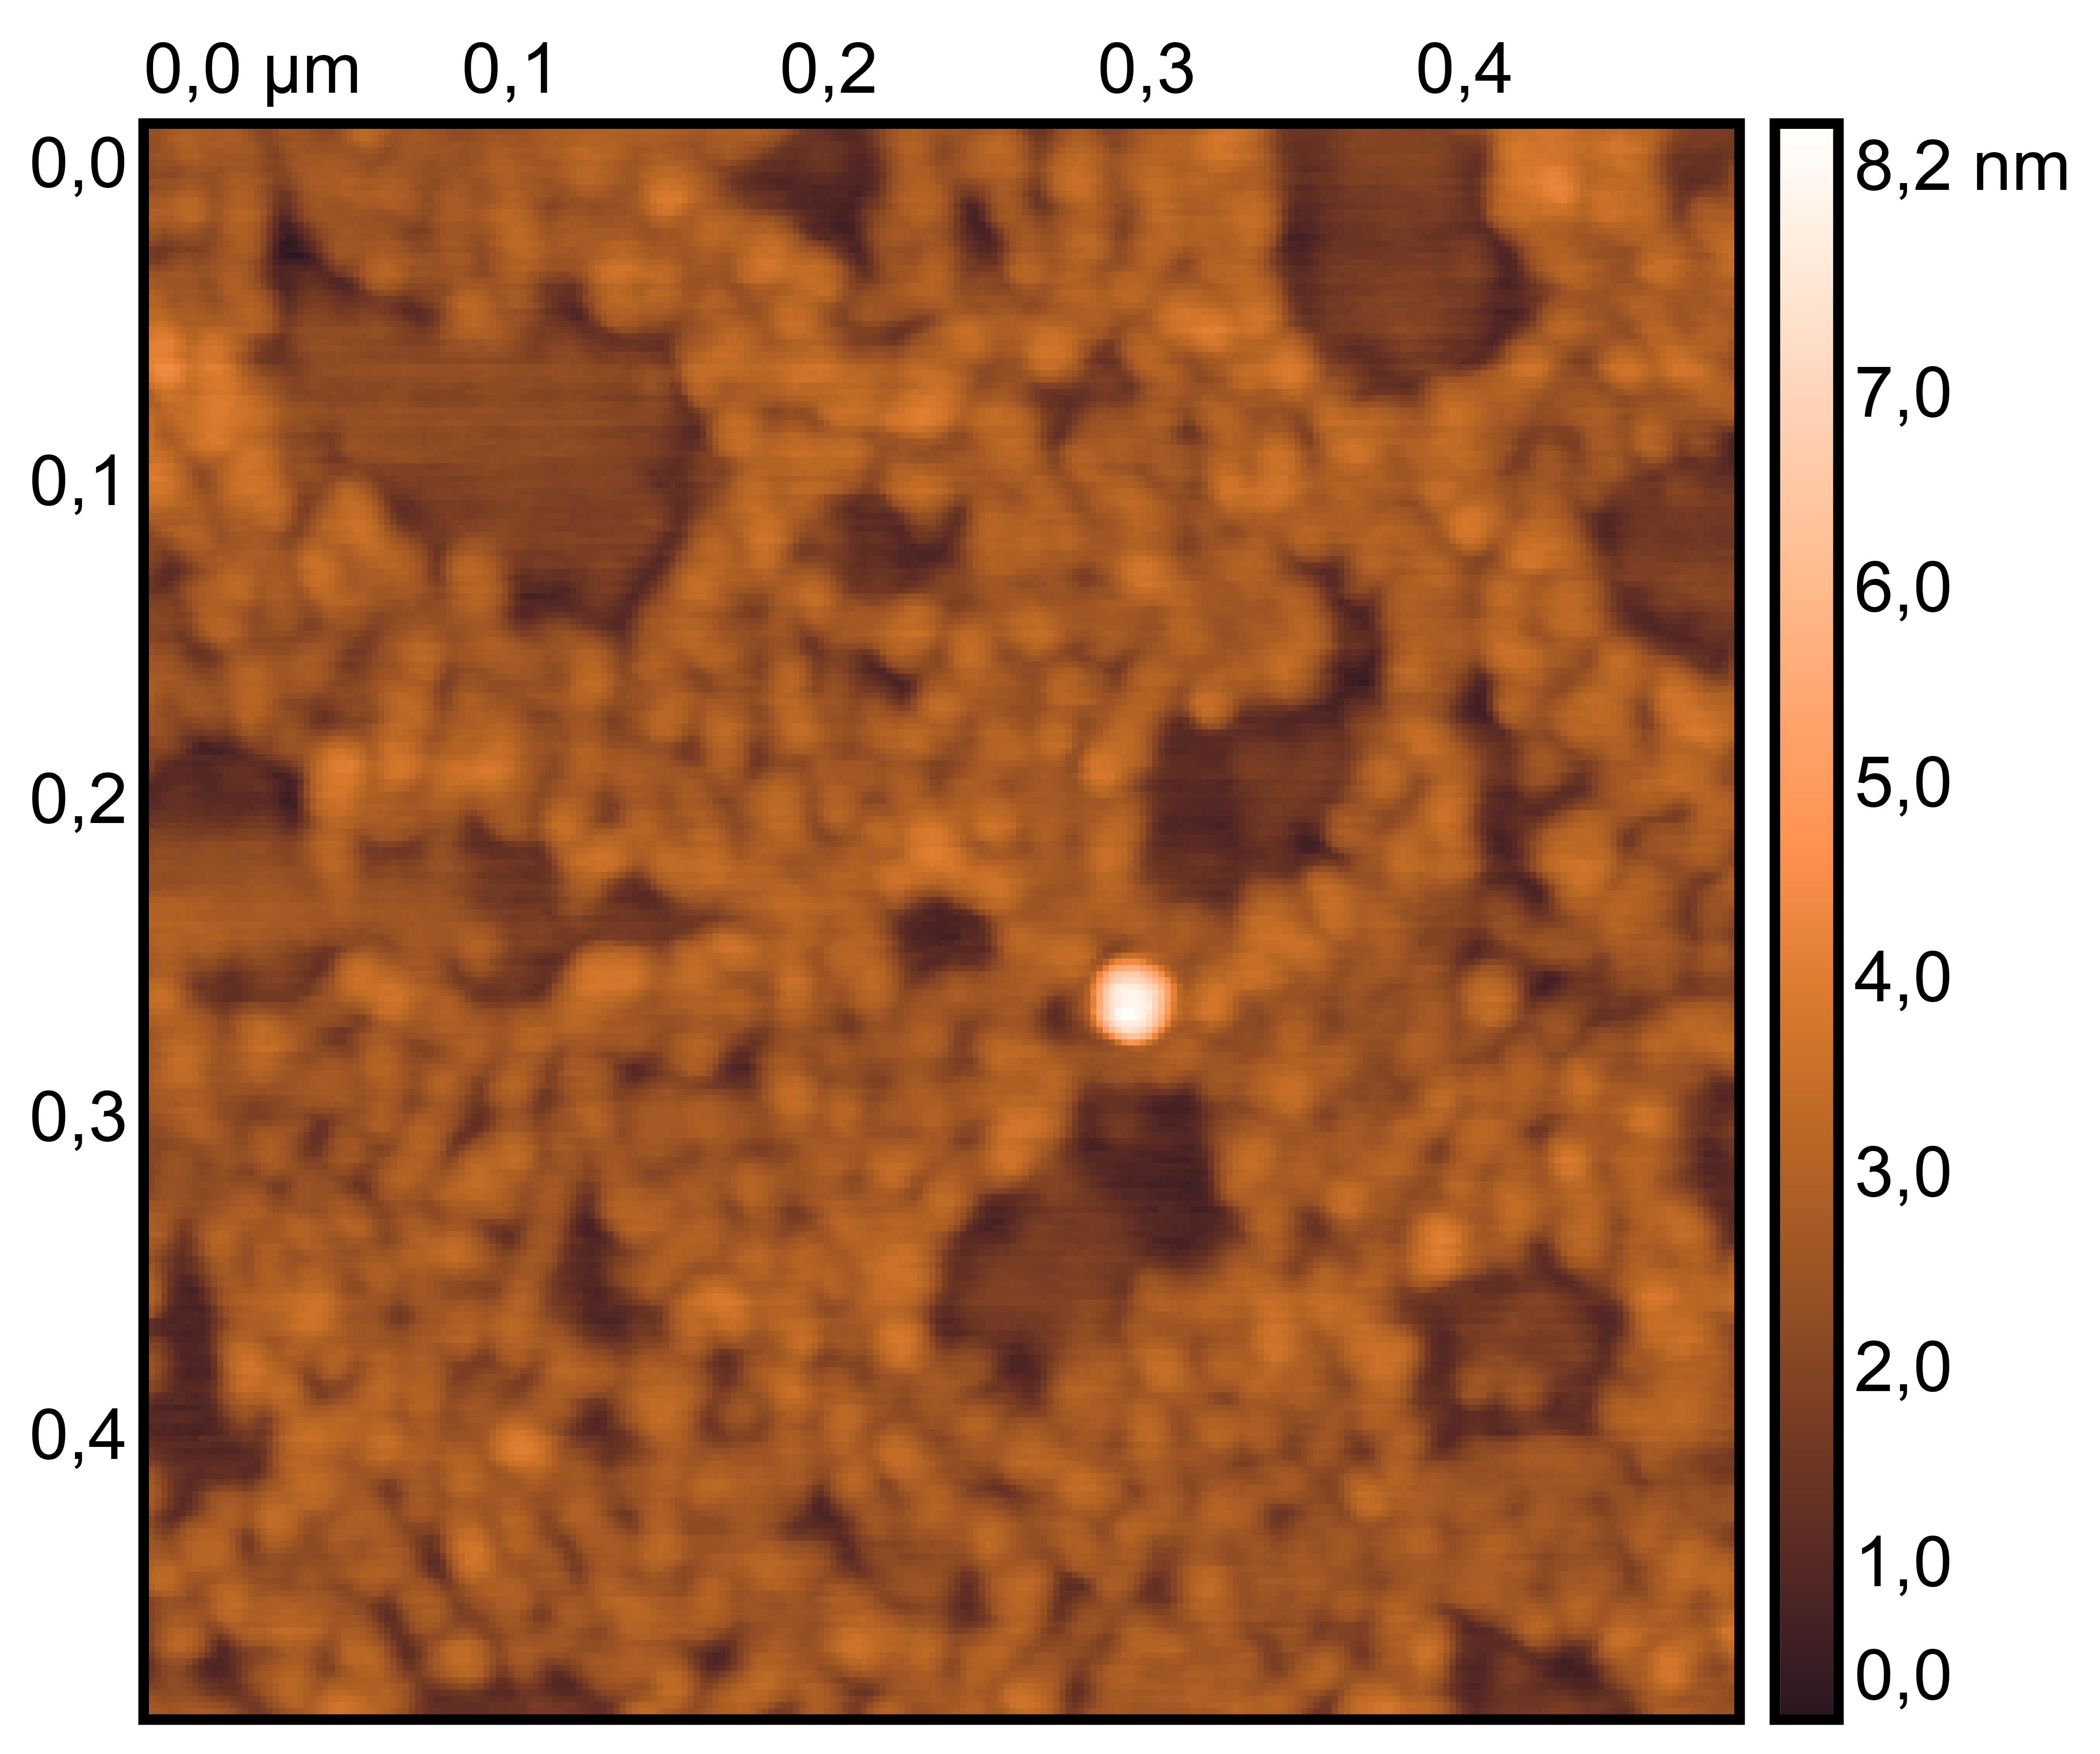
RDT + 100 mM K⁺
Prepare the gel with 0.75 g agarose, 25 mL 0.5 × TBE Buffer.
Mix the solutions (solvents) in 200 μL EP tubes according to the table below.
| Sample | 5×DNA Loading Buffer | ddH2O | |
|---|---|---|---|
| 1 | S1 3.1 μL | 2 μL | 4.9 μL |
| 2 | GS2 3.1 μL | 2 μL | 4.9 μL |
| 3 | GS3 3.1 μL | 2 μL | 4.9 μL |
| 4 | GS4 3.1 μL | 2 μL | 4.9 μL |
| 5 | 1+2 3.1 μL | 2 μL | 4.9 μL |
| 6 | 2+3 3.1 μL | 2 μL | 4.9 μL |
| 7 | 1+2+3 3.1 μL | 2 μL | 4.9 μL |
| 8 | 2+3+4 3.1 μL | 2 μL | 4.9 μL |
| 9 | TDN1 3.1 μL | 2 μL | 4.9 μL |
| 10 | TDN2 3.1 μL | 2 μL | 4.9 μL |
| 11 | Marker(50-1031 bp) 6 μL | 2 μL | 2 μL |
Add sample solutions of 10 μL each into the sample holes, according to the table below, Set the voltage to 80 V and run the electrophoresis for 70 min.
| Lane | 1 | 2 | 3 | 4 | 5 | 6 | 7 | 8 | 9 | 10 | 11 |
|---|---|---|---|---|---|---|---|---|---|---|---|
| Sample | S1 3.1 μLL | GS2 3.1 μL | GS3 3.1 μL | GS4 3.1 μL | 1+2 3.1 μL | 2+3 3.1 μL | 1+2+3 3.1 μL | 2+3+4 3.1 μL | TDN1 3.1 μL | TDN2 3.1 μL | Marker(50-1031 bp) 6 μL |
Obtain the electrophoretogram.
Mix TDN solution with 200 mM KCl solution and 200 mM LiCl solution (2:1:1).
Incubate 24 hours at room temperature.
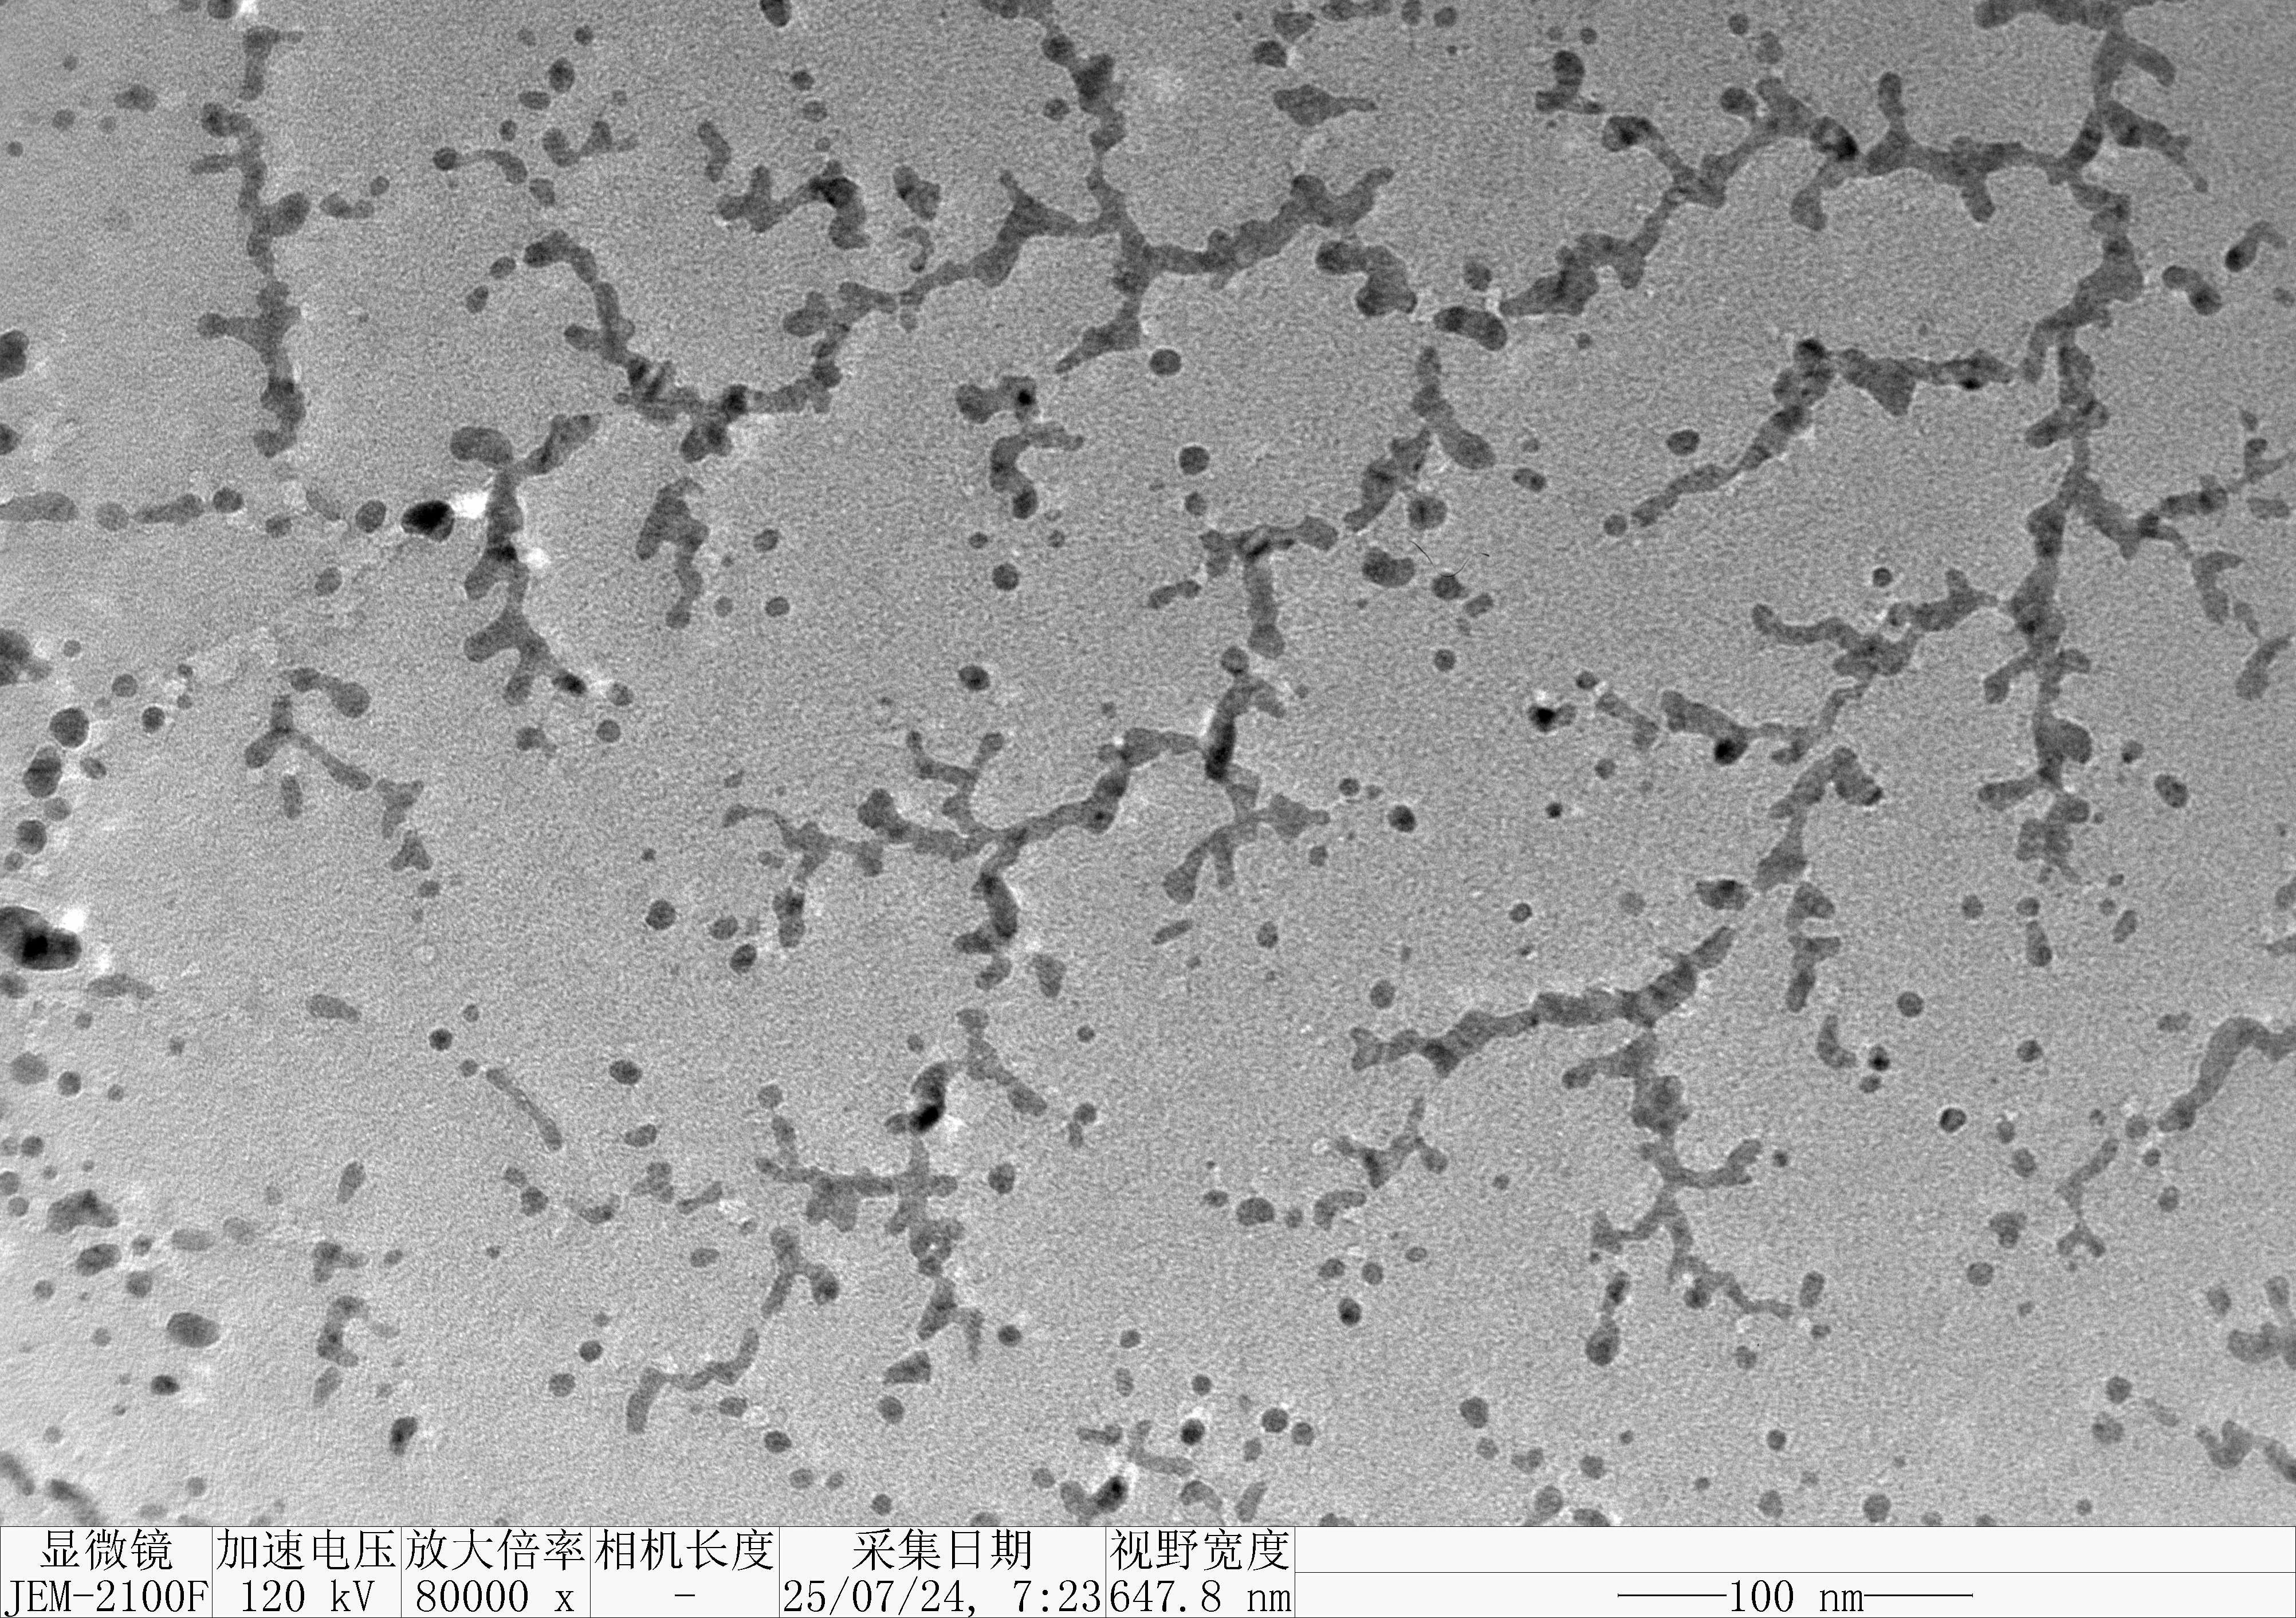
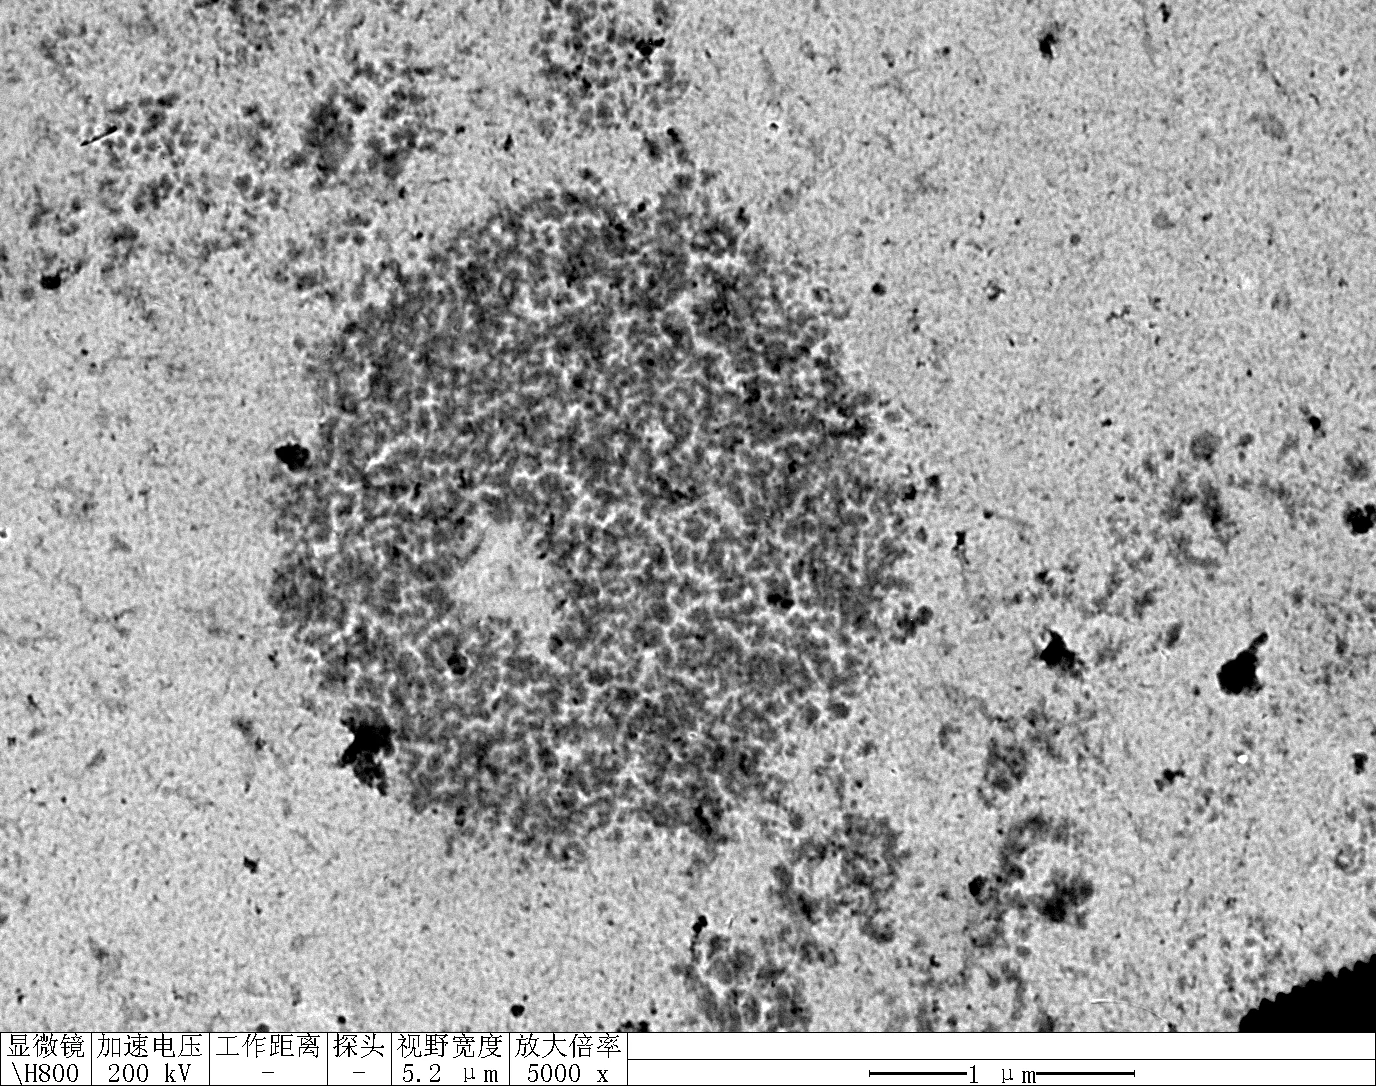
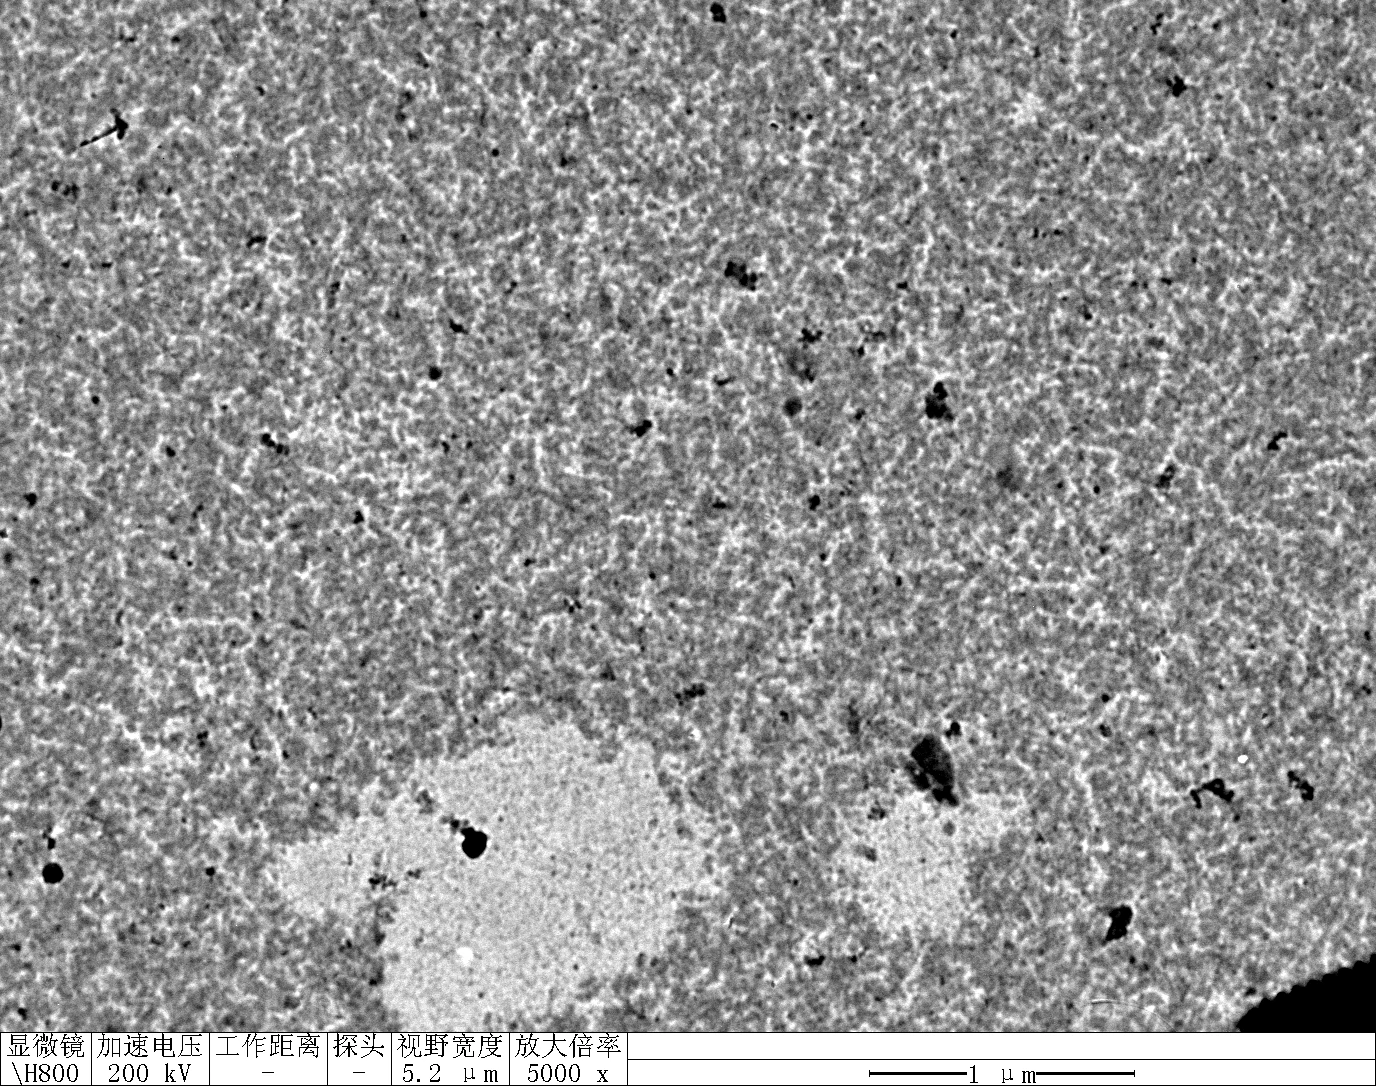
Clean 2 copper grids with plasma for 15 seconds.
Drop 1.5 μL of (TDN + 100 mM Li⁺, TDN + 50 mM K⁺ and 50 mM Li⁺) onto the different grids, allow adsorption for 2–5 minutes.
Remove excess liquid, air dry. Stain with 10 μL of 2% phosphotungstic acid solution for one minute, then wash off with water and dry again.
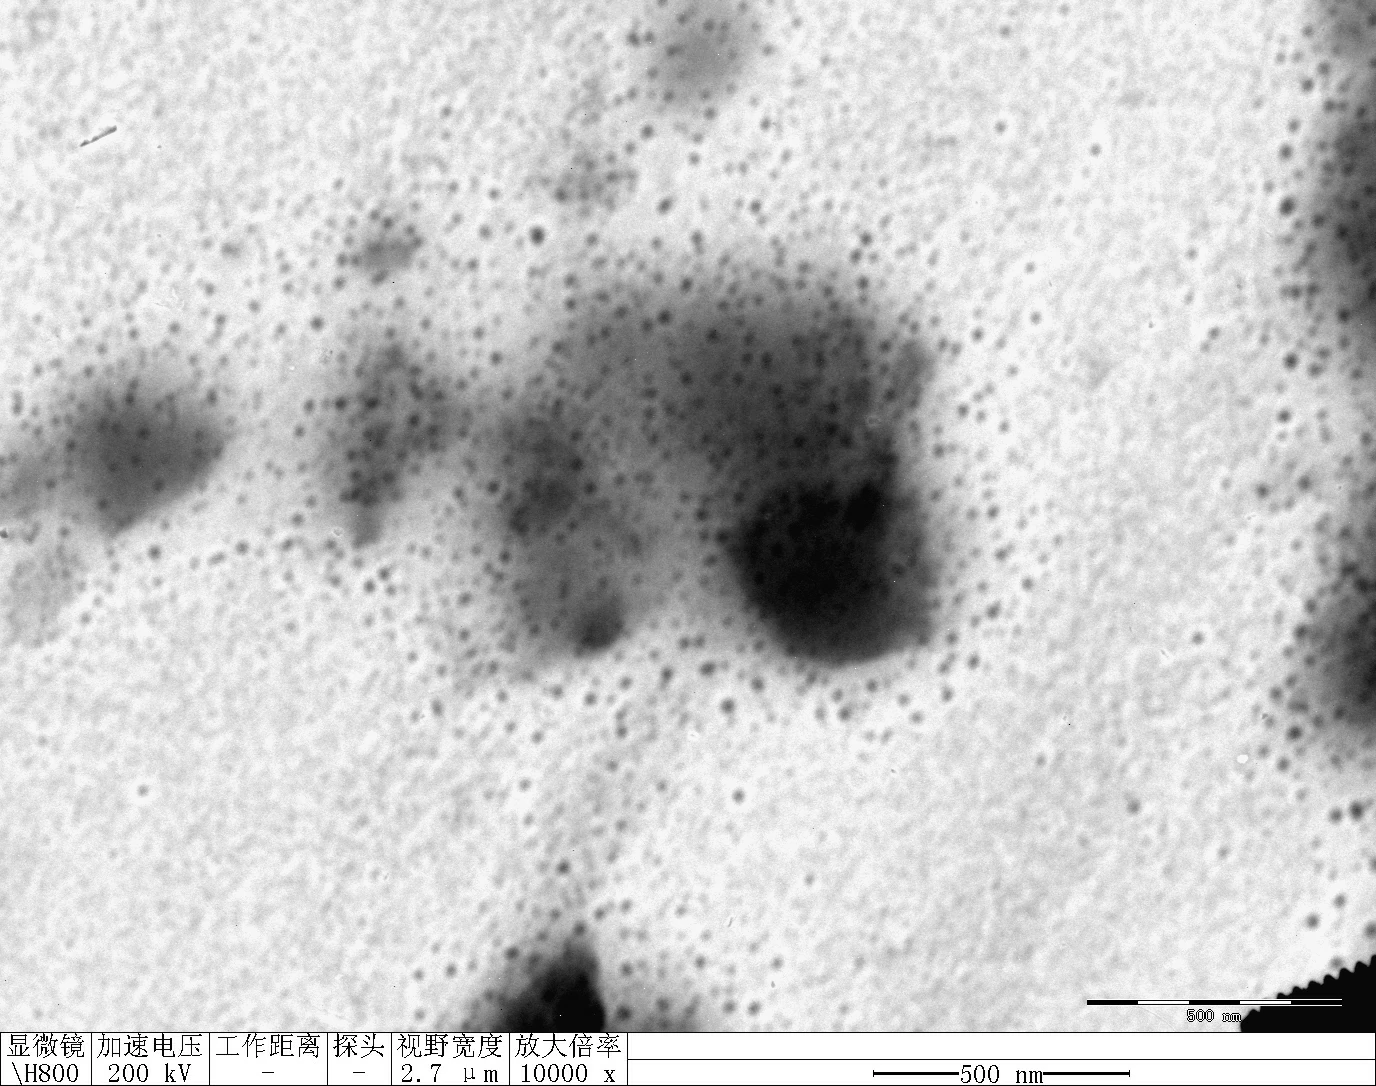
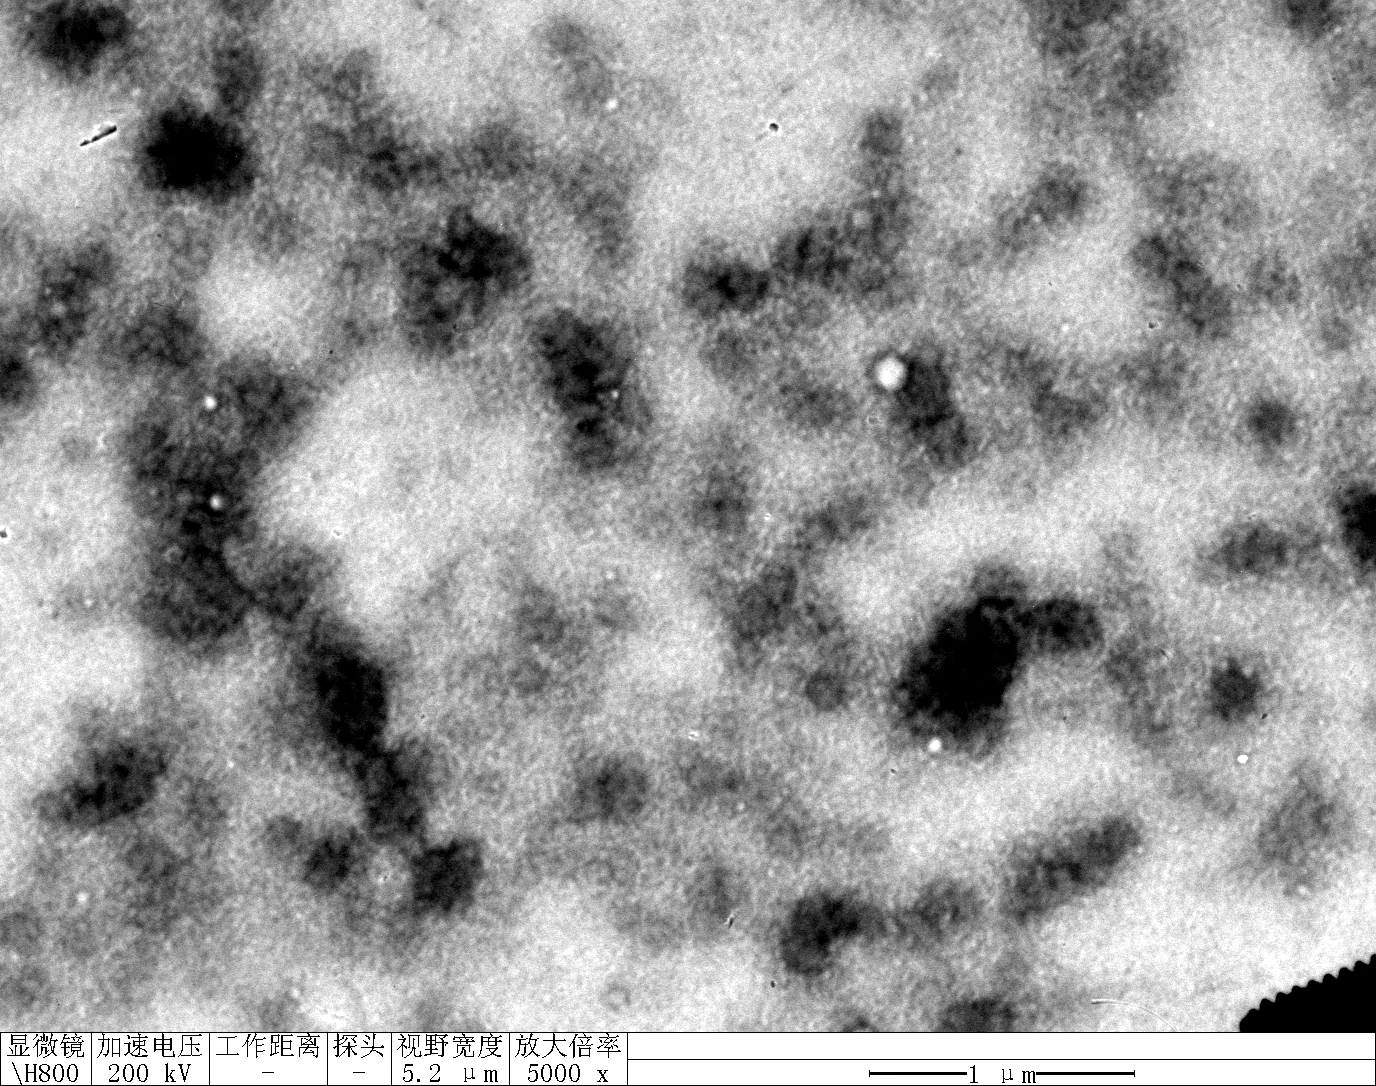
Observe under JEM-F200 (200 kV).
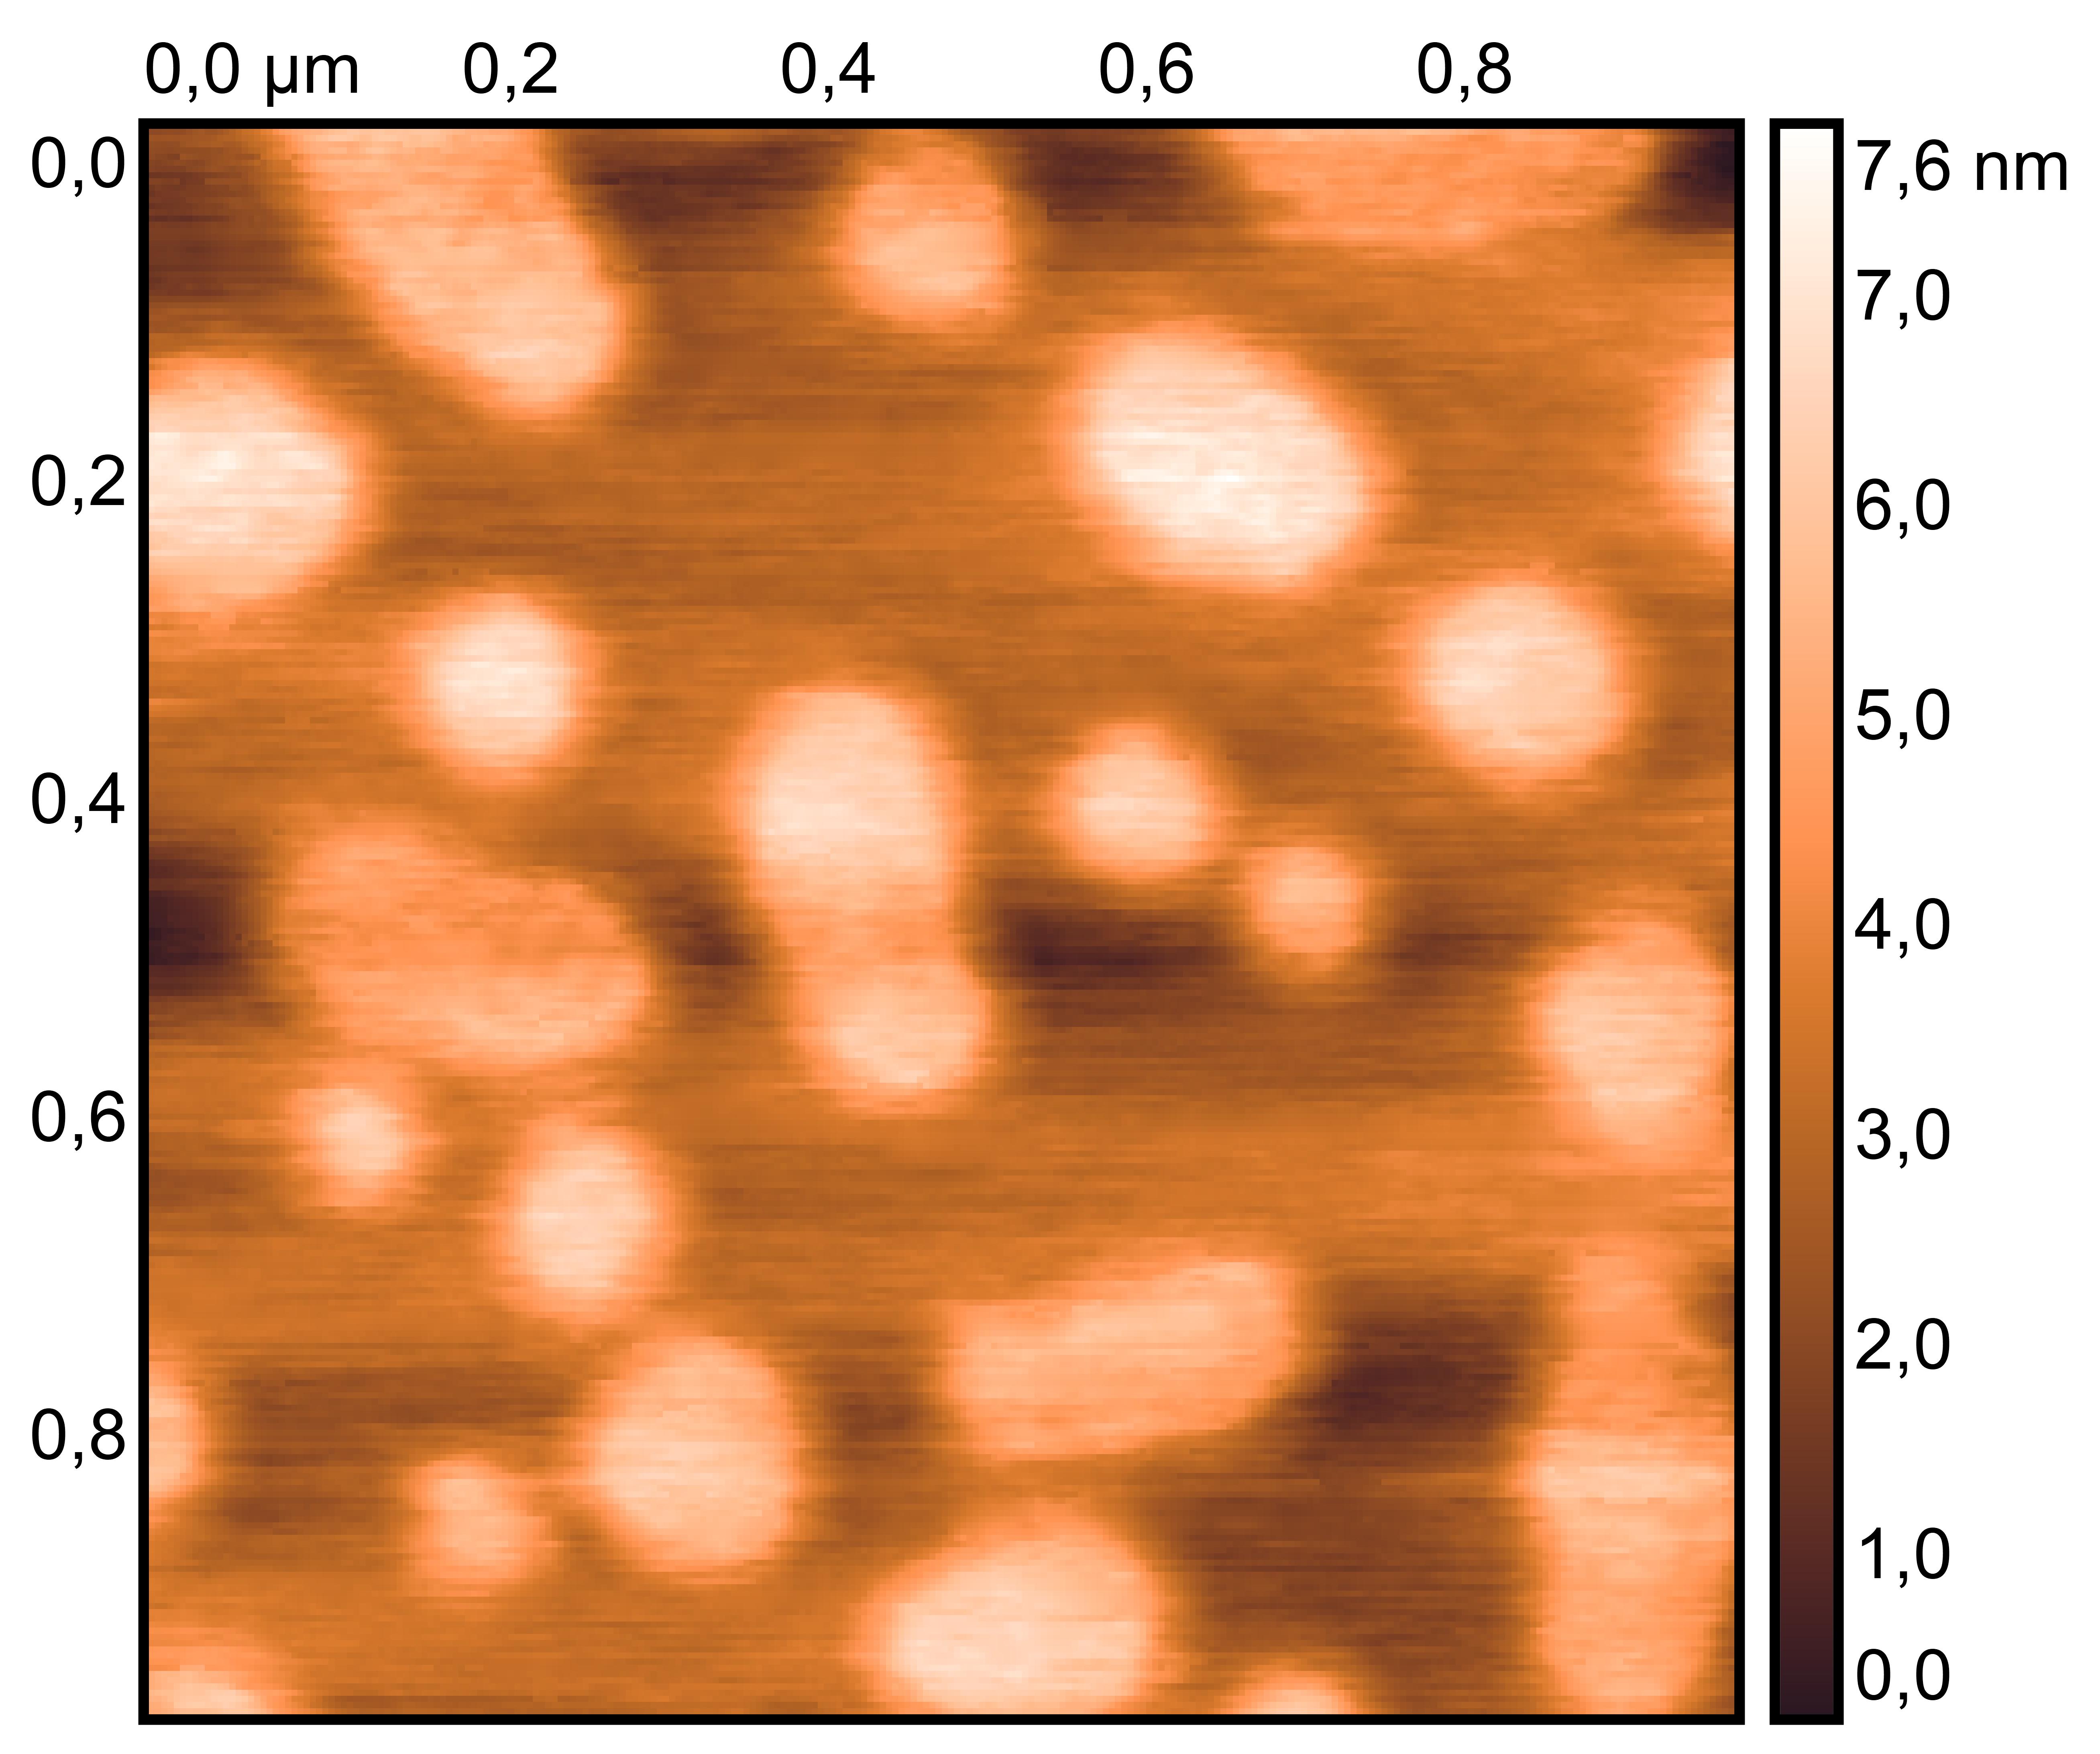
TDN + 100 mM Li⁺


TDN + 50 mM K⁺ and 50 mM Li⁺


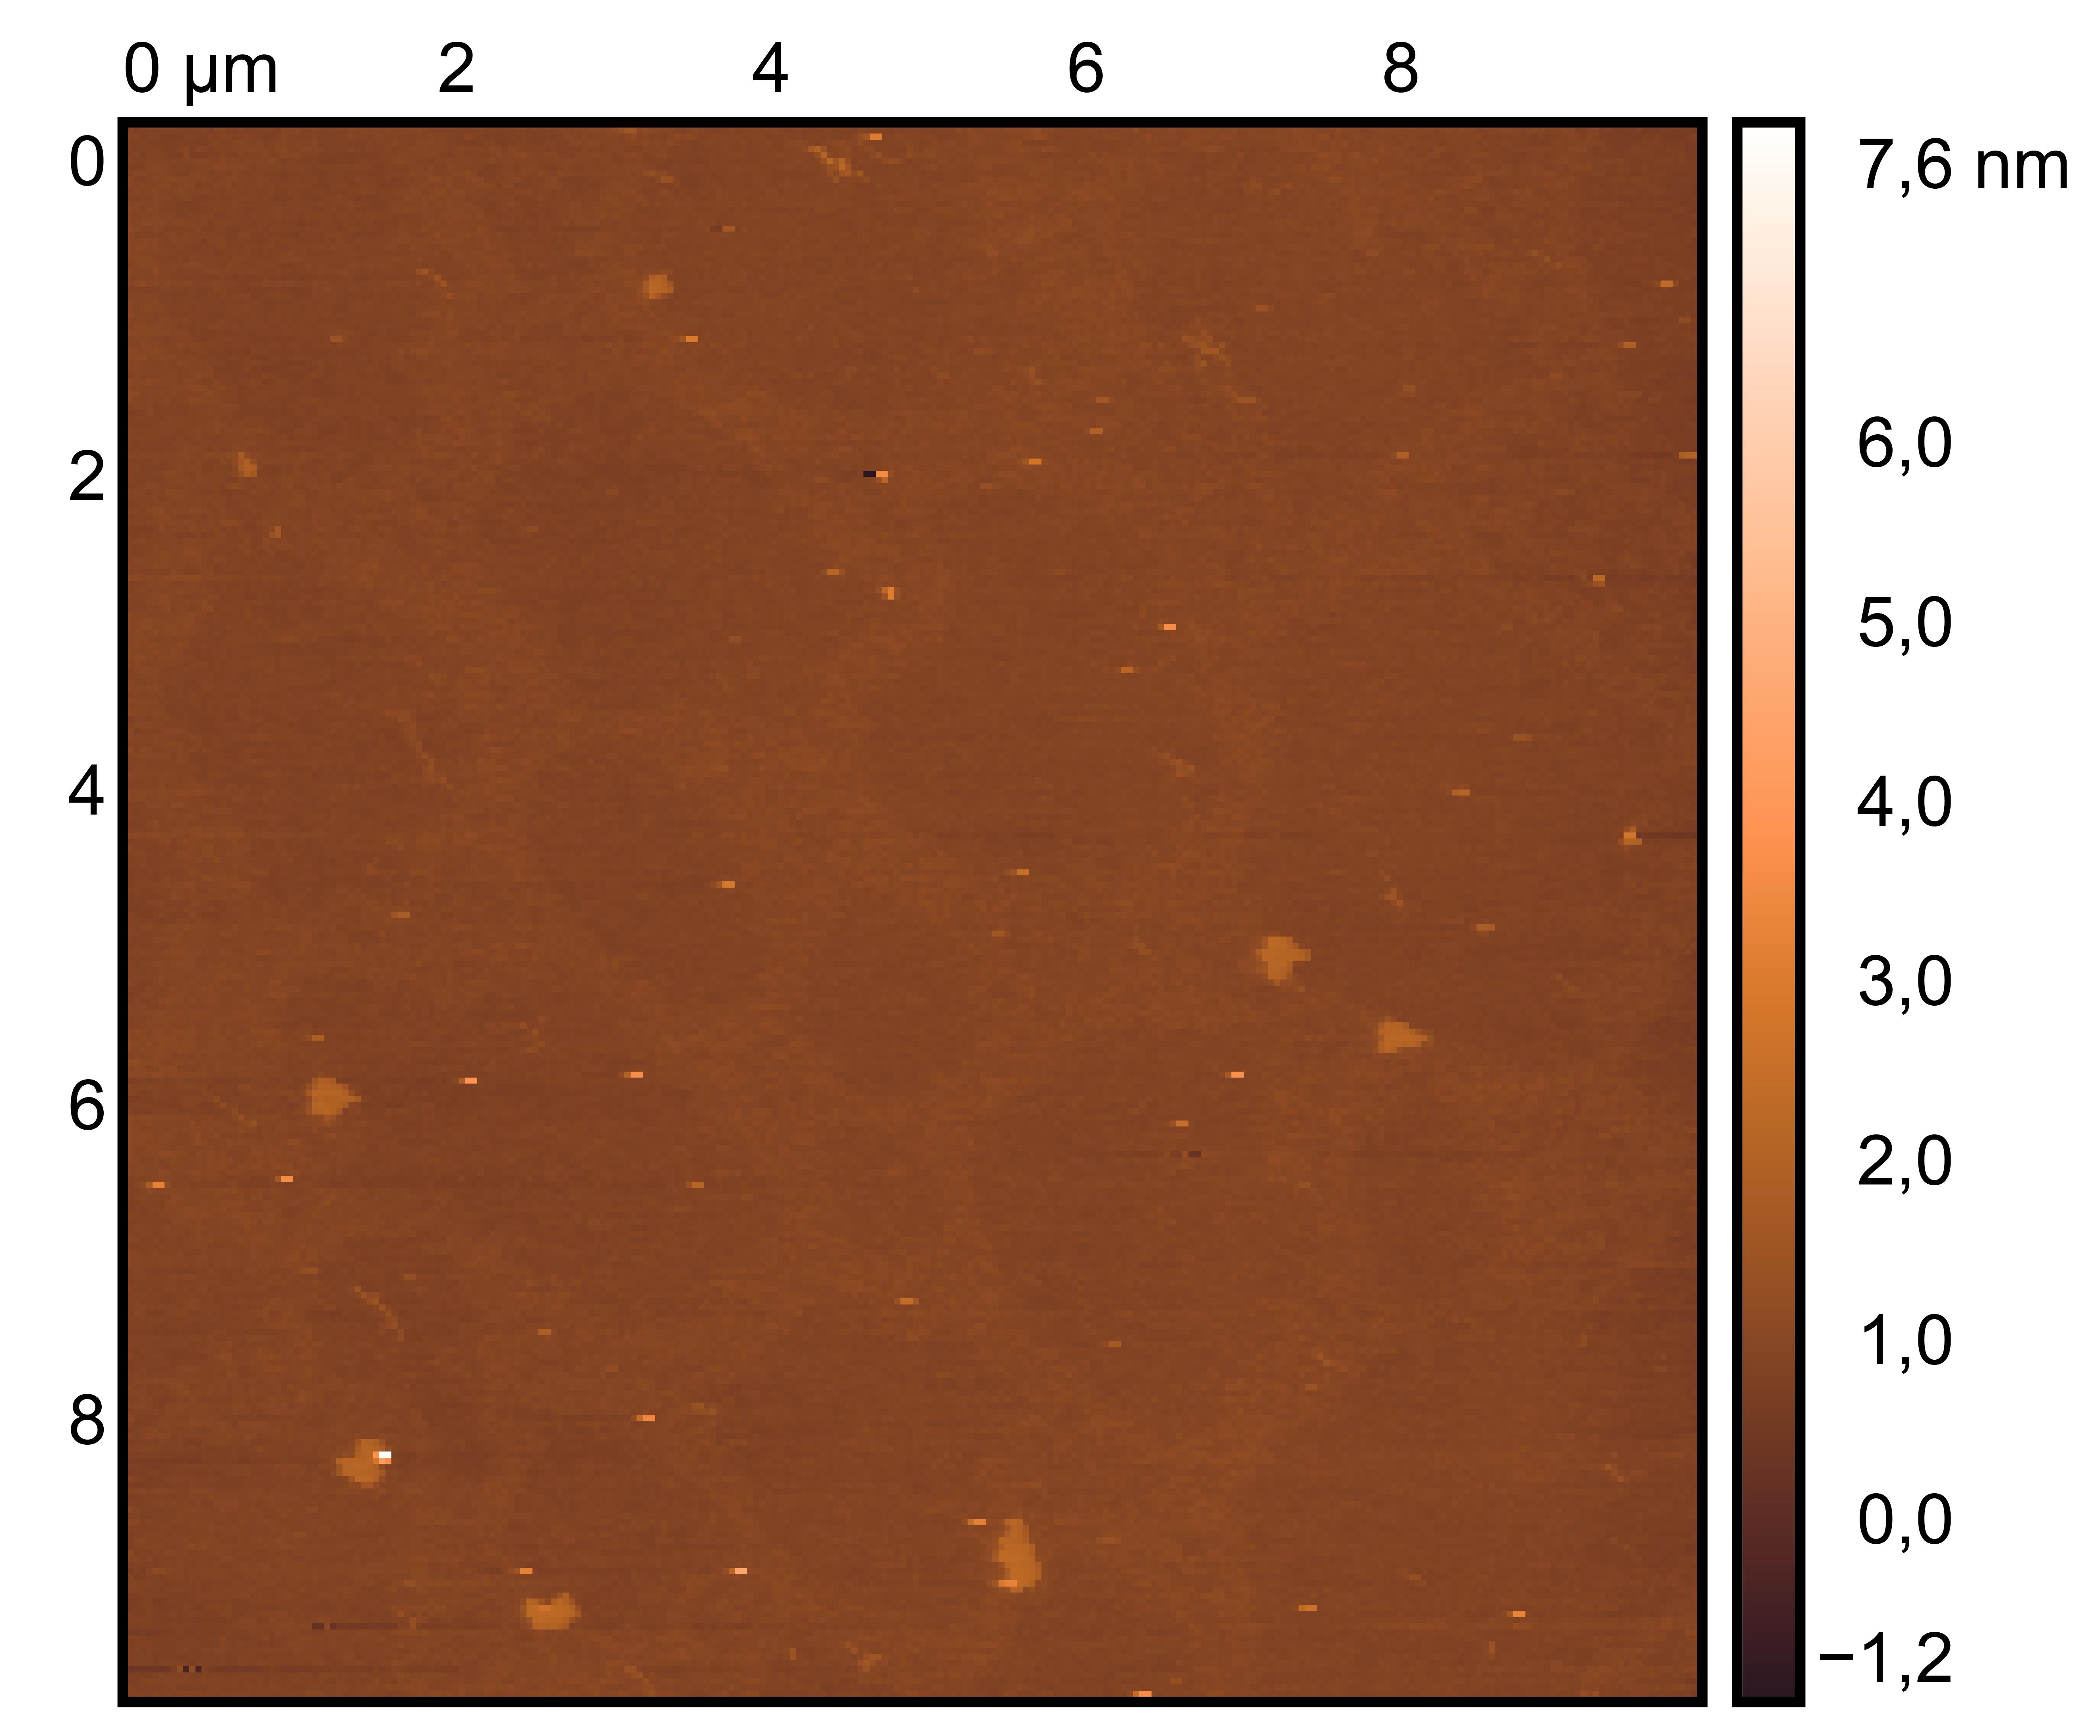
Treat 3 mica with 10 μM NiCl₂ for 3 minutes, rinse.
Drop 10 μL of (TDN + 50 mM K⁺ and 50 mM Li⁺, TDN solution, TDN + 100 mM K⁺), incubate for 8 minutes.
Wash gently 5 times, dry with nitrogen.
Scan under tapping mode in air.
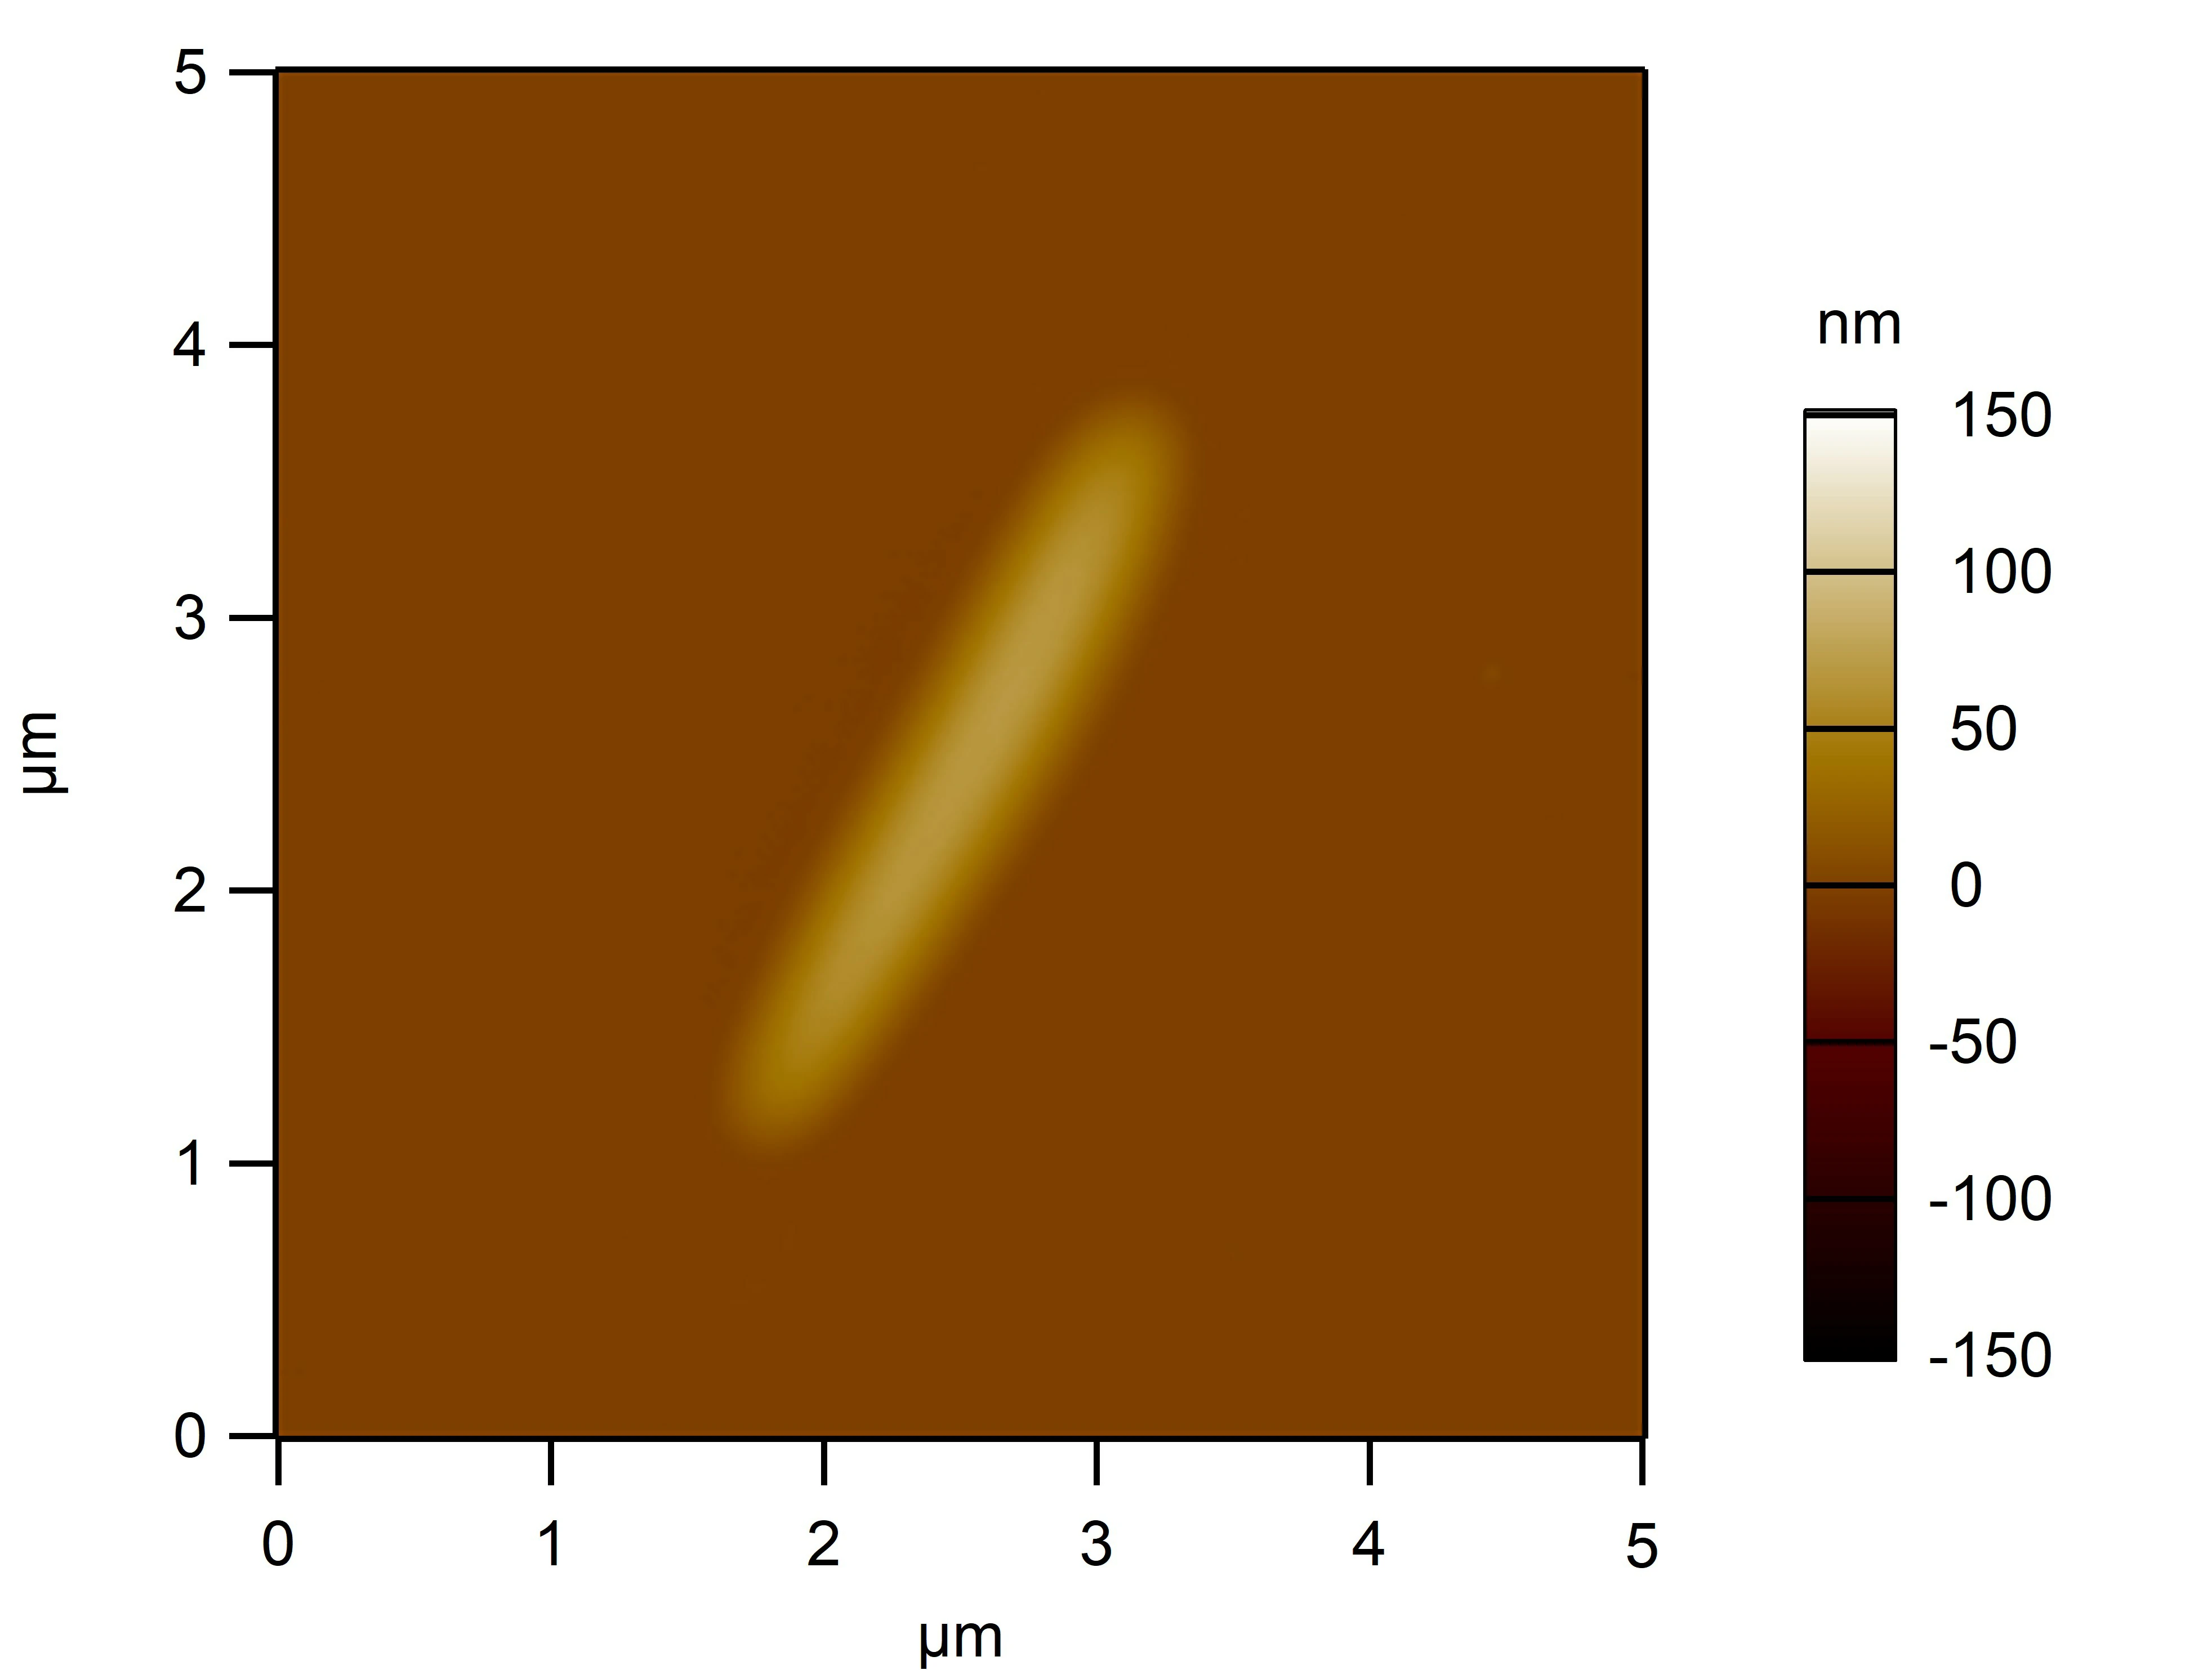
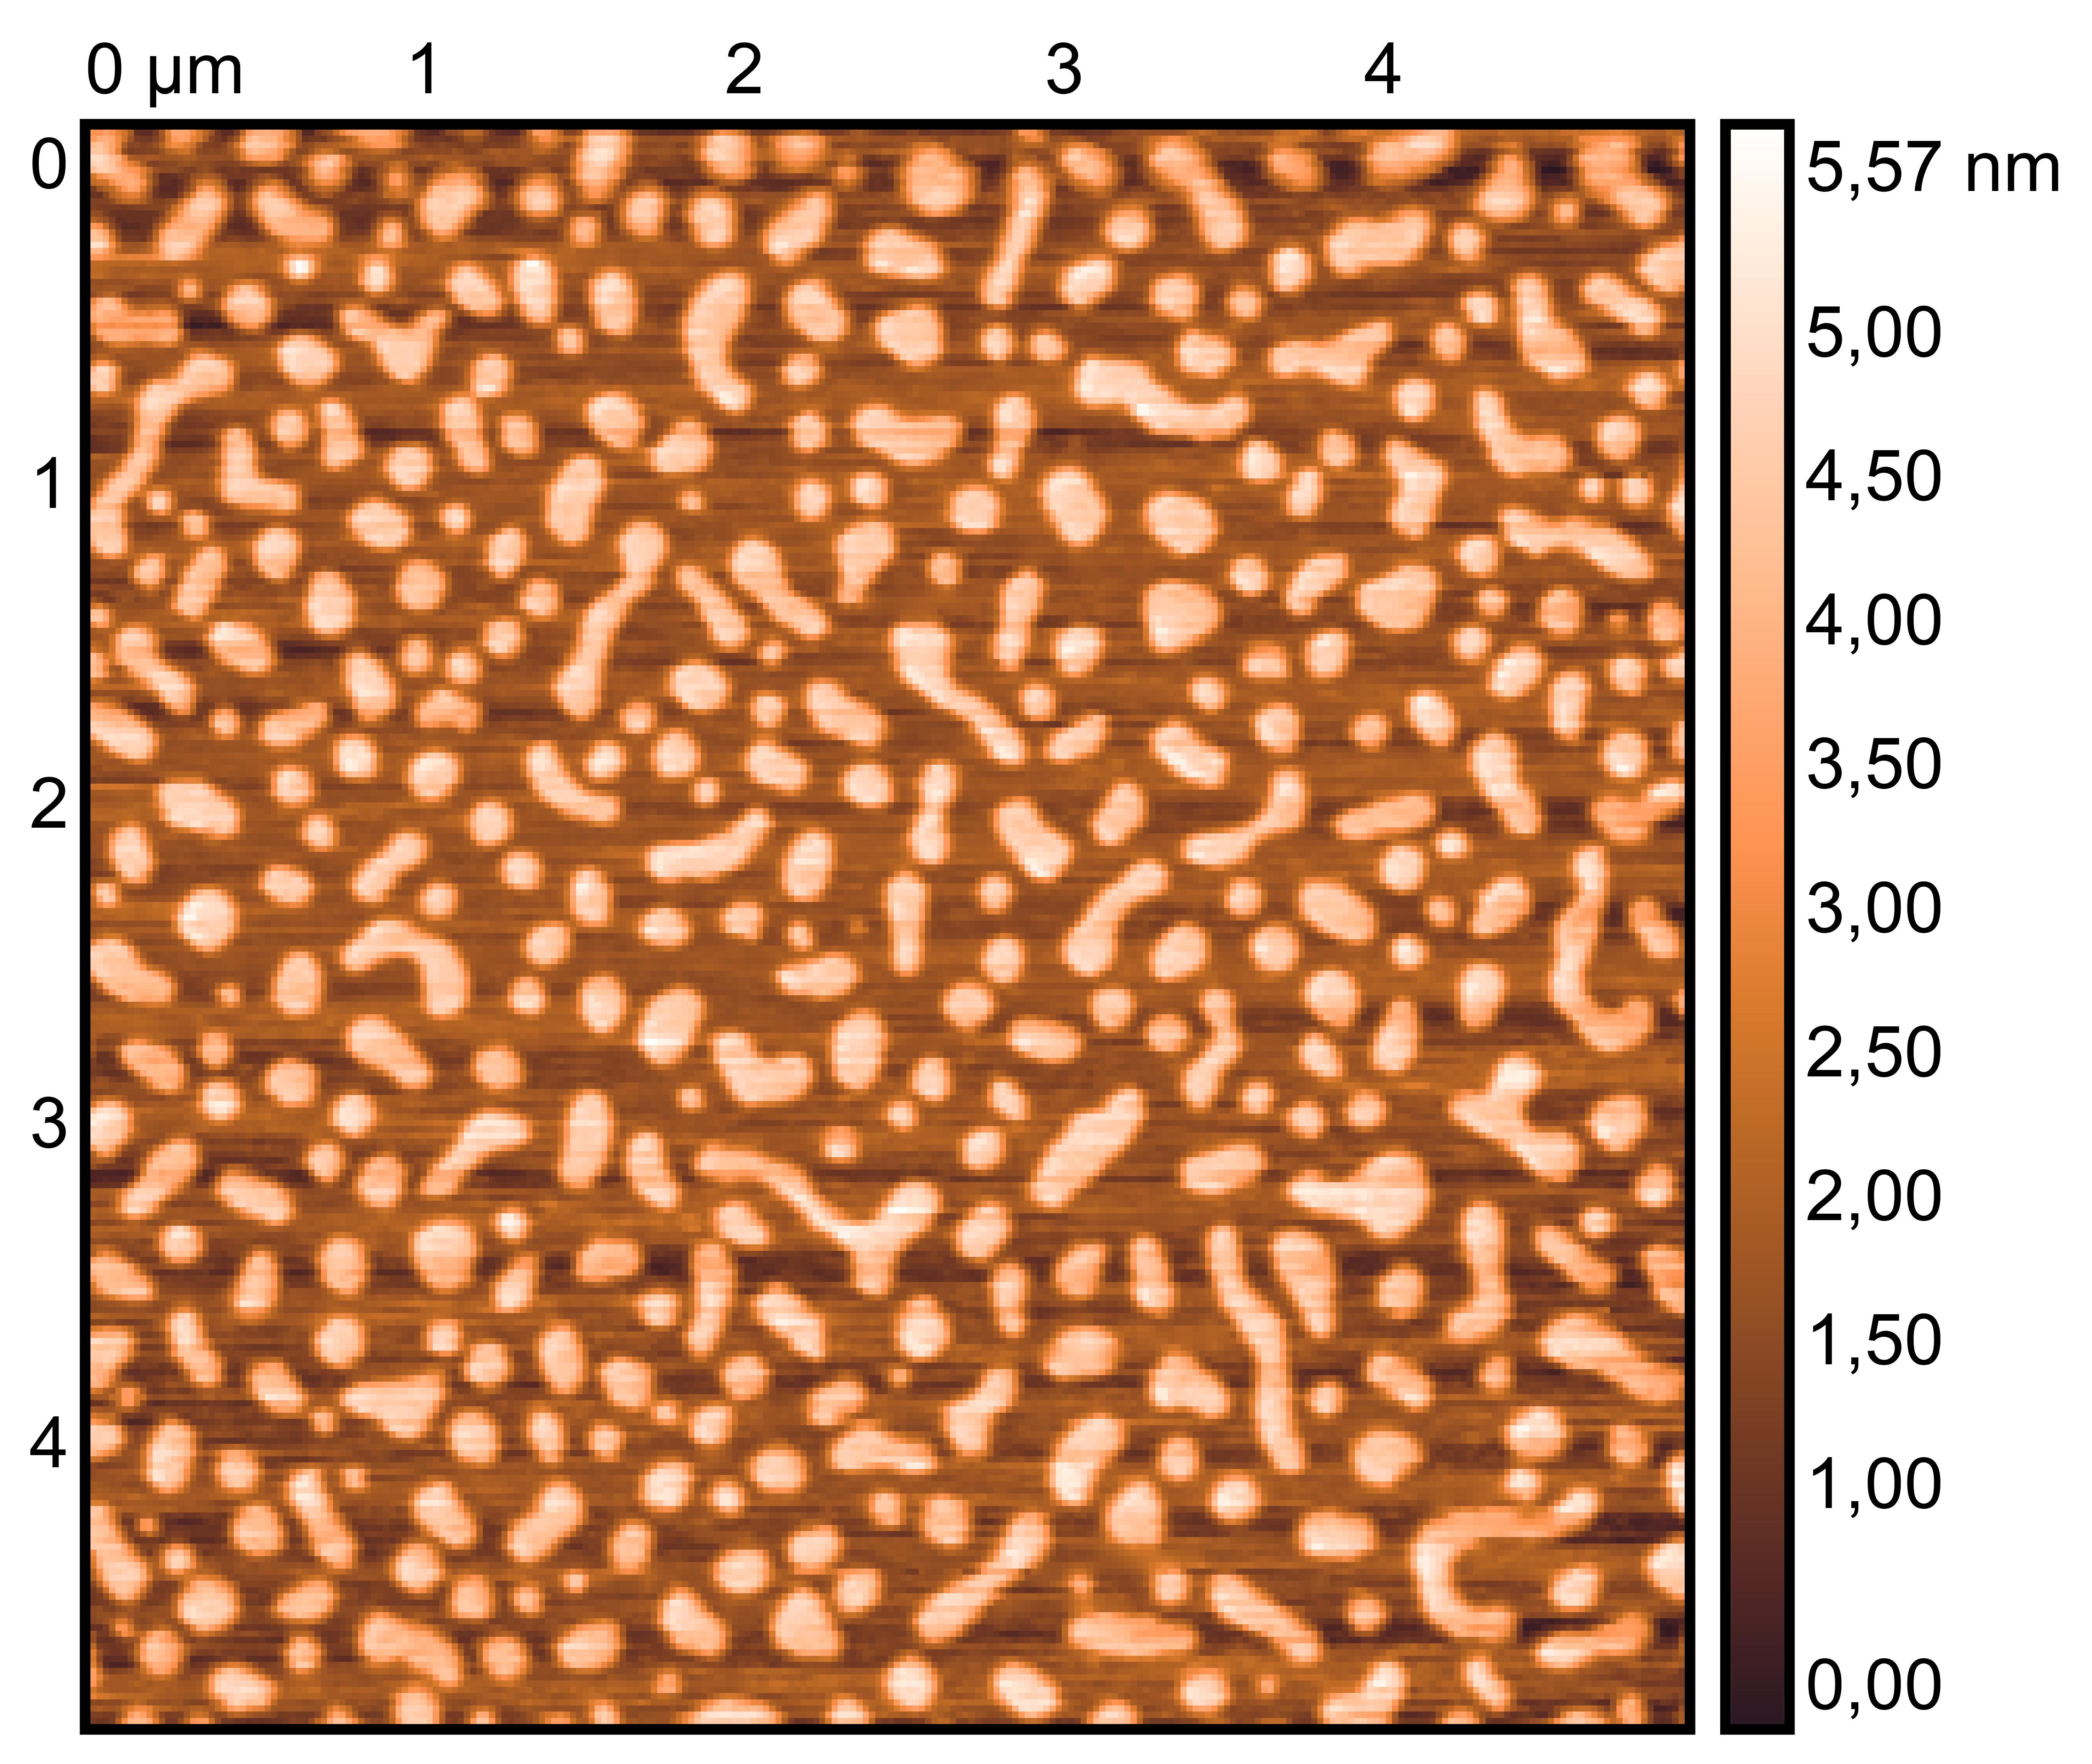
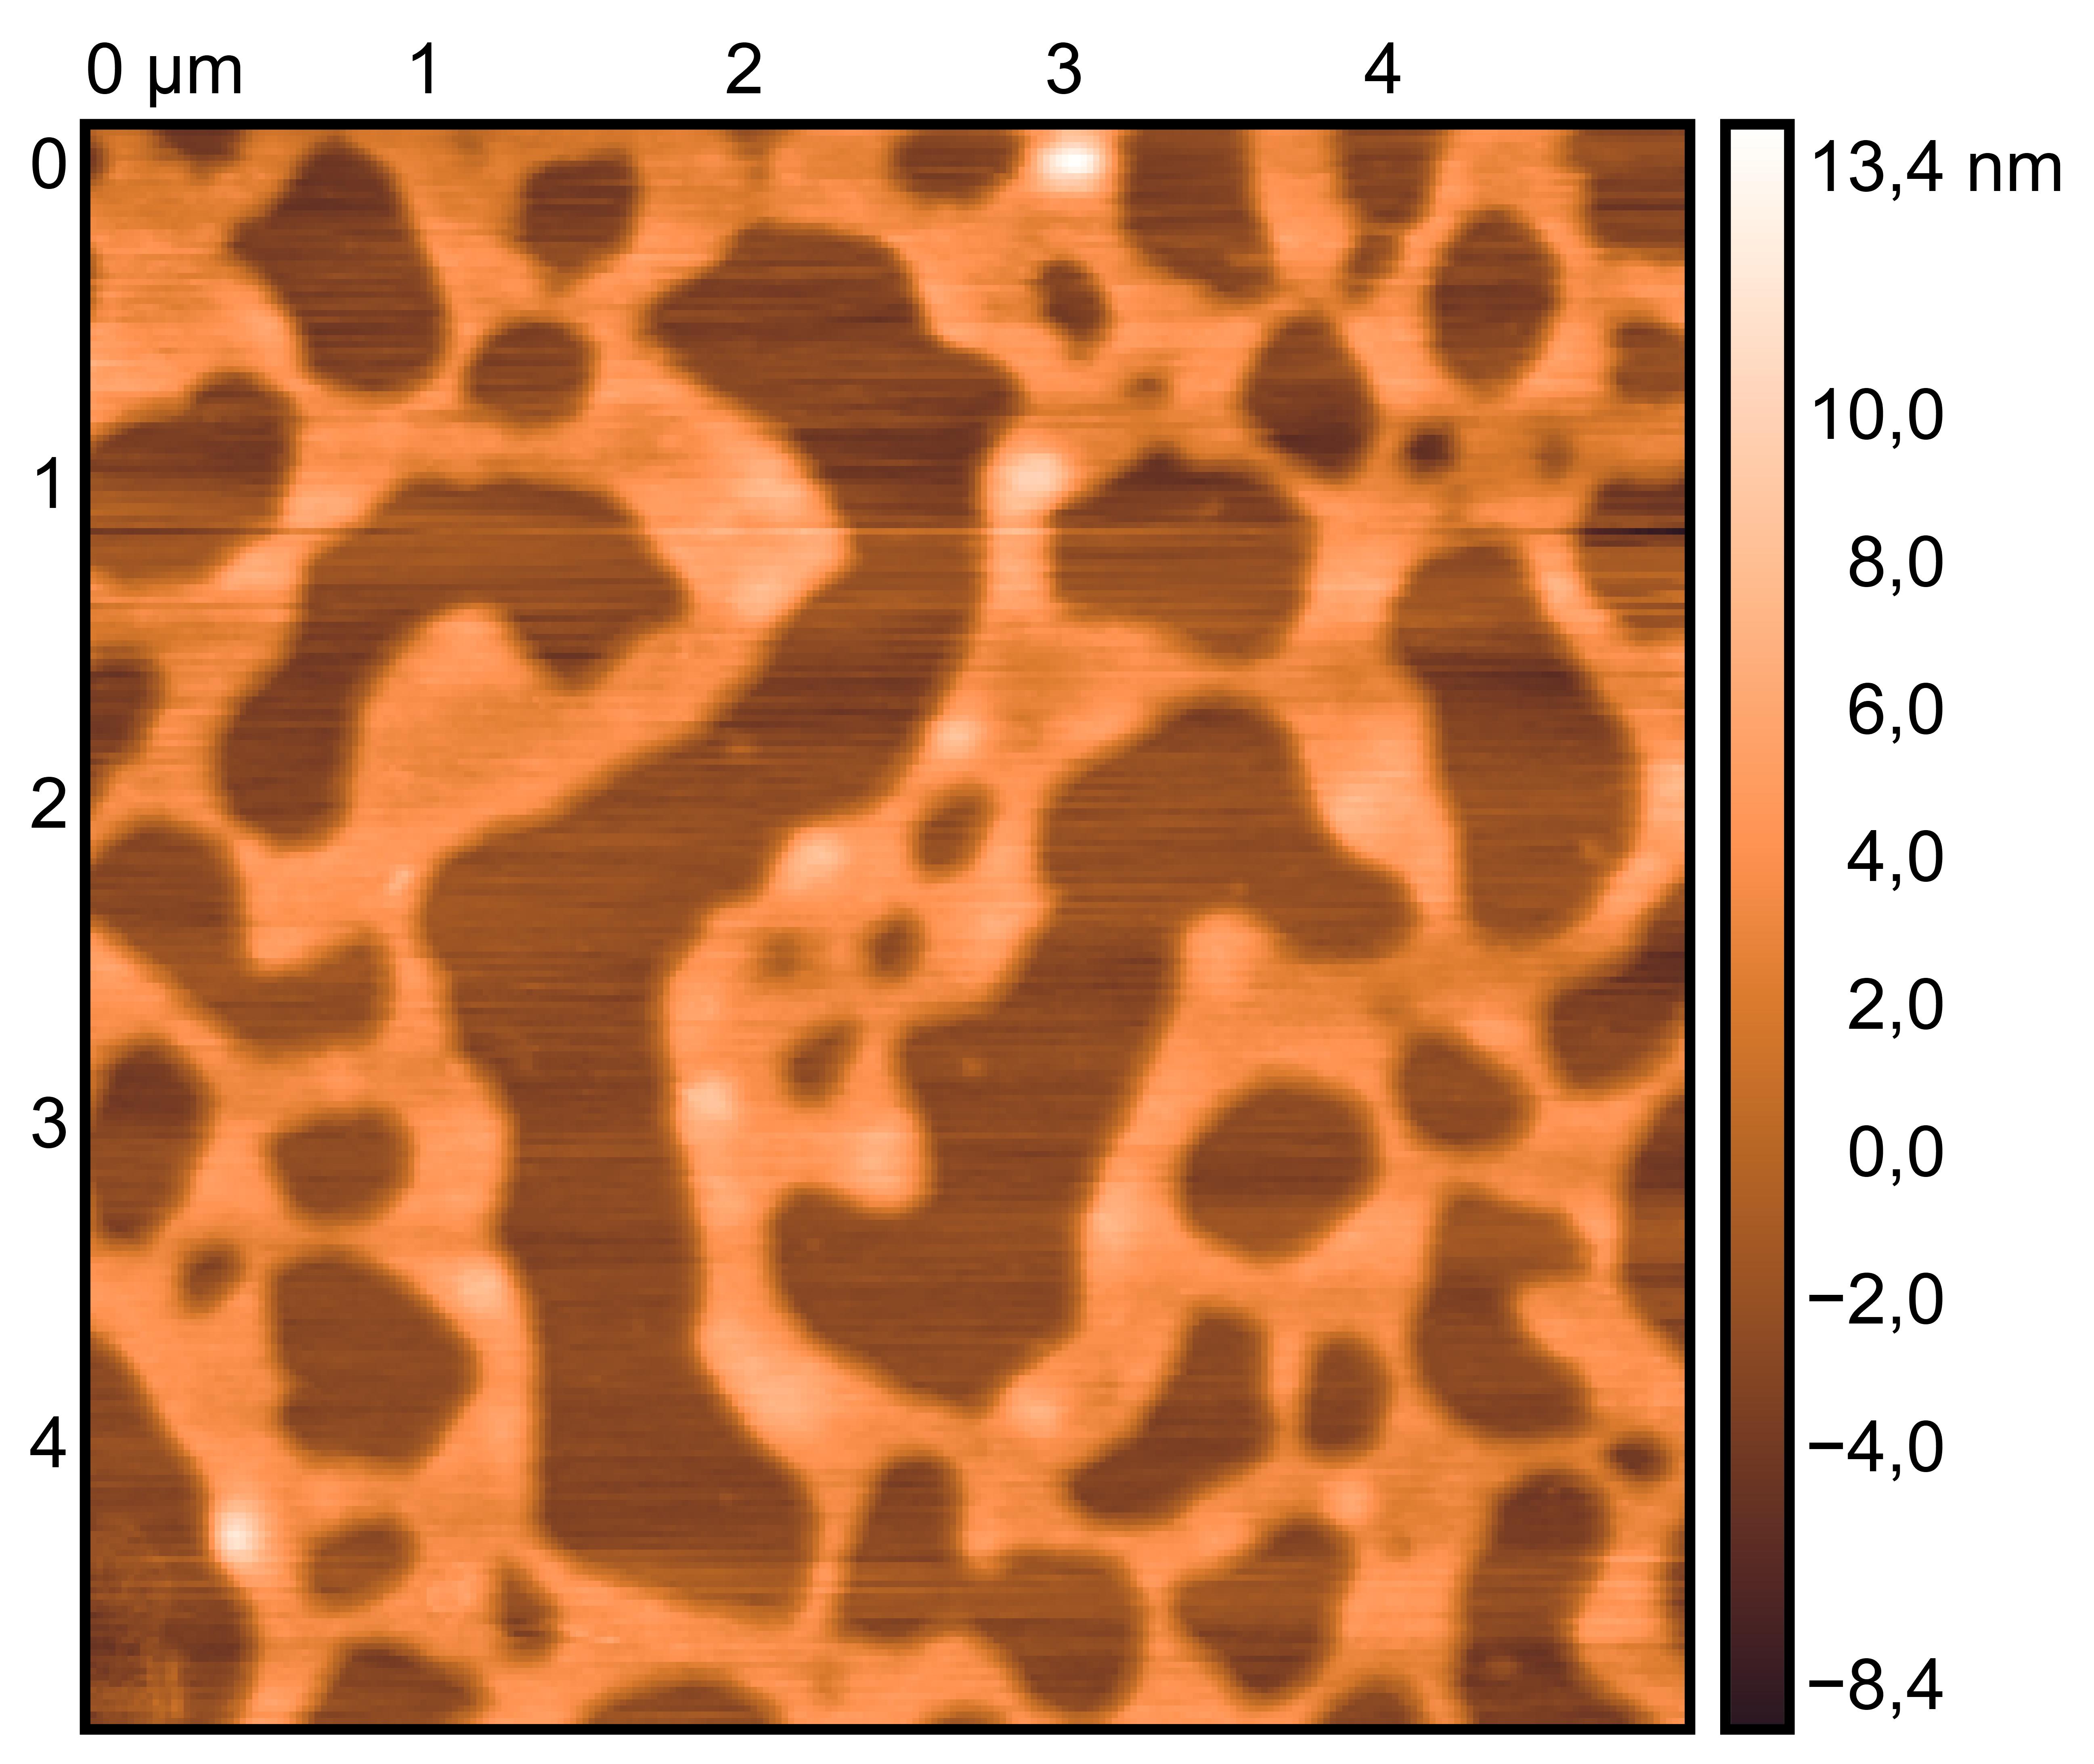
TDN + 50 mM K⁺ and 50 mM Li⁺


TDN solution
TDN + 100 mM K⁺
Mix TDN solution with 200 mM KCl solution and 200 mM LiCl solution (4:1:3).
Incubate 24 hours at room temperature.
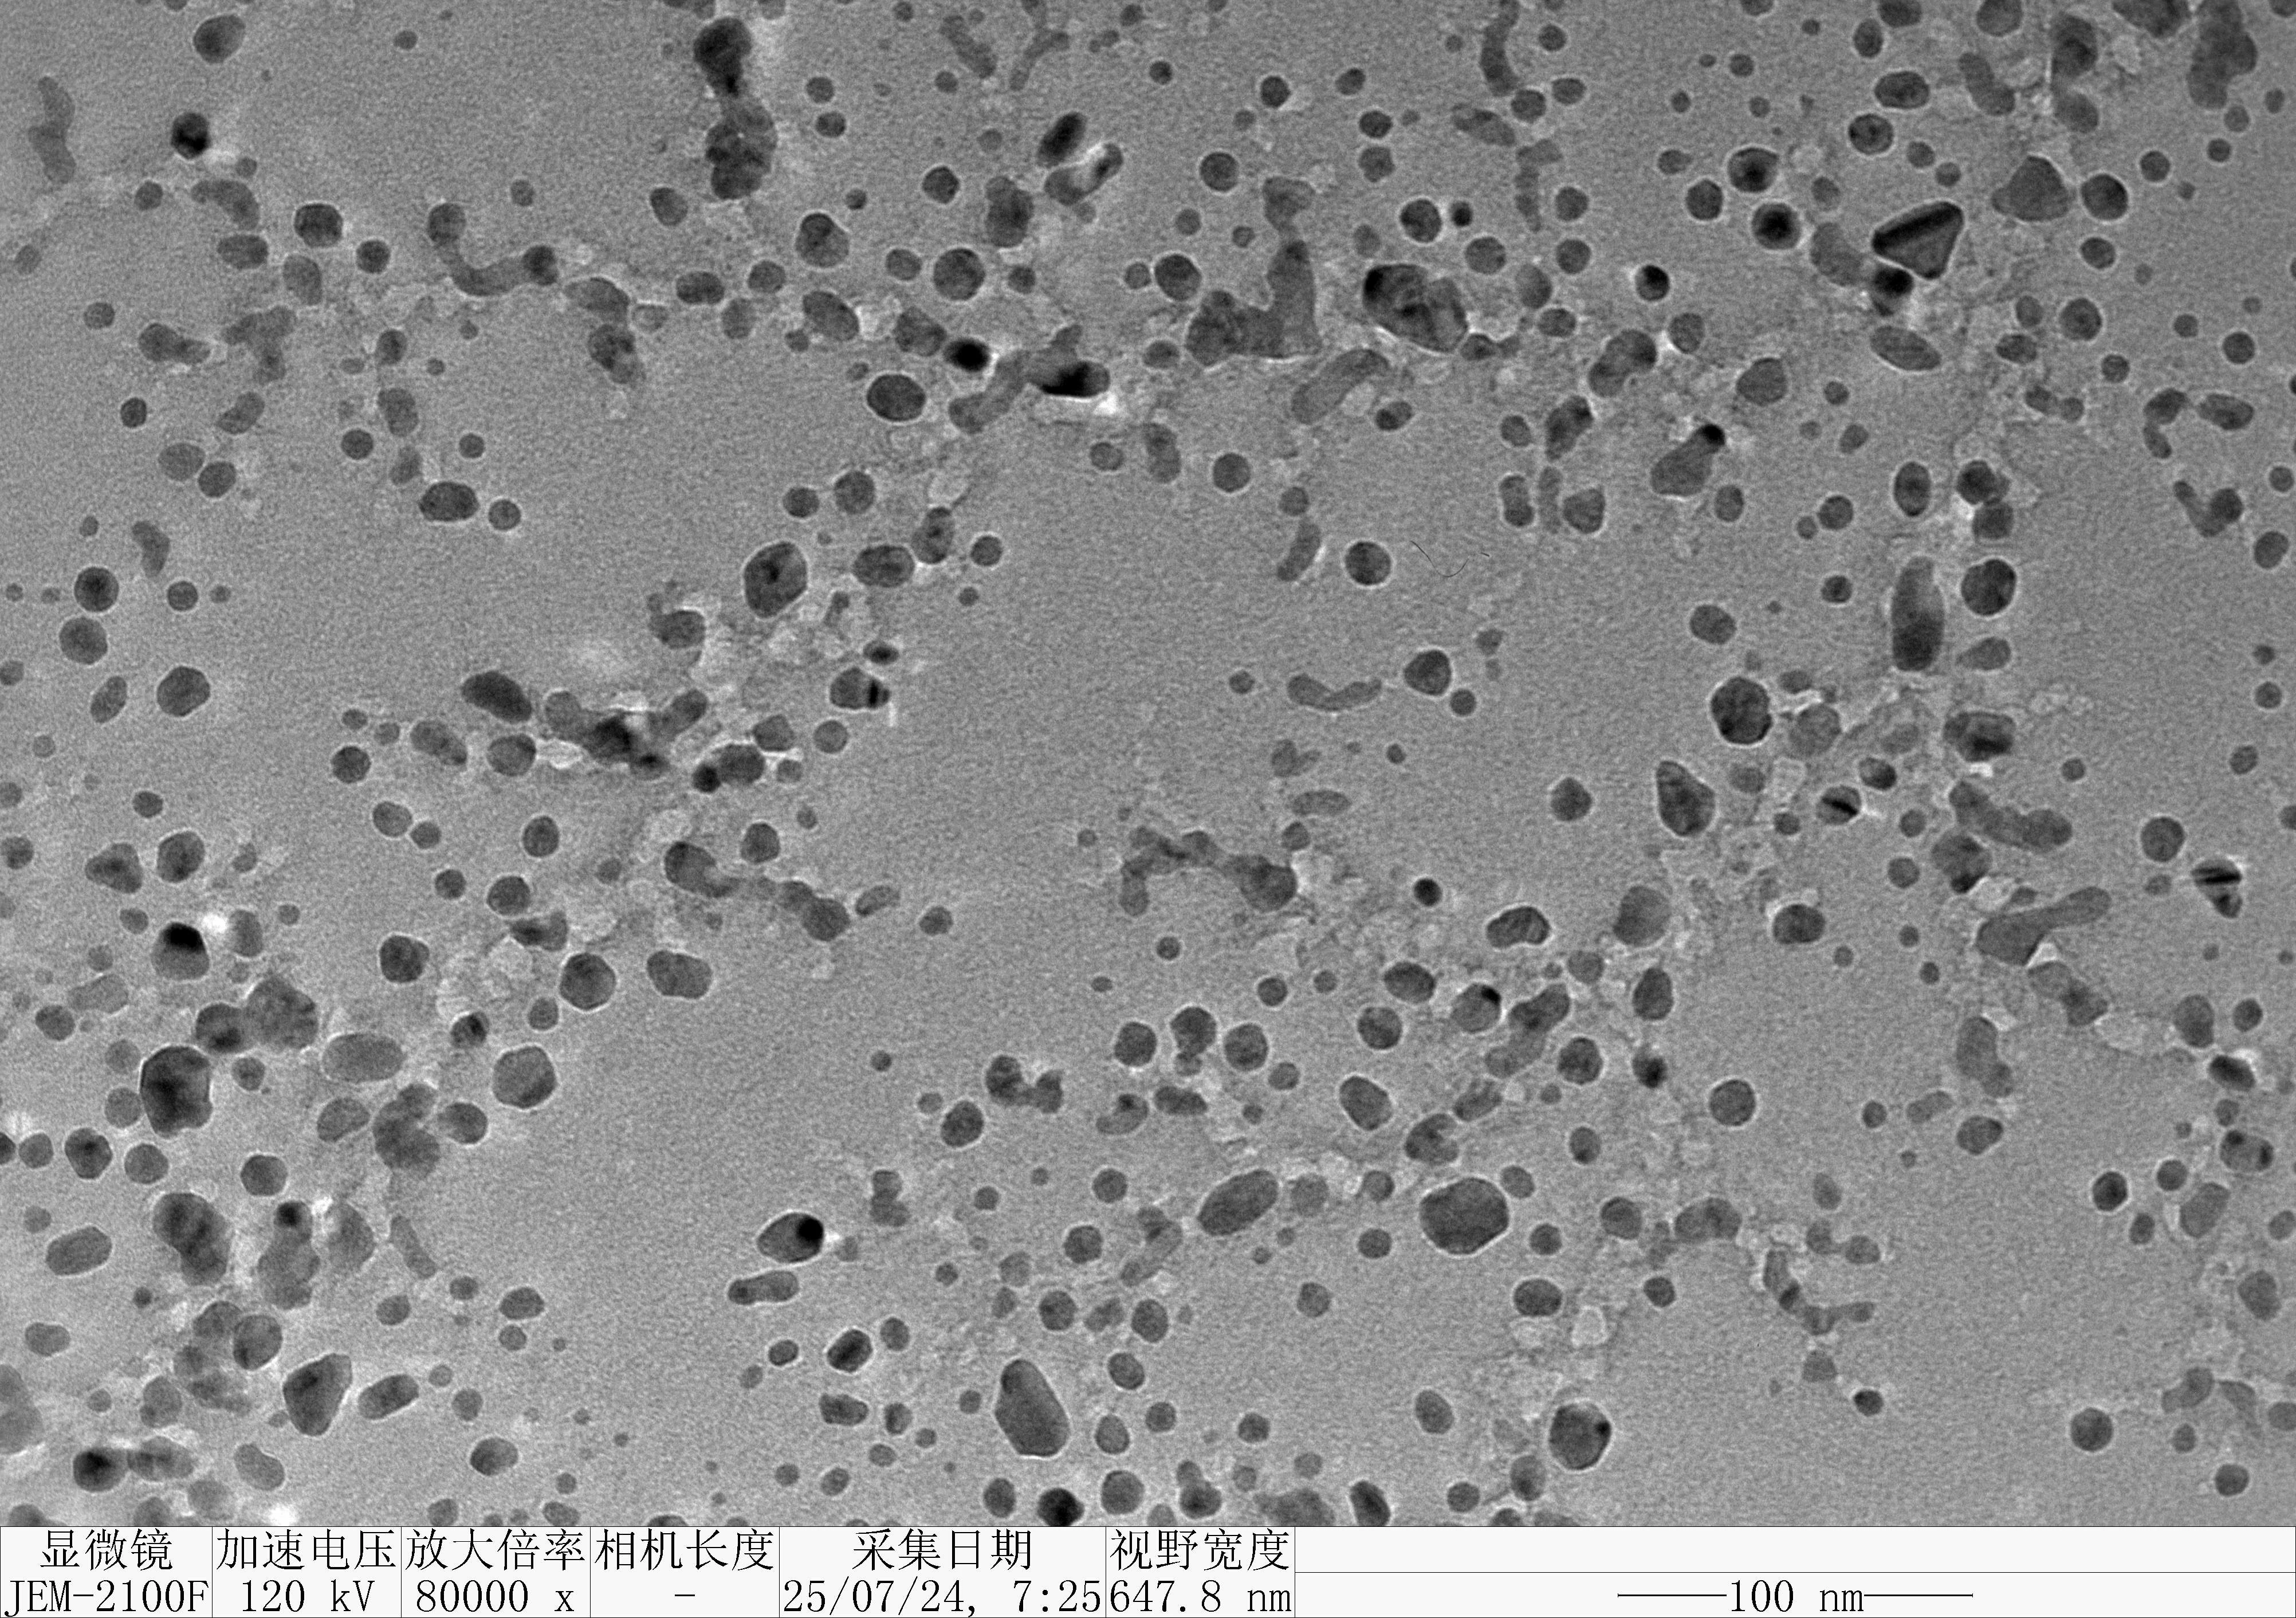
Clean 1 copper grid with plasma for 15 seconds.
Drop 1.5 μL of (TDN + 25 mM K⁺ and 75 mM Li⁺) onto the different grids, allow adsorption for 2–5 minutes.
Remove excess liquid, air dry. Stain with 10 μL of 2% phosphotungstic acid solution for one minute, then wash off with water and dry again.
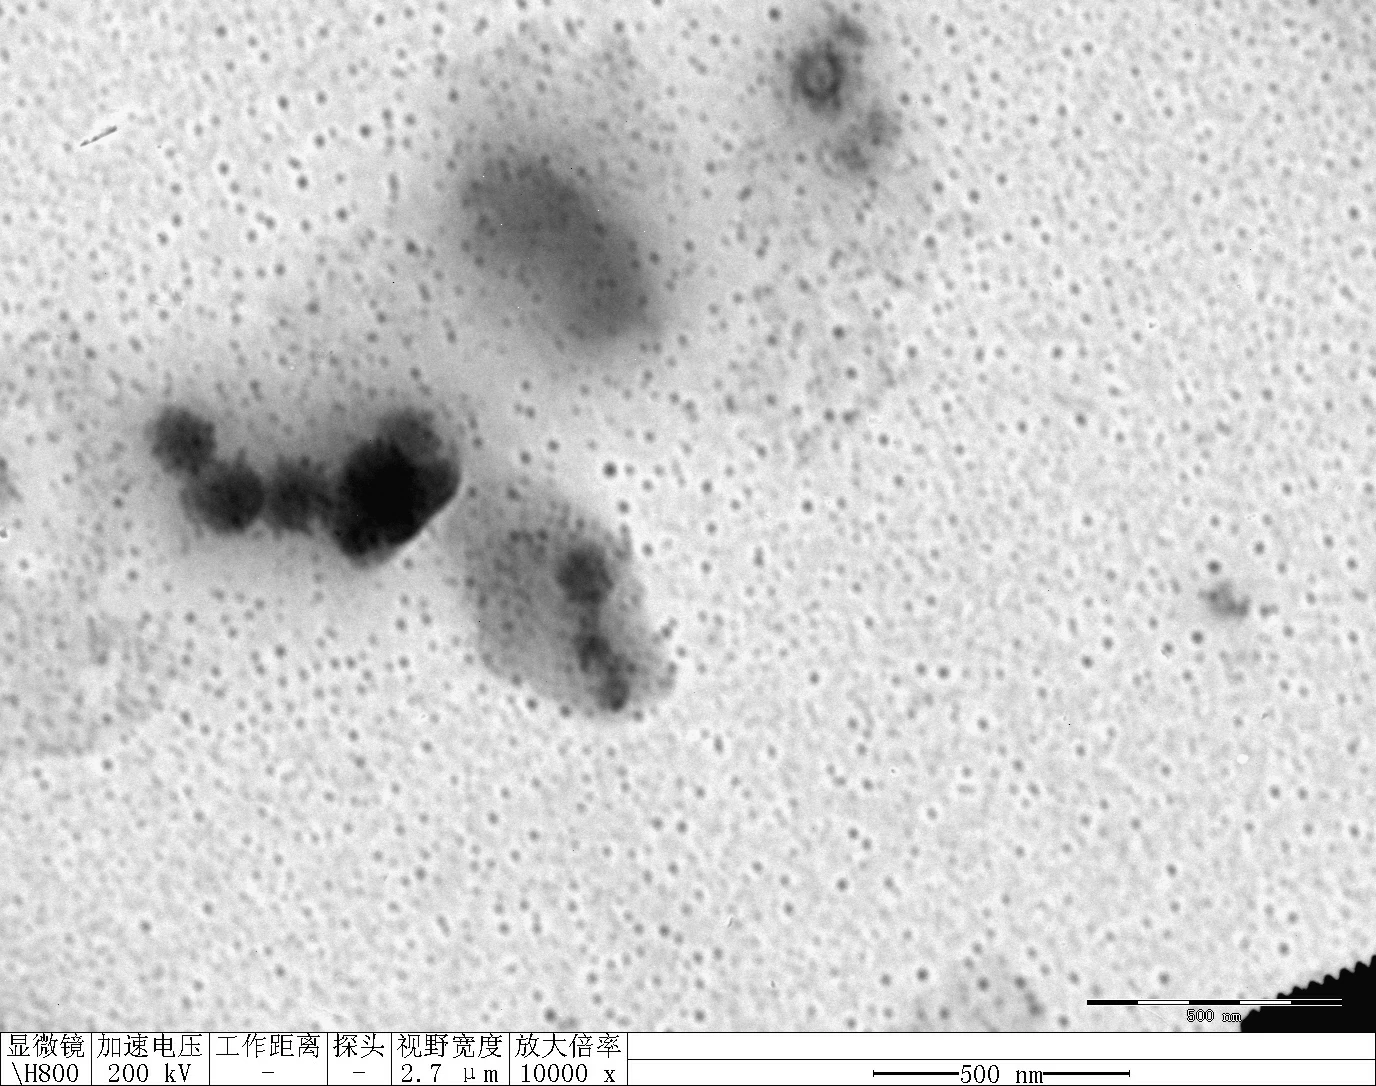
Observe under JEM-F200 (200 kV).
TDN + 25 mM K⁺ and 75 mM Li⁺


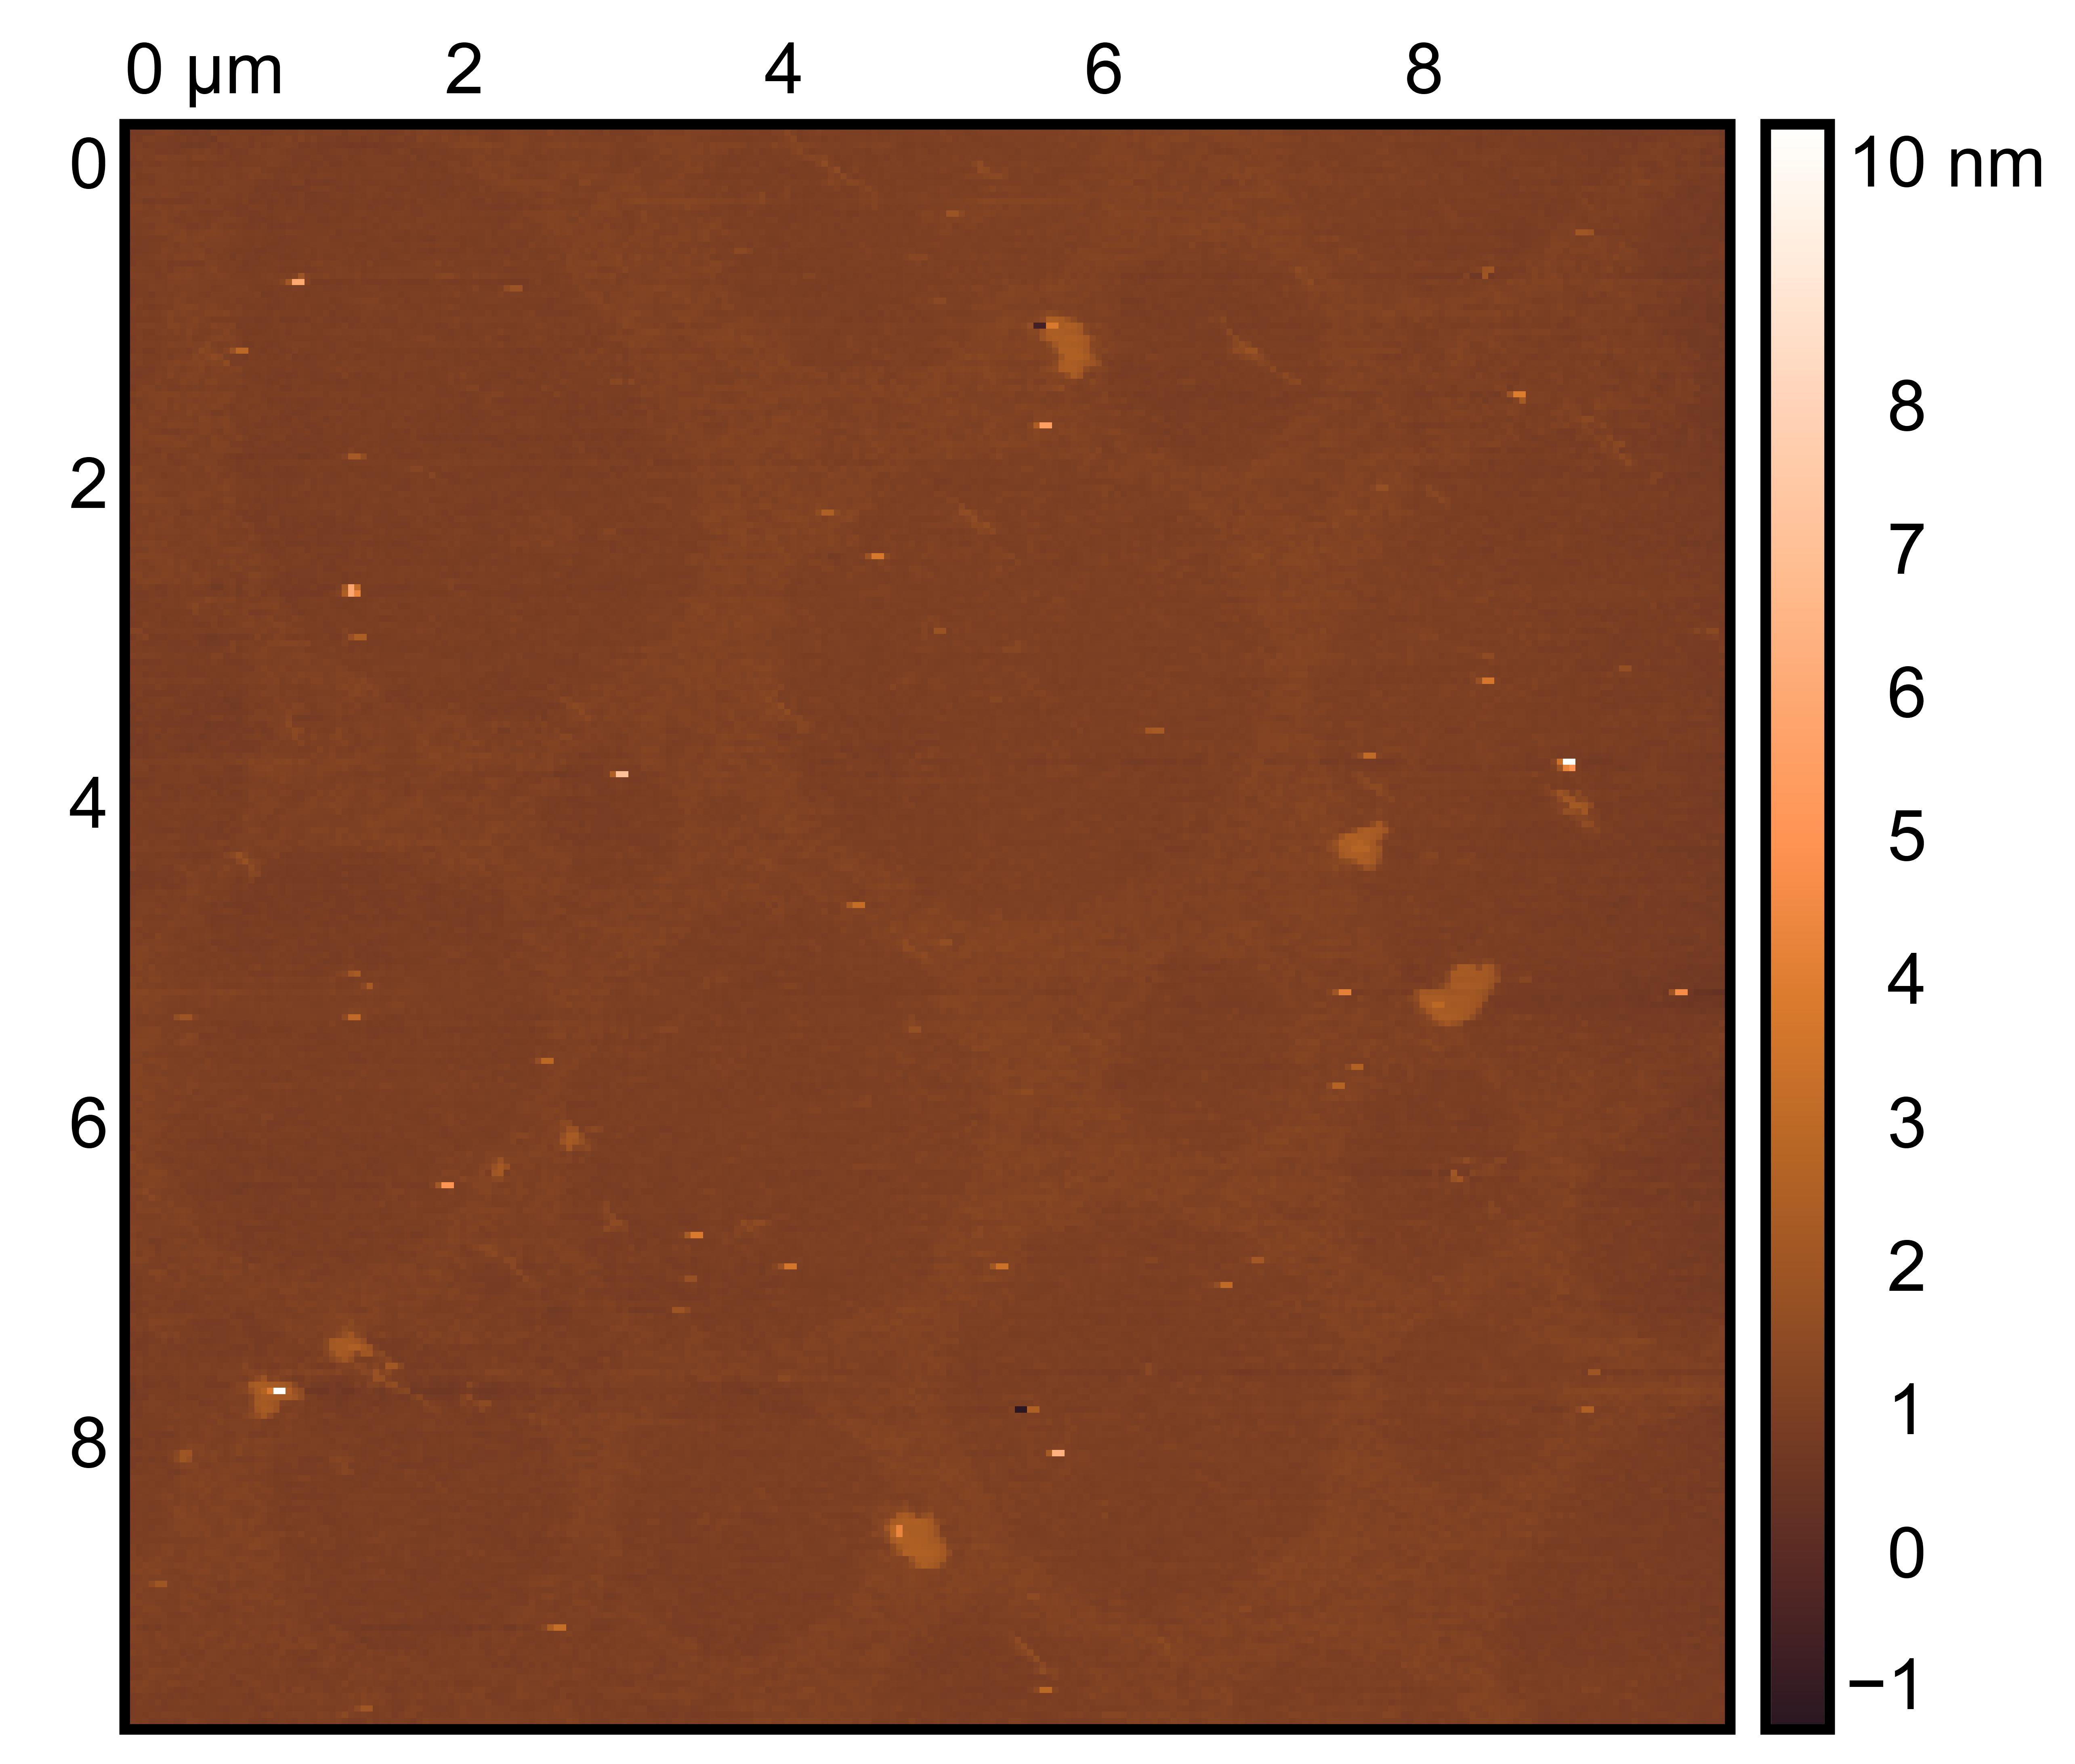
Treat 2 mica with 10 μM NiCl₂ for 3 minutes, rinse.
Drop 10 μL of (TDN + 25 mM K⁺ and 75 mM Li⁺, TDN + 50 mM K⁺), incubate for 8 minutes.
Wash gently 5 times, dry with nitrogen.
Scan under tapping mode in air.
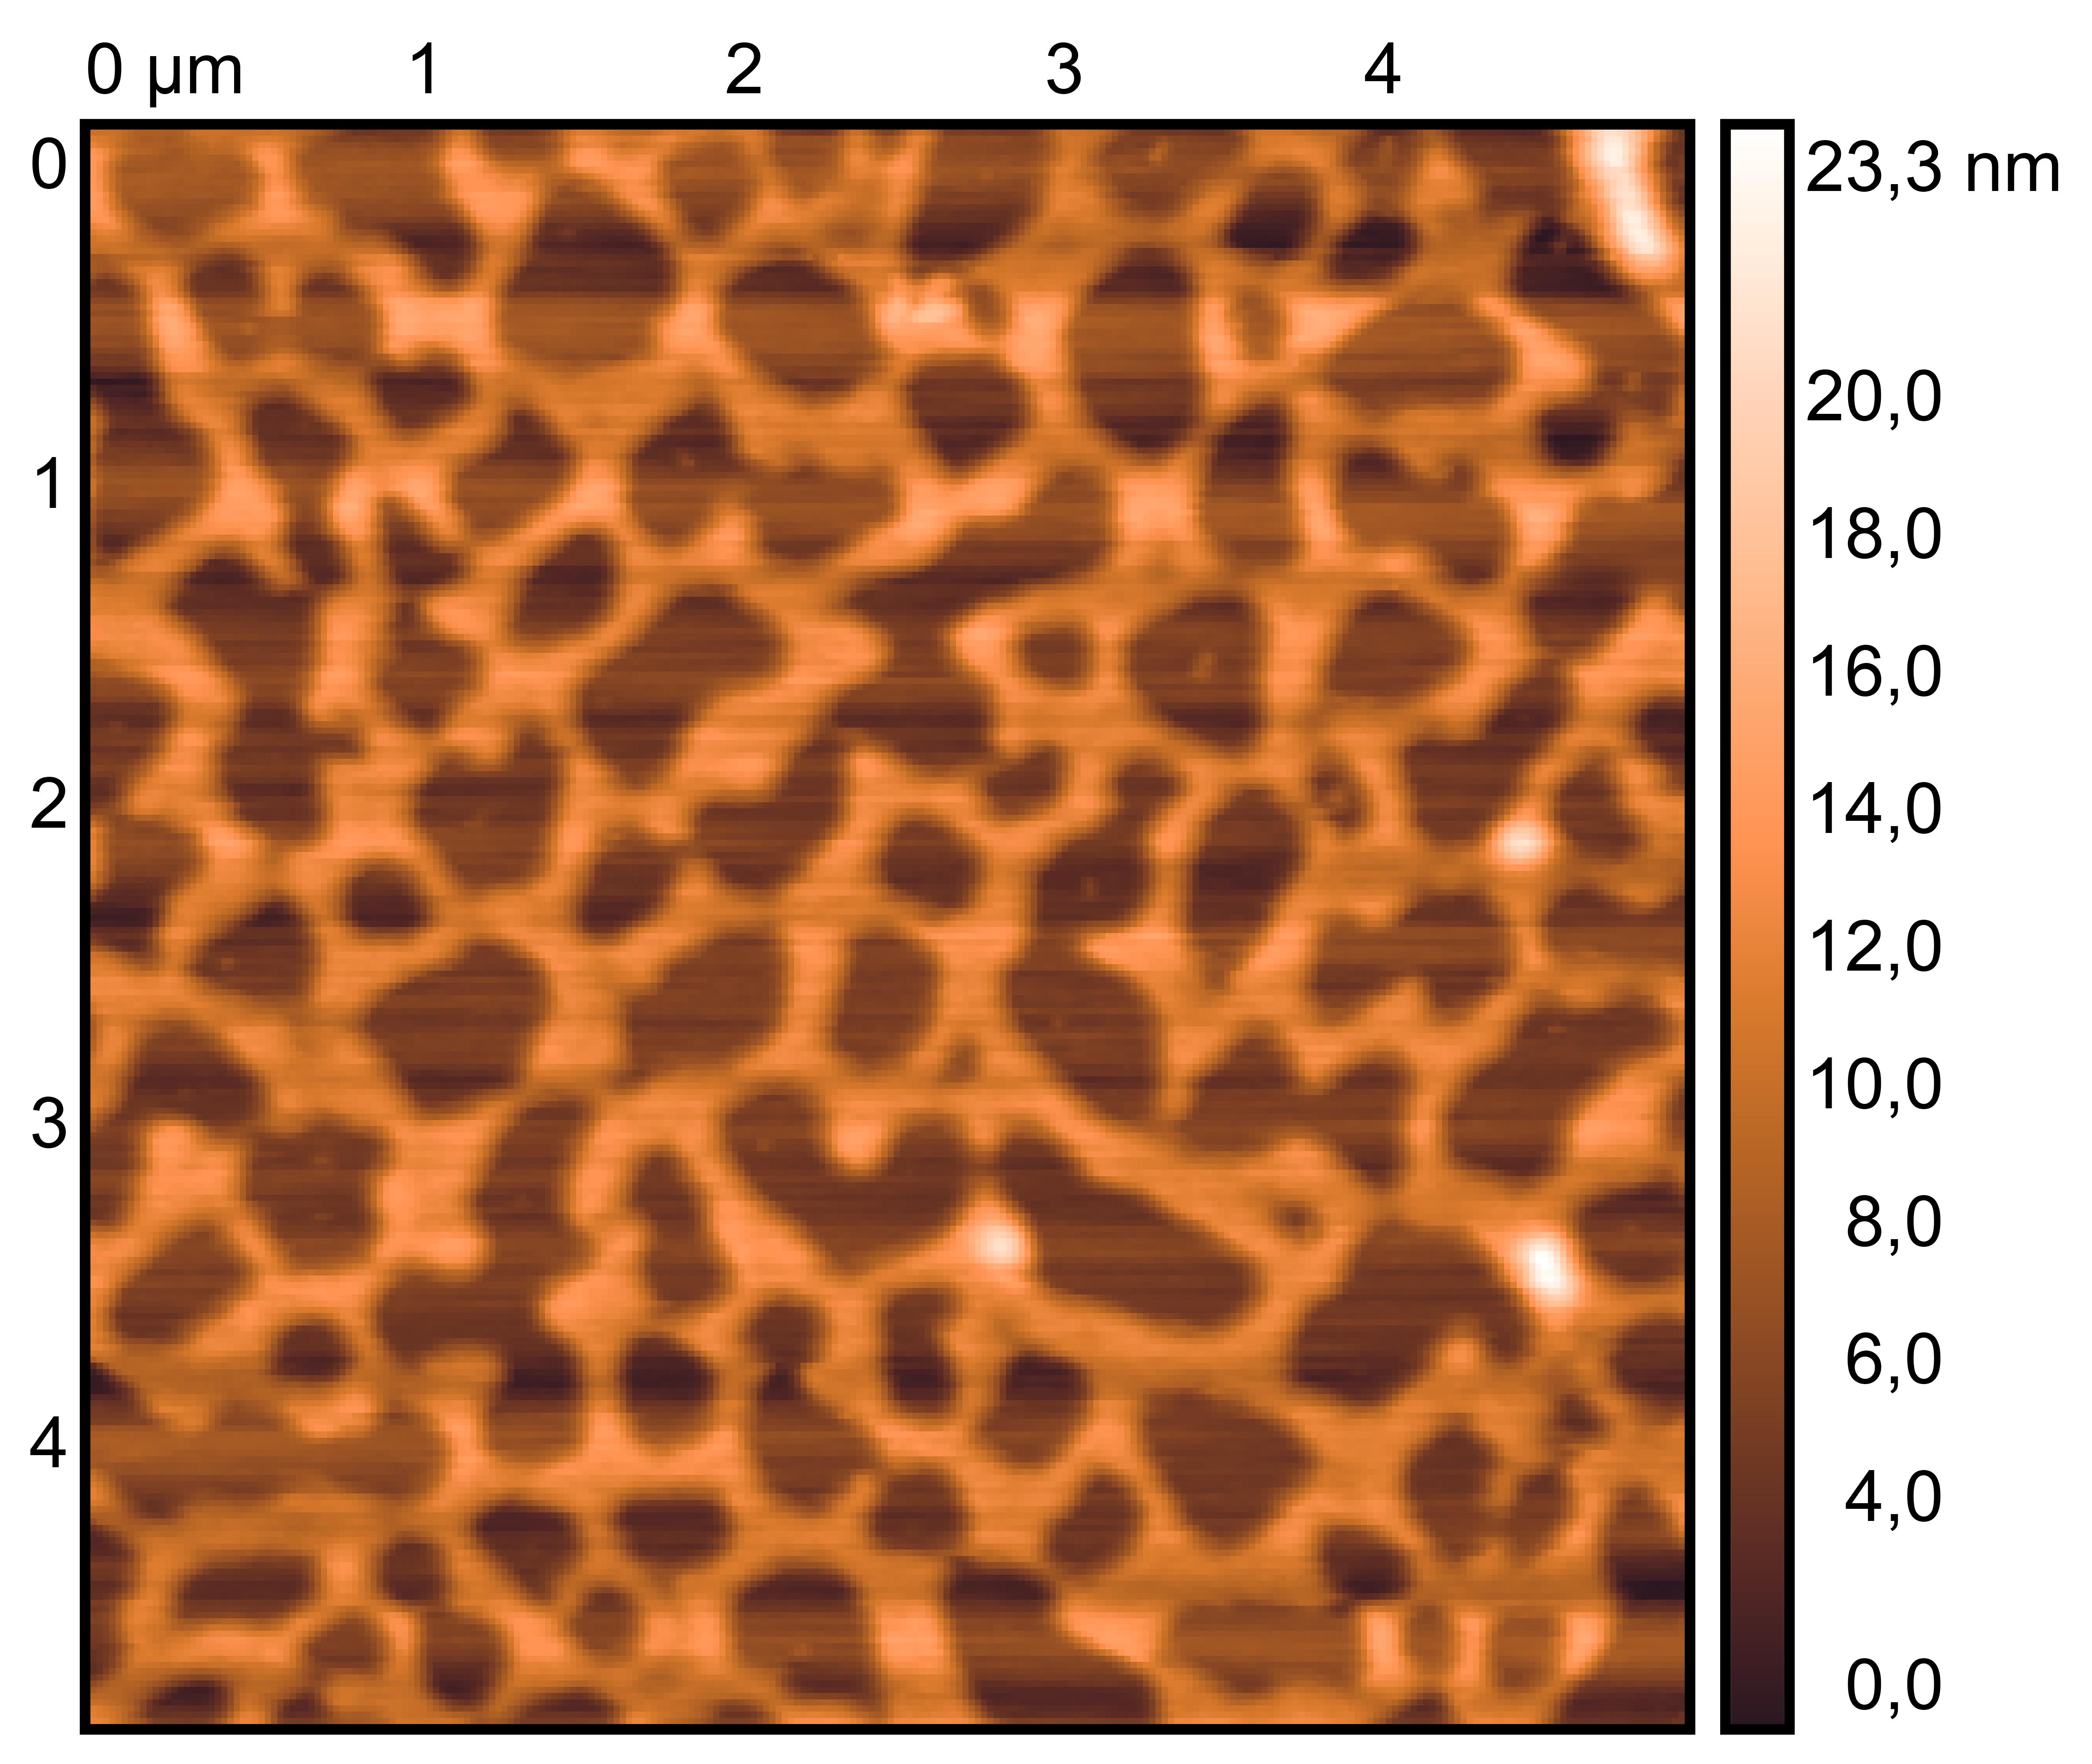
TDN + 25 mM K⁺ and 75 mM Li⁺
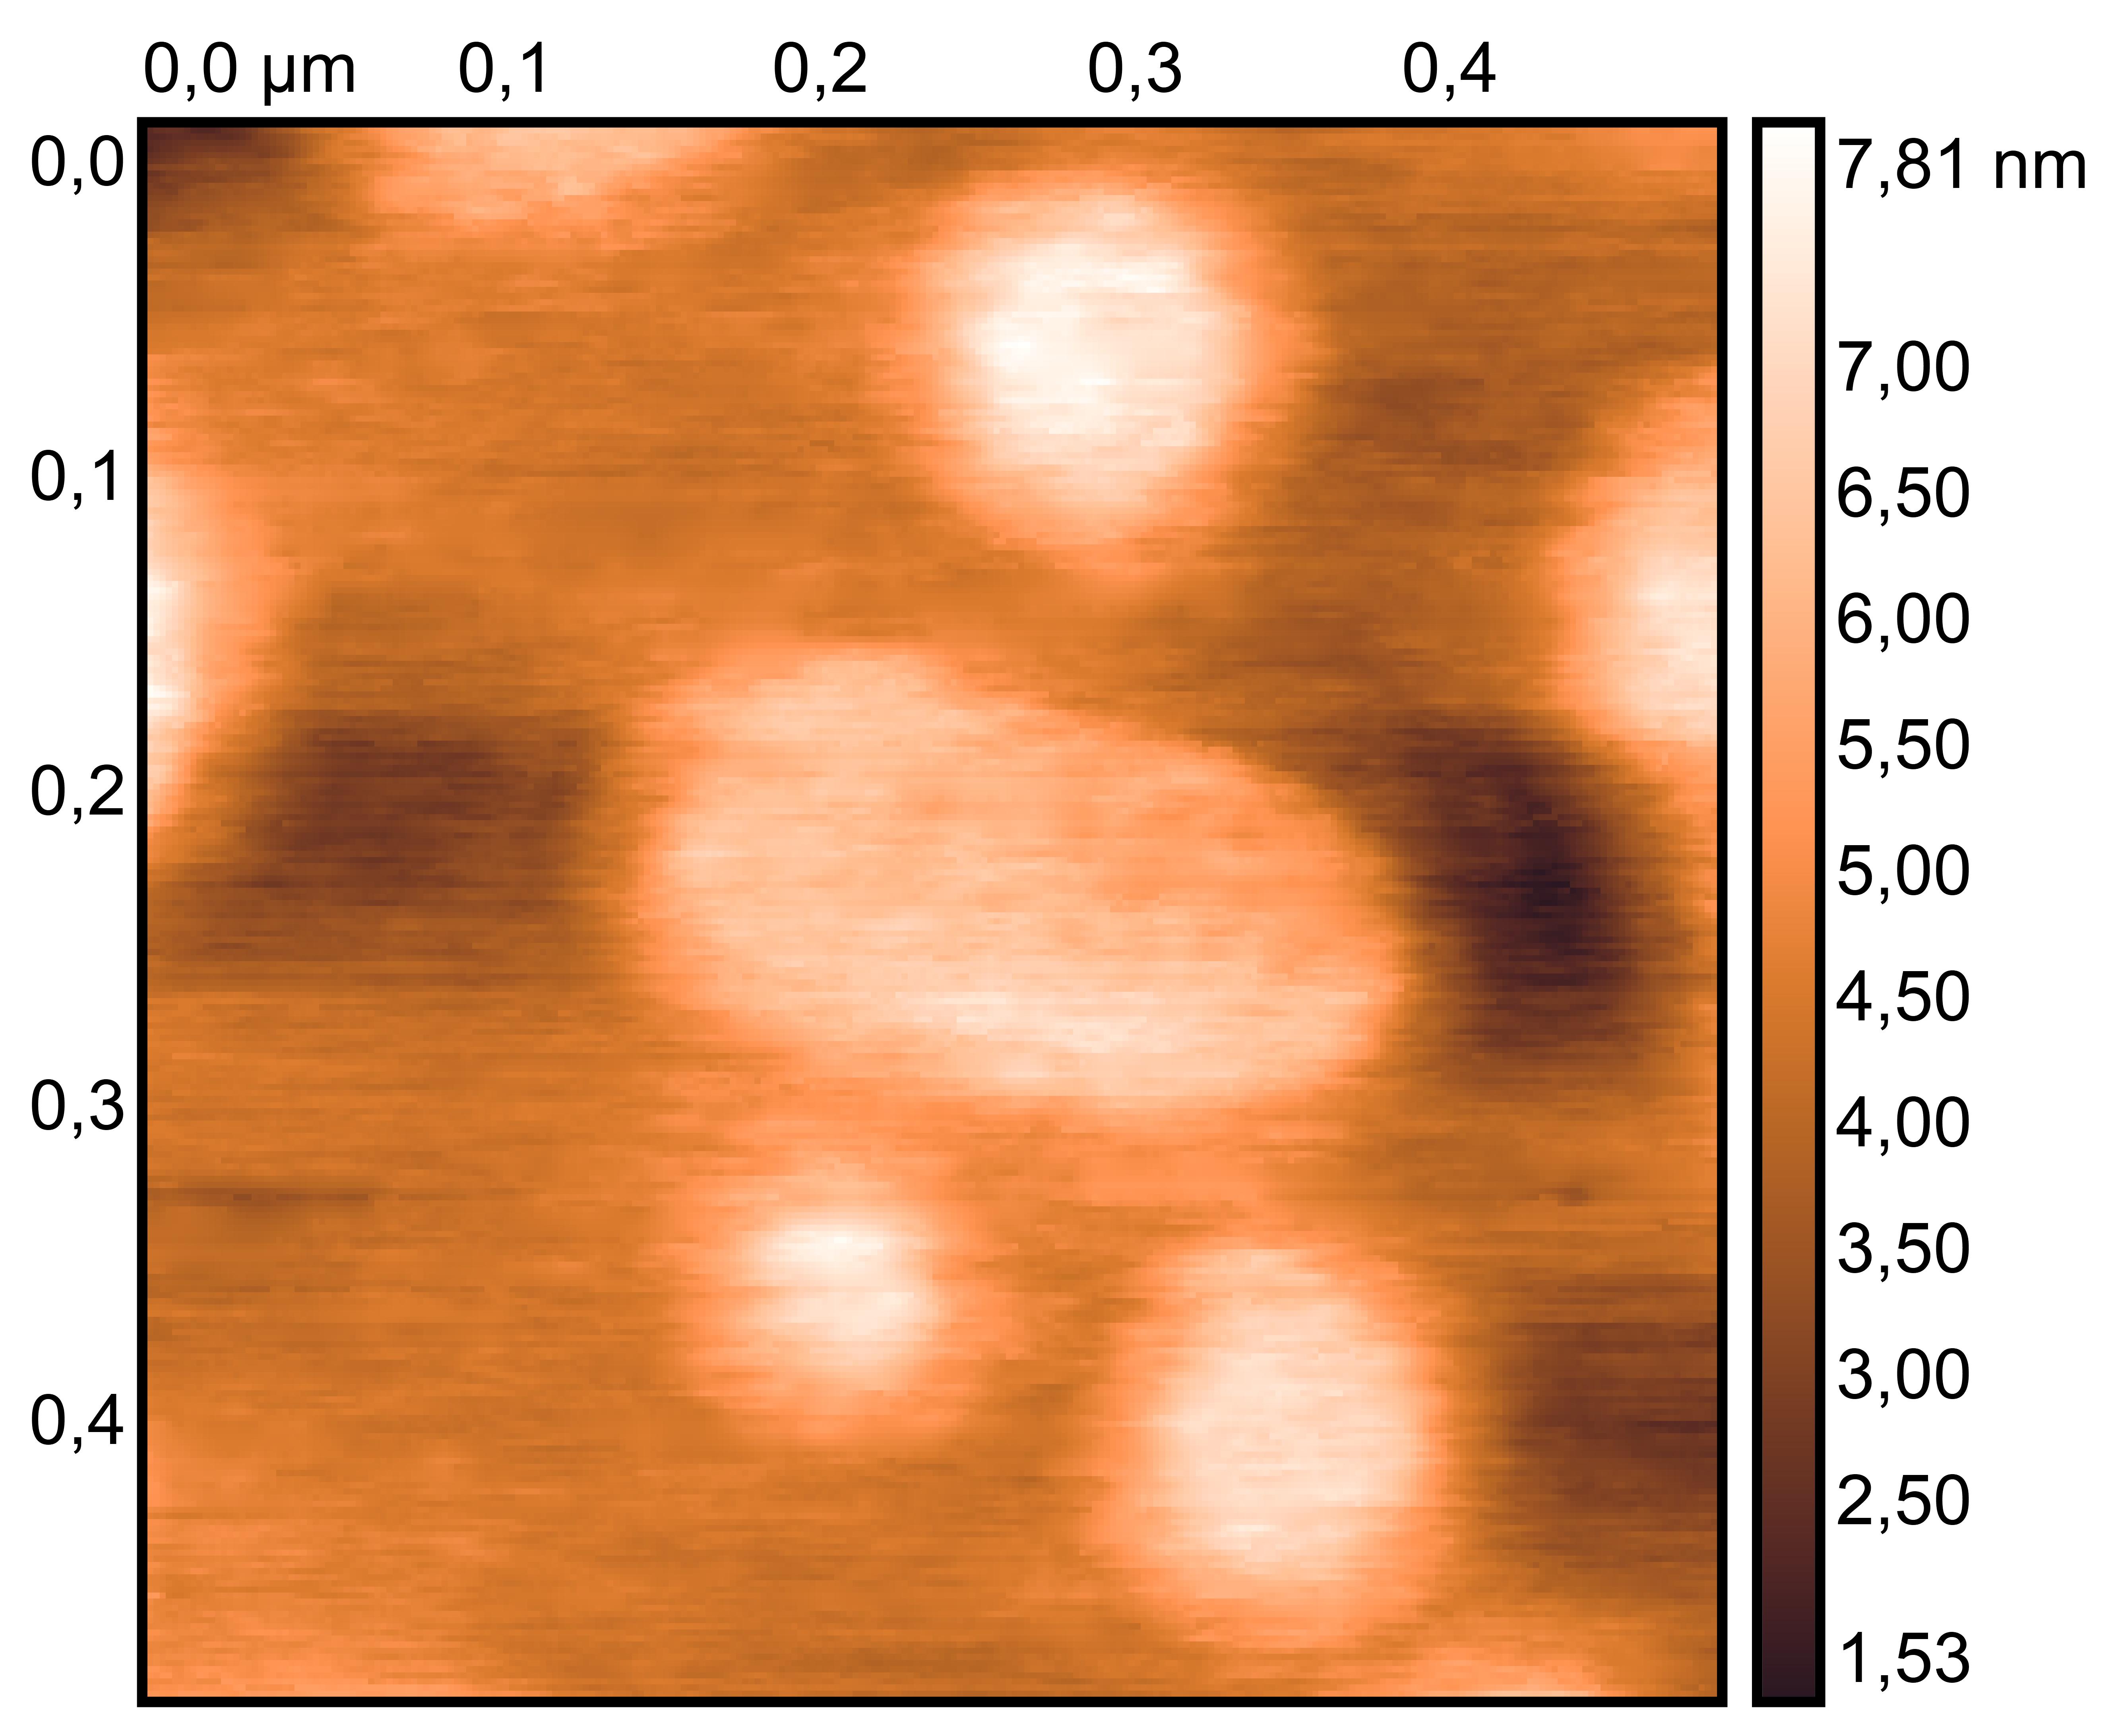
TDN + 50 mM K⁺
Procedure:
Transfer 20 μL (TDN + 100 mM Li⁺, TDN + 25 mM K⁺ and 75 mM Li⁺) into different microtubes.
Dilute to 1000 μL with buffer.
Load into cuvette; run three scans (30 s each).
Record average particle size.
TDN + 100 mM Li⁺
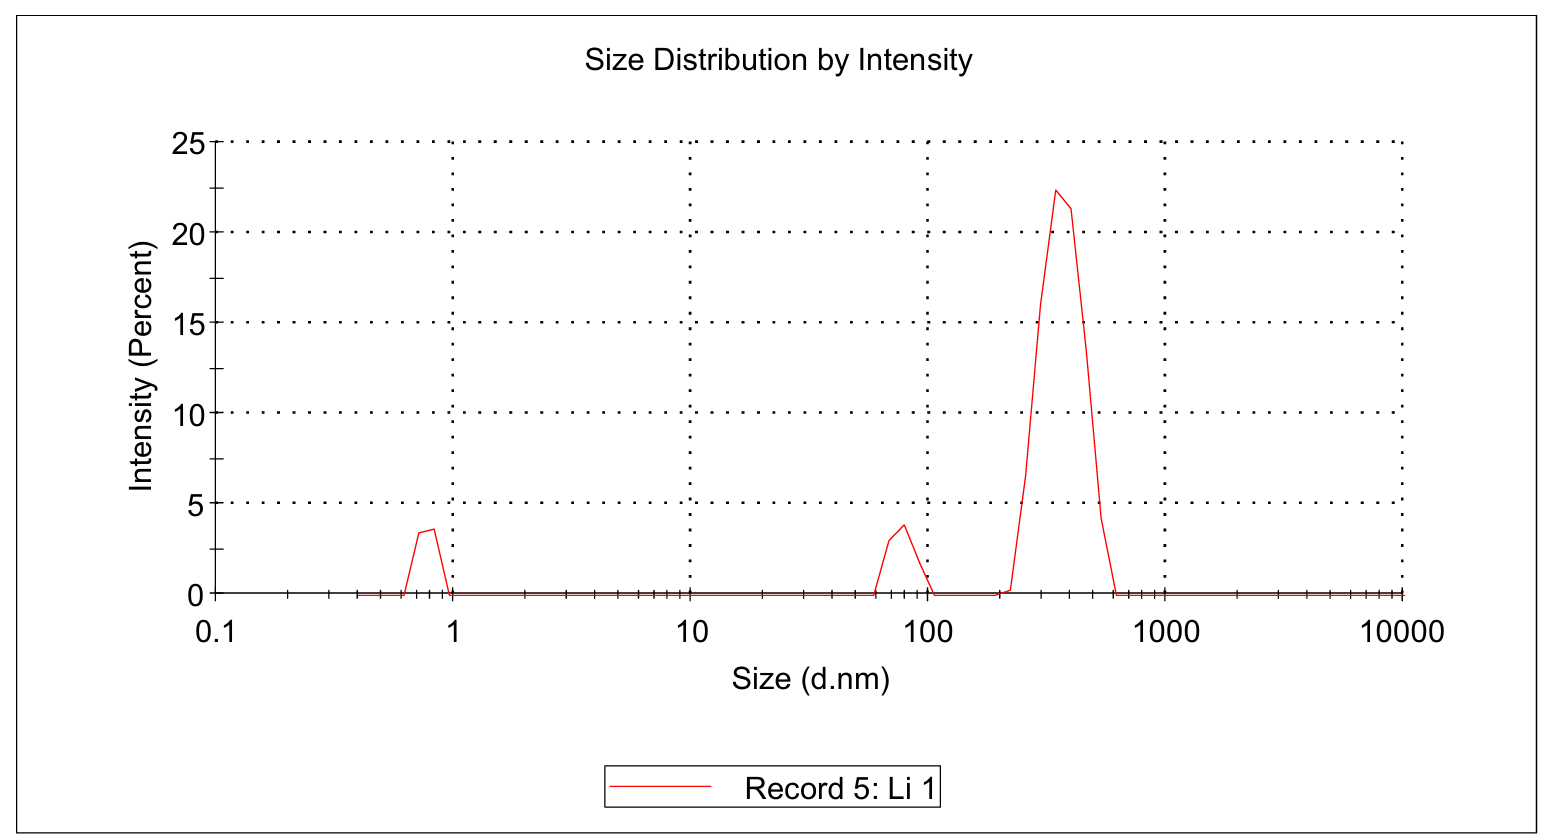
TDN + 25 mM K⁺ and 75 mM Li⁺

Prepare the gel with 0.5 g agarose, 25 mL 0.5 × TBE(100 mM K⁺) Buffer
Mix the solutions (solvents) in 200 μL EP tubes according to the table below.
| Sample | 5×DNA Loading Buffer | ddH2O | |
|---|---|---|---|
| 1 | Marker(50-1031 bp) 6 μL | 2 μL | 2 μL |
| 2 | TDN + 100 mM K⁺ 3.1 μL | 2 μL | 4.9 μL |
| 3 | TDN + 100 mM K⁺ 3.1 μL | 2 μL | 4.9 μL |
Add sample solutions of 10 μL each into the sample holes, according to the table below, Set the voltage to 80 V and run the electrophoresis for 70 min.
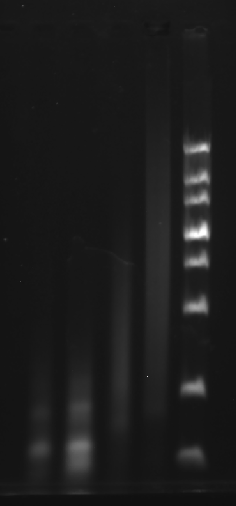
| Lane | 1 | 2 | 3 |
|---|---|---|---|
| Sample | Marker(50-1031 bp) 6 μL | TDN + 100 mM K⁺ 3.1 μL | TDN + 100 mM K⁺ 3.1 μL |
Obtain the electrophoretogram.
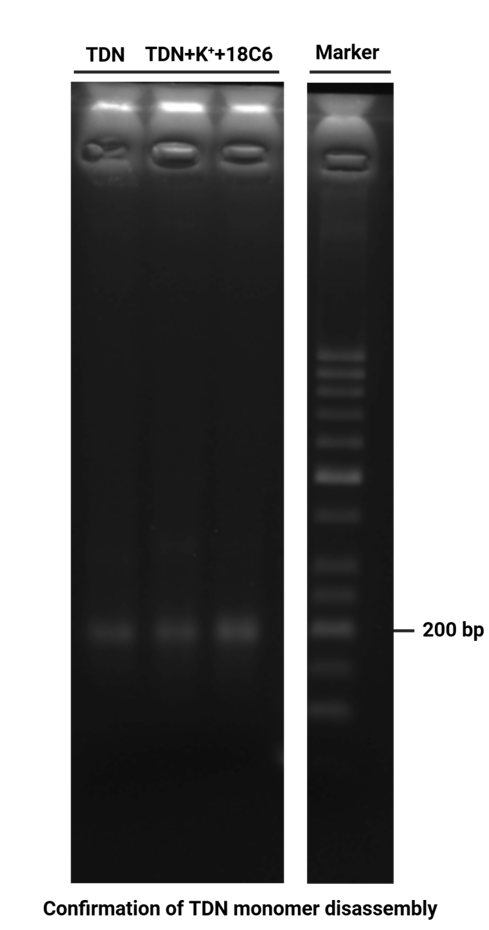
Mix TDN + 100 mM K⁺ 20 μL with 20 μL 100 mM 18-crowd-6 solution.
store in room temperature for 12 h.
Prepare the gel with 0.5 g agarose, 25 mL 0.5 × TBE Buffer.
Mix the solutions (solvents) in 200 μL EP tubes according to the table below.
| Sample | 5×DNA Loading Buffer | ddH2O | |
|---|---|---|---|
| 1 | TDN 3.1 μL | 2 μL | 4.9 μL |
| 2 | TDN + 100 mM K⁺ 18-crowd-6 3.1 μL | 2 μL | 4.9 μL |
| 3 | TDN + 100 mM K⁺ 18-crowd-6 3.1 μL | 2 μL | 4.9 μL |
| 4 | Marker(50-1031 bp) 6 μL | 2 μL | 2 μL |
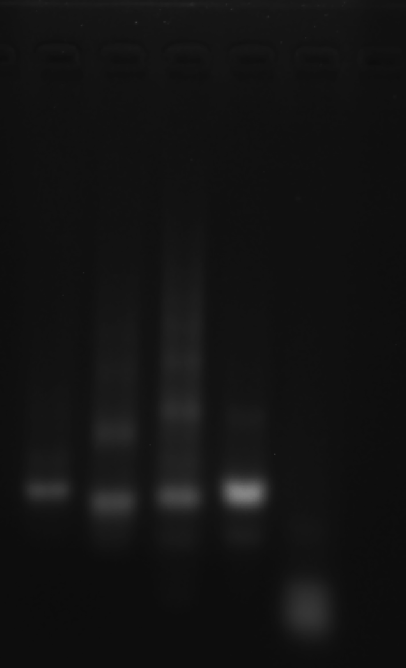
Add sample solutions of 10 μL each into the sample holes, according to the table below, Set the voltage to 80 V and run the electrophoresis for 70 min.
| Lane | 1 | 2 | 3 | 4 |
|---|---|---|---|---|
| Sample | TDN 3.1 μL | TDN + 100 mM K⁺ 18-crowd-6 3.1 μL | TDN + 100 mM K⁺ 18-crowd-6 3.1 μL | Marker(50-1031 bp) 6 μL |
Obtain the electrophoretogram.